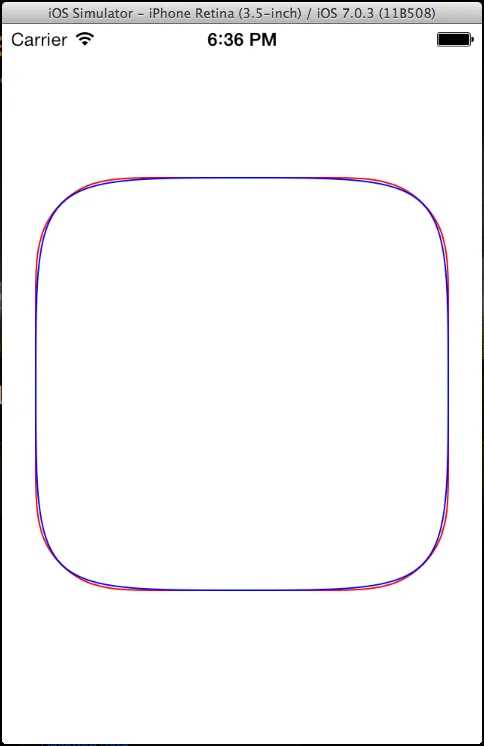
它与常规的圆角矩形略有不同:
其确切公式可以轻松获得。 但是,我无法弄清楚如何使用CGPath之类的方法绘制它,更不用说填充它并能够相对轻松地调整其大小。而且还要完全符合公式。
yourLayer.cornerCurve = CALayerCornerCurve.continuous
来源: https://developer.apple.com/documentation/quartzcore/calayercornercurve
.cornerCurve
:
yourLayer.cornerCurve = CALayerCornerCurve.continuous
- AnthonyR维基百科引用: 超椭圆
特别地,对于 n=1/2,每个弧都是由两个轴定义的二次贝塞尔曲线;因此,每个弧都是抛物线的一部分。
那么为什么不尝试使用贝塞尔曲线来逼近 Squircle? Bezier 和 Squircle 都由参数方程式定义。
UIBezierPath 类有一个方法:addCurveToPoint:controlPoint1:controlPoint2:
将立方贝塞尔曲线附加到接收器的路径上。
注意:使用 addQuadCurveToPoint:controlPoint:
方法会产生更差的结果 - 已测试。
我使用了这种方法,结果如下:
红线
- 圆角矩形,蓝线
- 由四条贝塞尔曲线构成的矩形
如果对这个结果感兴趣 - 下面是绘图代码。
注意:为了实现更精确的匹配,可能需要更改四个 角点
的坐标(现在它们对应于包含图形的矩形的角度)。
CGContextRef context = UIGraphicsGetCurrentContext();
CGContextSaveGState(context);
//set rect size for draw
float rectSize = 275.;
CGRect rectangle = CGRectMake(CGRectGetMidX(rect) - rectSize/2, CGRectGetMidY(rect) - rectSize/2, rectSize, rectSize);
//Rounded rectangle
CGContextSetStrokeColorWithColor(context, [UIColor redColor].CGColor);
UIBezierPath* roundedPath = [UIBezierPath bezierPathWithRoundedRect:rectangle cornerRadius:rectSize/4.7];
[roundedPath stroke];
//Rectangle from Fours Bezier Curves
CGContextSetStrokeColorWithColor(context, [UIColor blueColor].CGColor);
UIBezierPath *bezierCurvePath = [UIBezierPath bezierPath];
//set coner points
CGPoint topLPoint = CGPointMake(CGRectGetMinX(rectangle), CGRectGetMinY(rectangle));
CGPoint topRPoint = CGPointMake(CGRectGetMaxX(rectangle), CGRectGetMinY(rectangle));
CGPoint botLPoint = CGPointMake(CGRectGetMinX(rectangle), CGRectGetMaxY(rectangle));
CGPoint botRPoint = CGPointMake(CGRectGetMaxX(rectangle), CGRectGetMaxY(rectangle));
//set start-end points
CGPoint midRPoint = CGPointMake(CGRectGetMaxX(rectangle), CGRectGetMidY(rectangle));
CGPoint botMPoint = CGPointMake(CGRectGetMidX(rectangle), CGRectGetMaxY(rectangle));
CGPoint topMPoint = CGPointMake(CGRectGetMidX(rectangle), CGRectGetMinY(rectangle));
CGPoint midLPoint = CGPointMake(CGRectGetMinX(rectangle), CGRectGetMidY(rectangle));
//Four Bezier Curve
[bezierCurvePath moveToPoint:midLPoint];
[bezierCurvePath addCurveToPoint:topMPoint controlPoint1:topLPoint controlPoint2:topLPoint];
[bezierCurvePath moveToPoint:midLPoint];
[bezierCurvePath addCurveToPoint:botMPoint controlPoint1:botLPoint controlPoint2:botLPoint];
[bezierCurvePath moveToPoint:midRPoint];
[bezierCurvePath addCurveToPoint:topMPoint controlPoint1:topRPoint controlPoint2:topRPoint];
[bezierCurvePath moveToPoint:midRPoint];
[bezierCurvePath addCurveToPoint:botMPoint controlPoint1:botRPoint controlPoint2:botRPoint];
[bezierCurvePath stroke];
CGContextRestoreGState(context);
下面是已经填写好的答案,同时也已经转换为Swift版本:
override func draw(_ rect: CGRect) {
super.draw(rect)
guard let context = UIGraphicsGetCurrentContext() else {
return
}
context.saveGState()
let rect = self.bounds
let rectSize: CGFloat = rect.width
let rectangle = CGRect(x: rect.midX - rectSize / 2, y: rect.midY - rectSize / 2, width: rectSize, height: rectSize)
let topLPoint = CGPoint(x: rectangle.minX, y: rectangle.minY)
let topRPoint = CGPoint(x: rectangle.maxX, y: rectangle.minY)
let botLPoint = CGPoint(x: rectangle.minX, y: rectangle.maxY)
let botRPoint = CGPoint(x: rectangle.maxX, y: rectangle.maxY)
let midRPoint = CGPoint(x: rectangle.maxX, y: rectangle.midY)
let botMPoint = CGPoint(x: rectangle.midX, y: rectangle.maxY)
let topMPoint = CGPoint(x: rectangle.midX, y: rectangle.minY)
let midLPoint = CGPoint(x: rectangle.minX, y: rectangle.midY)
let bezierCurvePath = UIBezierPath()
bezierCurvePath.move(to: midLPoint)
bezierCurvePath.addCurve(to: topMPoint, controlPoint1: topLPoint, controlPoint2: topLPoint)
bezierCurvePath.addCurve(to: midRPoint, controlPoint1: topRPoint, controlPoint2: topRPoint)
bezierCurvePath.addCurve(to: botMPoint, controlPoint1: botRPoint, controlPoint2: botRPoint)
bezierCurvePath.addCurve(to: midLPoint, controlPoint1: botLPoint, controlPoint2: botLPoint)
context.setFillColor(UIColor.lightGray.cgColor)
bezierCurvePath.fill()
context.restoreGState()
}
非常适合在UIView子类中使用。
extension UIBezierPath {
static func superellipse(in rect: CGRect, cornerRadius: CGFloat) -> UIBezierPath {
// (Corner radius can't exceed half of the shorter side; correct if
// necessary:)
let minSide = min(rect.width, rect.height)
let radius = min(cornerRadius, minSide/2)
let topLeft = CGPoint(x: rect.minX, y: rect.minY)
let topRight = CGPoint(x: rect.maxX, y: rect.minY)
let bottomLeft = CGPoint(x: rect.minX, y: rect.maxY)
let bottomRight = CGPoint(x: rect.maxX, y: rect.maxY)
// The two points of the segment along the top side (clockwise):
let p0 = CGPoint(x: rect.minX + radius, y: rect.minY)
let p1 = CGPoint(x: rect.maxX - radius, y: rect.minY)
// The two points of the segment along the right side (clockwise):
let p2 = CGPoint(x: rect.maxX, y: rect.minY + radius)
let p3 = CGPoint(x: rect.maxX, y: rect.maxY - radius)
// The two points of the segment along the bottom side (clockwise):
let p4 = CGPoint(x: rect.maxX - radius, y: rect.maxY)
let p5 = CGPoint(x: rect.minX + radius, y: rect.maxY)
// The two points of the segment along the left side (clockwise):
let p6 = CGPoint(x: rect.minX, y: rect.maxY - radius)
let p7 = CGPoint(x: rect.minX, y: rect.minY + radius)
let path = UIBezierPath()
path.move(to: p0)
path.addLine(to: p1)
path.addCurve(to: p2, controlPoint1: topRight, controlPoint2: topRight)
path.addLine(to: p3)
path.addCurve(to: p4, controlPoint1: bottomRight, controlPoint2: bottomRight)
path.addLine(to: p5)
path.addCurve(to: p6, controlPoint1: bottomLeft, controlPoint2: bottomLeft)
path.addLine(to: p7)
path.addCurve(to: p0, controlPoint1: topLeft, controlPoint2: topLeft)
return path
}
}
p0
到p7
可以在以下图表中可视化:
如果您传递的矩形实际上是一个正方形,并且圆角半径等于或大于边长的一半,则直线线段会折叠(p0
“合并”为p1
,p2
与p3
等),从而得到标准超椭圆。这里其他的答案看起来并不像真正的东西。如果你想要一个实际匹配 iOS 图标形状的东西,那么有一个详细的方法在这里,其中包含许多非常神奇的数字。向 PaintCode 致敬。
这不是一个很好的答案,因为它没有深入回答你所问的问题,即如何以编程方式绘制超椭圆形**,但你可以:
Load the SVG, and convert it to a UIBezierPath, from there you can scale and transform however you like:
PocketSVG *myVectorDrawing = [[PocketSVG alloc] initFromSVGFileNamed:@"iOS_7_icon_shape"];
UIBezierPath *myBezierPath = myVectorDrawing.bezier;
// Apply your transforms here:
[myBezierPath applyTransform:CGAffineTransformMakeScale(2.5, 2.5)];
[myBezierPath applyTransform:CGAffineTransformMakeTranslation(10, 50)];
CAShapeLayer *myShapeLayer = [CAShapeLayer layer];
myShapeLayer.path = myBezierPath.CGPath;
myShapeLayer.strokeColor = [[UIColor redColor] CGColor];
myShapeLayer.lineWidth = 2;
myShapeLayer.fillColor = [[UIColor clearColor] CGColor];
[self.view.layer addSublayer:myShapeLayer];
值得注意的是,这个形状可能并不是一个精确的超椭圆形: http://i.imgur.com/l0ljVRo.png
CALayerCornerCurve.continuous
相同的结果。这是PaintCode的objc扩展的Swift版本:extension UIBezierPath {
/// Source: [PaintCode](https://www.paintcodeapp.com/news/code-for-ios-7-rounded-rectangles)
static func iOS7RoundedRect(in rect: CGRect, cornerRadius radius: CGFloat) -> UIBezierPath {
let limit: CGFloat = min(rect.size.width, rect.size.height) / 2 / 1.52866483
let limitedRadius: CGFloat = min(radius, limit)
func topLeft(_ x: CGFloat, _ y: CGFloat) -> CGPoint {
CGPoint(x: rect.origin.x + x * limitedRadius, y: rect.origin.y + y * limitedRadius)
}
func topRight(_ x: CGFloat, _ y: CGFloat) -> CGPoint {
CGPoint(x: rect.origin.x + rect.size.width - x * limitedRadius, y: rect.origin.y + y * limitedRadius)
}
func bottomRight(_ x: CGFloat, _ y: CGFloat) -> CGPoint {
CGPoint(x: rect.origin.x + rect.size.width - x * limitedRadius, y: rect.origin.y + rect.size.height - y * limitedRadius)
}
func bottomLeft(_ x: CGFloat, _ y: CGFloat) -> CGPoint {
CGPoint(x: rect.origin.x + x * limitedRadius, y: rect.origin.y + rect.size.height - y * limitedRadius)
}
let path = UIBezierPath()
path.move(to: topLeft(1.52866483, 0.00000000))
path.addLine(to: topRight(1.52866471, 0.00000000))
path.addCurve(to: topRight(0.66993427, 0.06549600),
controlPoint1: topRight(1.08849323, 0.00000000),
controlPoint2: topRight(0.86840689, 0.00000000))
path.addLine(to: topRight(0.63149399, 0.07491100))
path.addCurve(to: topRight(0.07491176, 0.63149399),
controlPoint1: topRight(0.37282392, 0.16905899),
controlPoint2: topRight(0.16906013, 0.37282401))
path.addCurve(to: topRight(0.00000000, 1.52866483),
controlPoint1: topRight(0.00000000, 0.86840701),
controlPoint2: topRight(0.00000000, 1.08849299))
path.addLine(to: bottomRight(0.00000000, 1.52866471))
path.addCurve(to: bottomRight(0.06549569, 0.66993493),
controlPoint1: bottomRight(0.00000000, 1.08849323),
controlPoint2: bottomRight(0.00000000, 0.86840689))
path.addLine(to: bottomRight(0.07491111, 0.63149399))
path.addCurve(to: bottomRight(0.63149399, 0.07491111),
controlPoint1: bottomRight(0.16905883, 0.37282392),
controlPoint2: bottomRight(0.37282392, 0.16905883))
path.addCurve(to: bottomRight(1.52866471, 0.00000000),
controlPoint1: bottomRight(0.86840689, 0.00000000),
controlPoint2: bottomRight(1.08849323, 0.00000000))
path.addLine(to: bottomLeft(1.52866483, 0.00000000))
path.addCurve(to: bottomLeft(0.66993397, 0.06549569),
controlPoint1: bottomLeft(1.08849299, 0.00000000),
controlPoint2: bottomLeft(0.86840701, 0.00000000))
path.addLine(to: bottomLeft(0.63149399, 0.07491111))
path.addCurve(to: bottomLeft(0.07491100, 0.63149399),
controlPoint1: bottomLeft(0.37282401, 0.16905883),
controlPoint2: bottomLeft(0.16906001, 0.37282392))
path.addCurve(to: bottomLeft(0.00000000, 1.52866471),
controlPoint1: bottomLeft(0.00000000, 0.86840689),
controlPoint2: bottomLeft(0.00000000, 1.08849323))
path.addLine(to: topLeft(0.00000000, 1.52866483))
path.addCurve(to: topLeft(0.06549600, 0.66993397),
controlPoint1: topLeft(0.00000000, 1.08849299),
controlPoint2: topLeft(0.00000000, 0.86840701))
path.addLine(to: topLeft(0.07491100, 0.63149399))
path.addCurve(to: topLeft(0.63149399, 0.07491100),
controlPoint1: topLeft(0.16906001, 0.37282401),
controlPoint2: topLeft(0.37282401, 0.16906001))
path.addCurve(to: topLeft(1.52866483, 0.00000000),
controlPoint1: topLeft(0.86840701, 0.00000000),
controlPoint2: topLeft(1.08849299, 0.00000000))
path.close()
return path
}
}
UIBezierPath
路径与此代码生成的路径进行比较时,我注意到参数略有过时。但是差异非常小。 - Honghao Z如果使用OpenGL ES Shader,这个应该很容易实现。只需绘制一个四边形并将x和y作为顶点属性传递。在片元着色器中,将x和y插入到方程式中。如果结果小于等于1,则片元在图形内部。如果我有空闲时间,我可能会尝试一下并在此处发布。
如果要使用CGPath,我认为关键是将x和y参数化为t的函数,t从0到2π。然后以规则间隔评估x和y。我也会在空闲时间里尝试弄清楚这一点,但我的数学有些生疏。
顺便说一句,我确信苹果公司没有使用这个公式。请参见@millimoose发布的链接:http://blog.mikeswanson.com/post/62341902567/unleashing-genetic-algorithms-on-the-ios-7-icon
bezierPathWithRoundedRect
方法被修改以绘制更平滑的角落。而且它似乎不是一个squircle(方圆形):http://blog.mikeswanson.com/post/62341902567/unleashing-genetic-algorithms-on-the-ios-7-icon - millimooseUIBezierPath
方法并不能完美匹配图标模板,但比以前更接近了。 - millimoose