我有一个被标记为me/my-image的docker镜像,而且我在dockerhub上有个私有仓库名为me-private。
每当我推送me/my-image时,我总是会命中公共仓库。
请问如何确切地将我的镜像推送到我的私有仓库?
我有一个被标记为me/my-image的docker镜像,而且我在dockerhub上有个私有仓库名为me-private。
每当我推送me/my-image时,我总是会命中公共仓库。
请问如何确切地将我的镜像推送到我的私有仓库?
首先,您需要使用registryhost正确标记您的图像:
docker tag [OPTIONS] IMAGE[:TAG] [REGISTRYHOST/][USERNAME/]NAME[:TAG]
然后使用相同的标签进行docker push。
docker push NAME[:TAG]
例子:
docker tag 518a41981a6a myRegistry.com/myImage
docker push myRegistry.com/myImage
me-private.com私有仓库中:docker tag 518a41981a6a me-private.com/myPrivateImage && docker push me-private.com/myPrivateImage - Abdullah Jibalydocker login,然后给您的镜像打标签:docker tag 518a41981a6a me-private/myPrivateImage,最后推送镜像:docker push me-private/myPrivateImage。 - Abdullah Jibaly只需要三个简单的步骤:
docker login --username username
--password,会提示输入密码,但建议不要省略并手动输入,因为这样不会将其存储在命令历史中。docker tag my-image username/my-repo
docker push username/my-repo
--password标识。系统会提示您输入密码。请注意,此操作不会改变原意。 - AndrewD如果您的Docker注册表是私有的且自托管,则应执行以下操作:
docker login <REGISTRY_HOST>:<REGISTRY_PORT>
docker tag <IMAGE_ID> <REGISTRY_HOST>:<REGISTRY_PORT>/<APPNAME>:<APPVERSION>
docker push <REGISTRY_HOST>:<REGISTRY_PORT>/<APPNAME>:<APPVERSION>
示例:
docker login repo.company.com:3456
docker tag 19fcc4aa71ba repo.company.com:3456/myapp:0.1
docker push repo.company.com:3456/myapp:0.1
首先进入您的Docker Hub帐户并创建存储库。以下是我Docker Hub帐户的截图: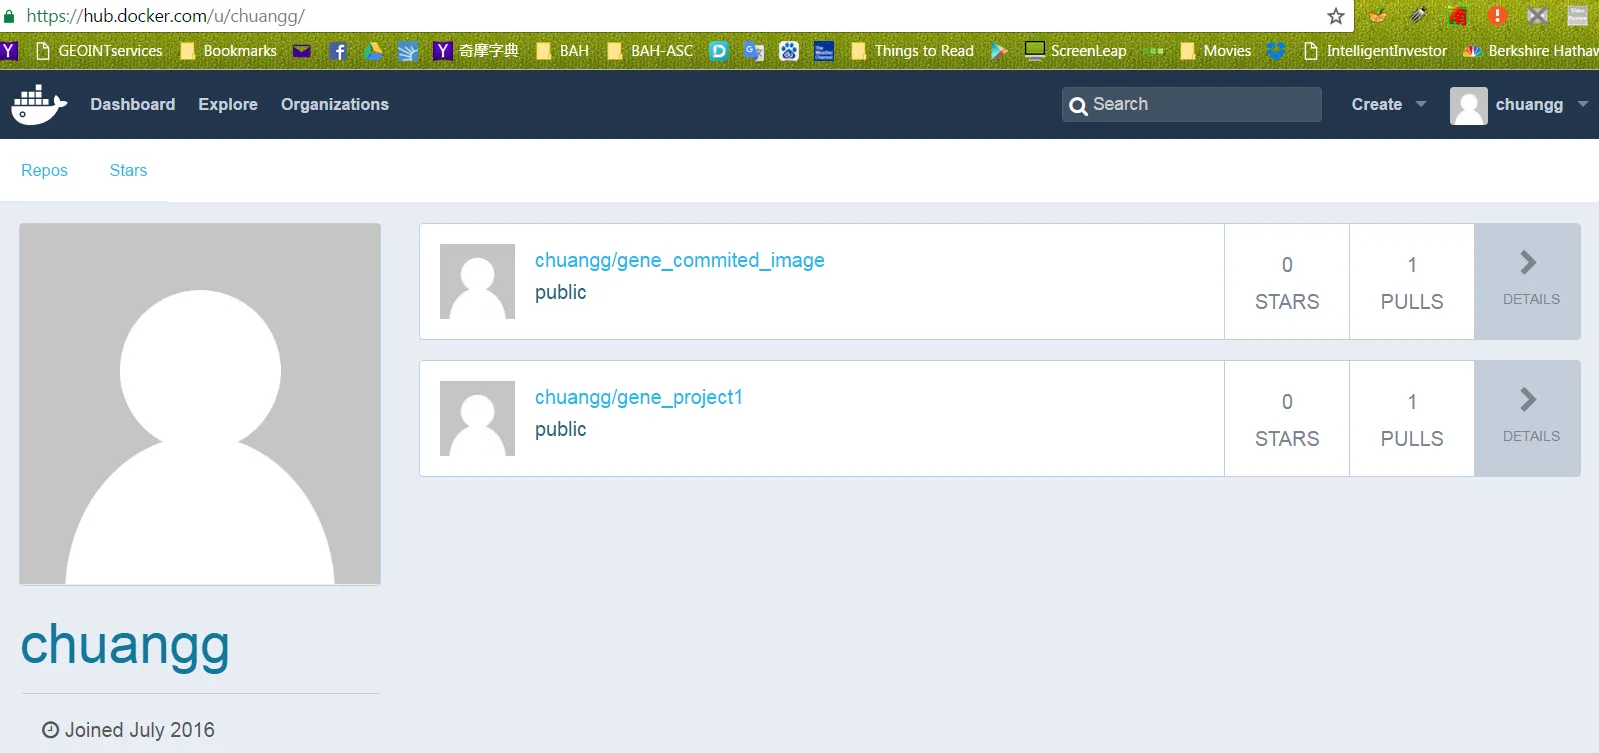
从图片中,您可以看到我的存储库名为“chuangg”
现在进入存储库,并通过单击您的图像名称将其设置为私有。所以对于我来说,我点击了“chuangg/gene_commited_image”,然后我进入Settings-> Make Private。然后按照屏幕上的指示进行操作: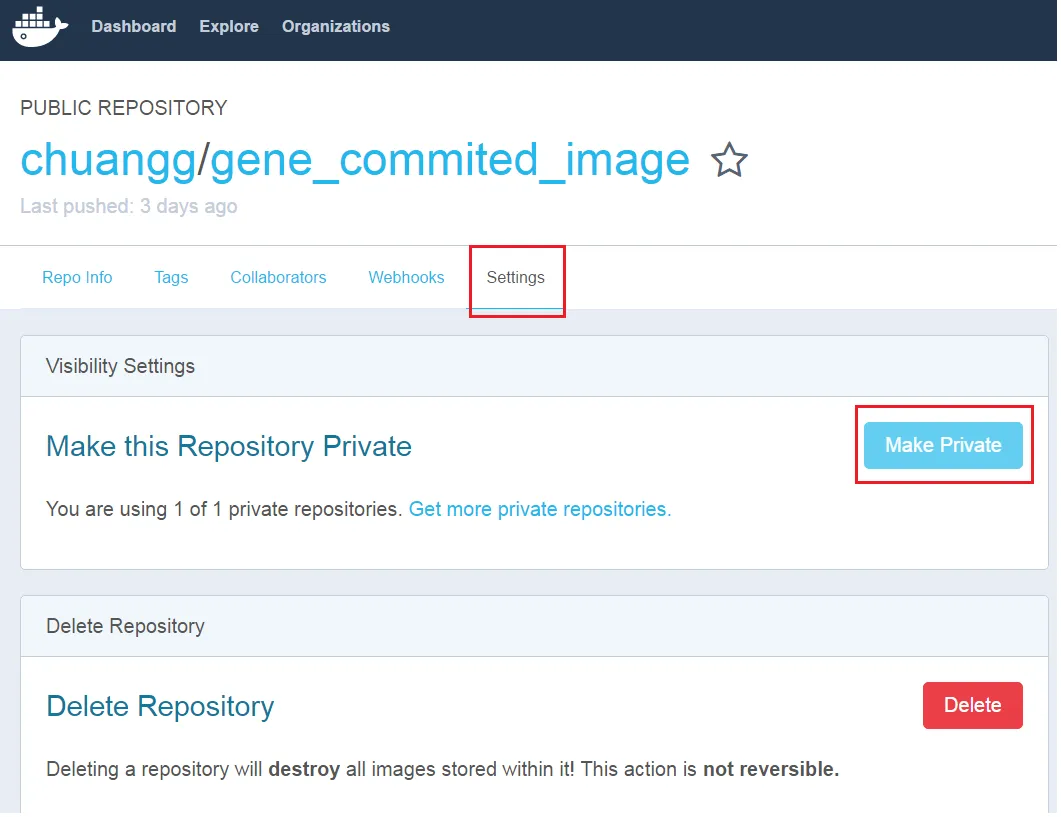
如何将您的Docker映像上传到Docker Hub
方法#1 = 通过命令行(cli)推送您的映像
1)docker commit <容器ID> <repo名称>/<您想给映像的名称>
是的,我认为必须是容器ID。它可能不能是图像ID。
例如= docker commit 99e078826312 chuangg/gene_commited_image
2)docker run -it chaung/gene_commited_image
3)docker login --username=<用户用户名> --password=<用户密码>
例如= docker login --username=chuangg --email=gc.genechaung@gmail.com
是的,您必须先登录。使用“docker logout”注销。
4)docker push chuangg/gene_commited_image
方法#2 = 使用pom.xml和命令行推送您的映像。
请注意,我使用了一个名为“build-docker”的Maven配置文件。如果您不想使用配置文件,请删除<profiles>, <profile>, and <id>build-docker</id>元素。
在父pom.xml中:
<profiles>
        <profile>
            <id>build-docker</id>
            <build>
                <plugins>
                    <plugin>
                        <groupId>io.fabric8</groupId>
                        <artifactId>docker-maven-plugin</artifactId>
                        <version>0.18.1</version>
                        <configuration>
                            <images>
                                <image>
                                    <name>chuangg/gene_project</name>
                                    <alias>${docker.container.name}</alias>
                                    <!-- Configure build settings -->
                                    <build>
                                        <dockerFileDir>${project.basedir}\src\docker\vending_machine_emulator</dockerFileDir>
                                        <assembly>
                                            <inline>
                                                <fileSets>
                                                    <fileSet>
                                                        <directory>${project.basedir}\target</directory>
                                                        <outputDirectory>.</outputDirectory>
                                                        <includes>
                                                            <include>*.jar</include>
                                                        </includes>
                                                    </fileSet>
                                                </fileSets>
                                            </inline>
                                        </assembly>
                                    </build>
                                </image>
                            </images>
                        </configuration>
                        <executions>
                            <execution>
                                <id>docker:build</id>
                                <phase>package</phase>
                                <goals>
                                    <goal>build</goal>
                                </goals>
                            </execution>
                        </executions>
                    </plugin>
                </plugins>
            </build>
        </profile>
    </profiles>
使用Docker终端命令部署Docker镜像(在pom.xml所在目录执行)= mvn clean deploy -Pbuild-docker docker:push
请注意,方法#2和#3之间的区别在于方法#3中有一个额外的<execution>用于部署。
方法#3= 使用Maven自动部署到Docker Hub
将以下内容添加到父级pom.xml文件中:
    <distributionManagement>
        <repository>
            <id>gene</id>
            <name>chuangg</name>
            <uniqueVersion>false</uniqueVersion>
            <layout>legacy</layout>
            <url>https://index.docker.io/v1/</url>
        </repository>
    </distributionManagement>


    <profiles>
        <profile>
            <id>build-docker</id>
            <build>
                <plugins>

                    <plugin>
                        <groupId>io.fabric8</groupId>
                        <artifactId>docker-maven-plugin</artifactId>
                        <version>0.18.1</version>
                        <configuration>
                            <images>
                                <image>
                                    <name>chuangg/gene_project1</name>
                                    <alias>${docker.container.name}</alias>
                                    <!-- Configure build settings -->
                                    <build>
                                        <dockerFileDir>${project.basedir}\src\docker\vending_machine_emulator</dockerFileDir>
                                        <assembly>
                                            <inline>
                                                <fileSets>
                                                    <fileSet>
                                                        <directory>${project.basedir}\target</directory>
                                                        <outputDirectory>.</outputDirectory>
                                                        <includes>
                                                            <include>*.jar</include>
                                                        </includes>
                                                    </fileSet>
                                                </fileSets>
                                            </inline>
                                        </assembly>
                                    </build>
                                </image>
                            </images>
                        </configuration>
                        <executions>
                            <execution>
                                <id>docker:build</id>
                                <phase>package</phase>
                                <goals>
                                    <goal>build</goal>
                                </goals>
                            </execution>
                            <execution>
                                <id>docker:push</id>
                                <phase>install</phase>
                                <goals>
                                    <goal>push</goal>
                                </goals>
                            </execution>

                        </executions>
                    </plugin>
                </plugins>
            </build>
        </profile>
    </profiles>
</project>
进入 C:\Users\Gene.docker\ 目录并将以下内容添加到你的 config.json 文件中: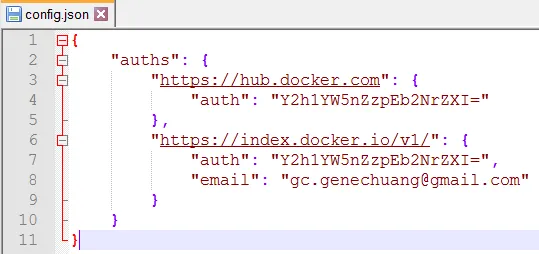
现在在你的 Docker 快速启动终端中输入mvn clean install -Pbuild-docker
如果您没有使用Maven配置文件,只需输入 mvn clean install
这是成功消息的截屏图:
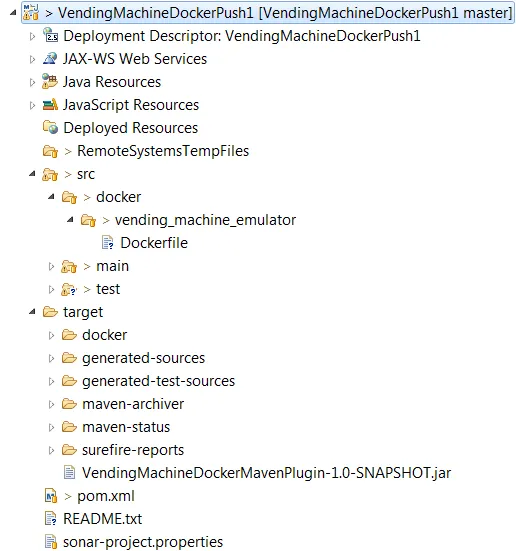
这是我的完整 pom.xml 文件和目录结构的截屏图:
<project xmlns="http://maven.apache.org/POM/4.0.0" xmlns:xsi="http://www.w3.org/2001/XMLSchema-instance"

xsi:schemaLocation="http://maven.apache.org/POM/4.0.0 http://maven.apache.org/xsd/maven-4.0.0.xsd">
<modelVersion>4.0.0</modelVersion>

<groupId>com.gene.app</groupId>
<artifactId>VendingMachineDockerMavenPlugin</artifactId>
<version>1.0-SNAPSHOT</version>
<packaging>jar</packaging>

<name>Maven Quick Start Archetype</name>
<url>www.gene.com</url>

<build>
    <pluginManagement>
        <plugins>
            <plugin>
                <groupId>org.apache.maven.plugins</groupId>
                <artifactId>maven-jar-plugin</artifactId>
                <configuration>
                    <archive>
                        <manifest>
                            <mainClass>com.gene.sample.Customer_View</mainClass>
                        </manifest>
                    </archive>
                </configuration>
            </plugin>
            <plugin>
                <groupId>org.apache.maven.plugins</groupId>
                <artifactId>maven-compiler-plugin</artifactId>
                <version>3.1</version>
                <configuration>

                    <source>1.7</source>
                    <target>1.7</target>

                </configuration>
            </plugin>
        </plugins>
    </pluginManagement>
</build>


<dependencies>
    <dependency>
        <groupId>junit</groupId>
        <artifactId>junit</artifactId>
        <version>4.8.2</version>
        <scope>test</scope>
    </dependency>

</dependencies>

<distributionManagement>
    <repository>
        <id>gene</id>
        <name>chuangg</name>
        <uniqueVersion>false</uniqueVersion>
        <layout>legacy</layout>
        <url>https://index.docker.io/v1/</url>
    </repository>
</distributionManagement>


<profiles>
    <profile>
        <id>build-docker</id>
        <properties>
            <java.docker.version>1.8.0</java.docker.version>
        </properties>
        <build>
            <plugins>

                <plugin>
                    <groupId>io.fabric8</groupId>
                    <artifactId>docker-maven-plugin</artifactId>
                    <version>0.18.1</version>
                    <configuration>
                        <images>
                            <image>
                                <name>chuangg/gene_project1</name>
                                <alias>${docker.container.name}</alias>
                                <!-- Configure build settings -->
                                <build>
                                    <dockerFileDir>${project.basedir}\src\docker\vending_machine_emulator</dockerFileDir>
                                    <assembly>
                                        <inline>
                                            <fileSets>
                                                <fileSet>
                                                    <directory>${project.basedir}\target</directory>
                                                    <outputDirectory>.</outputDirectory>
                                                    <includes>
                                                        <include>*.jar</include>
                                                    </includes>
                                                </fileSet>
                                            </fileSets>
                                        </inline>
                                    </assembly>
                                </build>
                            </image>
                        </images>
                    </configuration>
                    <executions>
                        <execution>
                            <id>docker:build</id>
                            <phase>package</phase>
                            <goals>
                                <goal>build</goal>
                            </goals>
                        </execution>
                        <execution>
                            <id>docker:push</id>
                            <phase>install</phase>
                            <goals>
                                <goal>push</goal>
                            </goals>
                        </execution>

                    </executions>
                </plugin>
            </plugins>
        </build>
    </profile>
</profiles>
 这是我的Dockerfile:
FROM java:8

MAINTAINER Gene Chuang
RUN echo Running Dockerfile in src/docker/vending_machine_emulator/Dockerfile directory

ADD maven/VendingMachineDockerMavenPlugin-1.0-SNAPSHOT.jar /bullshitDirectory/gene-app-1.0-SNAPSHOT.jar

CMD ["java", "-classpath", "/bullshitDirectory/gene-app-1.0-SNAPSHOT.jar", "com/gene/sample/Customer_View" ]
常见错误 #1:
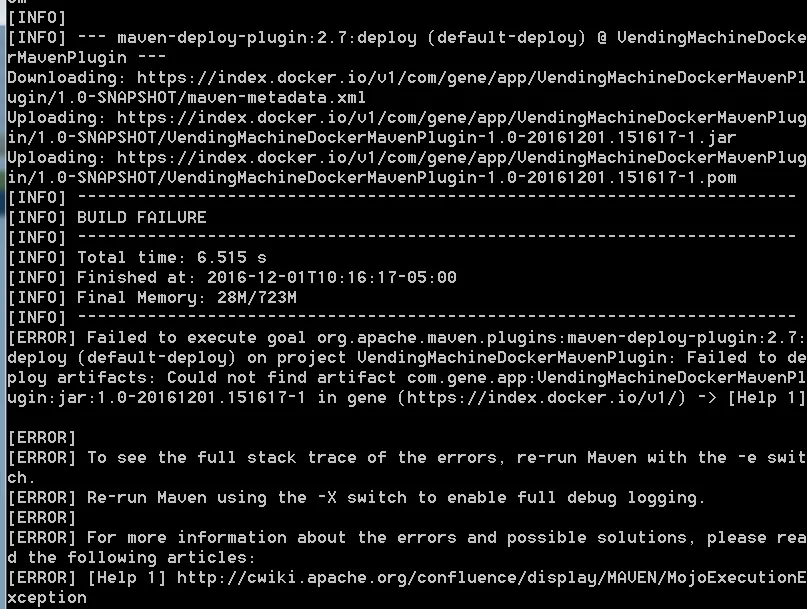
错误 #1 的解决方案= 不要将 <execution> 与 maven 部署阶段同步,否则 maven 将尝试部署镜像两次,并在 jar 上添加时间戳。这就是为什么我使用了<phase>install</phase>。
有两个选项:
进入hub,首先创建仓库并将其标记为私有。然后当你推送到该仓库时,它将会是私有的。这是最常见的方法。
登录您的Docker Hub账户,进入您的全局设置。有一个设置可以让您设置要推送的仓库的默认可见性。默认情况下,它被设置为公共的,但如果您将其更改为私有的,则您推送的所有仓库都将默认标记为私有。需要注意的是,您需要在您的账户上拥有足够的私有仓库,否则该仓库将被锁定,直到您升级您的计划。
docker push命令。但如果我正确理解了这个问题,那么这些答案都是不正确的,上面由Ken Cochrane发布的答案才应该被接受。 - Martin Andersson参考: dock.docker.com
本主题提供有关部署和配置注册表的基本信息。
在部署注册表之前,您需要在主机上安装Docker。
使用以下命令启动注册表容器:
start_registry.sh
#!/bin/bash

docker run -d \
  -p 5000:5000 \
  --restart=always \
  --name registry \
  -v /data/registry:/var/lib/registry \
  registry:2
从Docker Hub拉取ubuntu:16.04镜像。
$ docker pull ubuntu:16.04
将镜像标记为localhost:5000/my-ubuntu。这将为现有的镜像创建一个附加标记。当标记的第一部分是主机名和端口时,Docker会将其解释为推送位置的注册表。
$ docker tag ubuntu:16.04 localhost:5000/my-ubuntu
将此镜像推送到运行在 localhost:5000 的本地注册表中:
$ docker push localhost:5000/my-ubuntu
localhost:5000/my-ubuntu 镜像。$ docker image remove ubuntu:16.04
$ docker image remove localhost:5000/my-ubuntu
localhost:5000/my-ubuntu镜像。 $ docker pull localhost:5000/my-ubuntu
根据docs.docker.com,这是非常不安全且不推荐的。
编辑daemon.json文件,在Linux上默认位置为/etc/docker/daemon.json,在Windows Server上为C:\ProgramData\docker\config\daemon.json。如果您使用的是Docker for Mac或Docker for Windows,请单击Docker图标->首选项->Daemon,添加insecure registry。
如果daemon.json文件不存在,请创建它。假设文件中没有其他设置,它应该具有以下内容:
{
  "insecure-registries" : ["myregistrydomain.com:5000"]
}
启用不安全的注册表后,Docker将执行以下步骤:
重新启动Docker以使更改生效。
在Dockerhub上创建存储库:
$docker tag IMAGE_ID UsernameOnDockerhub/repoNameOnDockerhub:latest
$docker push UsernameOnDockerhub/repoNameOnDockerhub:latest
注意:这里的"repoNameOnDockerhub"表示你在Dockerhub上要使用的存储库名称必须存在。
"latest"只是一个标签。
> docker login [OPTIONS] [SERVER]

[OPTIONS]:
-u username
-p password
> docker login localhost:8080
> docker tag SOURCE_IMAGE[:TAG] TARGET_IMAGE[:TAG]
> docker tag myApp:v1 localhost:8080/myname/myApp:v1
>docker push [OPTIONS] NAME[:TAG]
例如:
> docker push localhost:8080/myname/myApp:v1
简单的解决方案:
前往 https://hub.docker.com/ 创建一个私有仓库,例如 johnsmith/private-repository 这是你构建镜像时将使用的 NAME/REPOSITORY。
首先,执行 docker login
其次,我使用 "docker build -t johnsmith/private-repository:01 ."(其中 01 是我的版本名称)来创建镜像,并使用 "docker images" 确认已创建镜像,如下所示的黄色框中:(抱歉,我无法粘贴表格格式,只能粘贴文本字符串)
johnsmith/private-repository(REPOSITORY) 01(TAG) c5f4a2861d6e(IMAGE ID) 2 天前(CREATED) 305MB(SIZE)
docker push johnsmith/private-repository:01(你的私有仓库在此处,例如 https://hub.docker.com/r/johnsmith/private-repository/)完成!
docker build和docker push来操作dockerhub私有仓库。 - rustyMagnet