请注意,MSYS2包括MinGW-w64和Pacman软件包管理器,是一个功能强大的类Linux终端和Windows下的GCC和LLVM(clang)构建环境。它类似于Cygwin,而Git for Windows中的Git Bash使用了MSYS2 mingw64环境。然而,MSYS2经过优化用于构建软件,所以对于使用Git,他们建议您单独安装和使用Git for Windows的Git Bash。因此,您可以将常规的MSYS2视为本地的Windows构建环境,而将Git Bash视为基于MSYS2的本地Windows git和开发环境。
从WSL(Windows子系统)中,你可以在Windows中拥有真正的Linux环境。前两个是Windows中的类Linux环境。WSL是真正的Linux环境在Windows中。
Download and install the latest version of MSYS2.
- You can get it here: https://www.msys2.org/.
Ensure Windows Terminal is installed. If you have Windows 11 or later, it's already installed. If you have Windows 10 or older, you'll need to manually install Windows Terminal from the Microsoft Store, here: https://apps.microsoft.com/detail/9N0DX20HK701?hl=en-zm&gl=ZM
Open Windows PowerShell and run New-Guid 7 times, one for each MSYS2 profile entry we will create below. Copy and paste the numbers out into a text editor. You'll need these numbers later. Example: here are my generated GUID numbers:
6f0ee3d1-ac4f-48ca-bcf5-a9795f9942d2
80414396-5ef4-490b-af88-29600c19ca4a
aef16ae0-7dd1-4ac7-abd8-60a646abb9ca
a718a3d5-9e77-4d0d-b7b6-69ec3d190206
1f2869c0-1310-403b-93a7-9227f42eeb24
10c96d8f-9e6b-48f6-8f59-034c586d7e57
ada1f939-0f7b-400c-b755-8cbff4fd40a8
Open Windows Terminal, and add 7 new MSYS2 profile entries:
Open Windows Terminal.
Then, click the little drop-down arrow at the top-right of the open tab, and select "Settings" --> in the Settings tab that opens up, click "Open JSON file" in the bottom-left, as shown here:
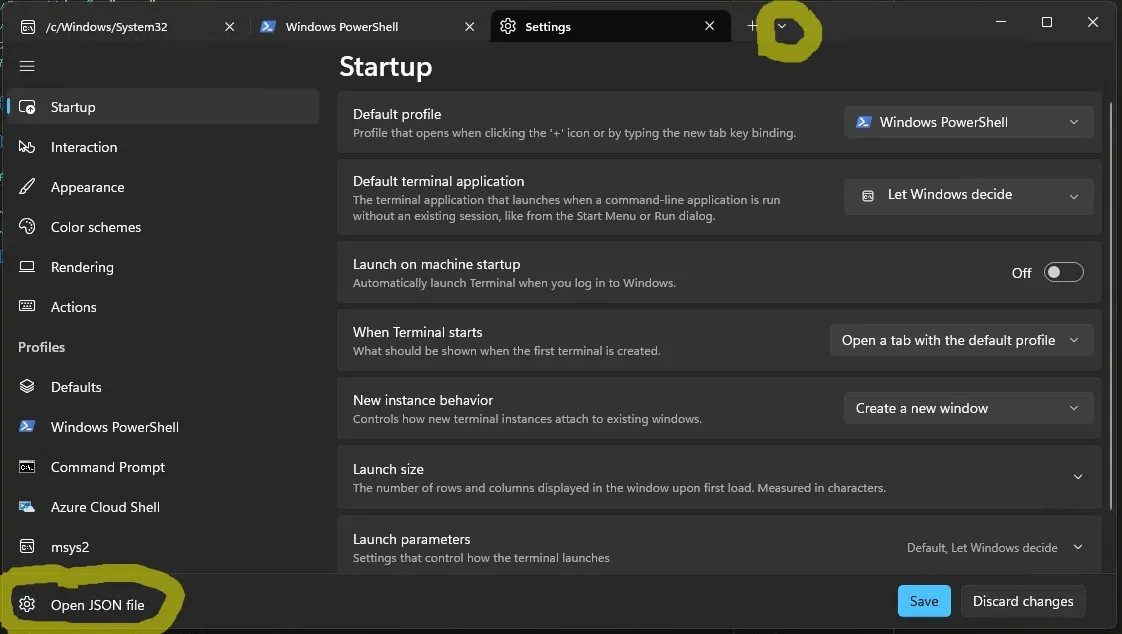
In the JSON settings file that opens up, look for the "profiles" section in the JSON file:
"profiles":
{
"defaults": {},
"list":
[
{
"guid": "{b453ae62-4e3d-5e58-b989-0a998ec441b8}",
"hidden": false,
"name": "Azure Cloud Shell",
"source": "Windows.Terminal.Azure"
},
]
},
Here, we will add 7 new MSYS2 profiles. Use a unique GUID from your previously-generated list above for each entry. Be sure to add a comma at the end of the last pre-existing profile entry above.
Here are my new entries in the JSON "profiles" list above. Your GUIDs should be different, based on what you generated above (I actually don't know if yours need to be different from mine; I just know each entry needs a unique GUID one from another). Ensure you put a comma after each entry, including adding a comma after the ending } of the last entry just above. Notice the Linux-like forward slashes in the paths.
My 7 new MSYS2 profiles:
"profiles":
{
"defaults": {},
"list":
[
{
"commandline": "C:/msys64/msys2_shell.cmd -defterm -here -no-start -msys2 -shell bash",
"guid": "{6f0ee3d1-ac4f-48ca-bcf5-a9795f9942d2}",
"hidden": false,
"name": "MSYS2: msys2",
"startingDirectory": "%USERPROFILE%",
"icon": "C:/msys64/msys2.ico",
"font":
{
"size": 10
}
},
{
"commandline": "C:/msys64/msys2_shell.cmd -defterm -here -no-start -mingw32 -shell bash",
"guid": "{80414396-5ef4-490b-af88-29600c19ca4a}",
"hidden": false,
"name": "MSYS2: mingw32",
"startingDirectory": "%USERPROFILE%",
"icon": "C:/msys64/mingw32.ico",
"font":
{
"size": 10
}
},
{
"commandline": "C:/msys64/msys2_shell.cmd -defterm -here -no-start -mingw64 -shell bash",
"guid": "{aef16ae0-7dd1-4ac7-abd8-60a646abb9ca}",
"hidden": false,
"name": "MSYS2: mingw64",
"startingDirectory": "%USERPROFILE%",
"icon": "C:/msys64/mingw64.ico",
"font":
{
"size": 10
}
},
{
"commandline": "C:/msys64/msys2_shell.cmd -defterm -here -no-start -ucrt64 -shell bash",
"guid": "{a718a3d5-9e77-4d0d-b7b6-69ec3d190206}",
"hidden": false,
"name": "MSYS2: ucrt64 (recommended default)",
"startingDirectory": "%USERPROFILE%",
"icon": "C:/msys64/ucrt64.ico",
"font":
{
"size": 10
}
},
{
"commandline": "C:/msys64/msys2_shell.cmd -defterm -here -no-start -clang64 -shell bash",
"guid": "{1f2869c0-1310-403b-93a7-9227f42eeb24}",
"hidden": false,
"name": "MSYS2: clang64",
"startingDirectory": "%USERPROFILE%",
"icon": "C:/msys64/clang64.ico",
"font":
{
"size": 10
}
},
{
"commandline": "C:/msys64/msys2_shell.cmd -defterm -here -no-start -clang32 -shell bash",
"guid": "{10c96d8f-9e6b-48f6-8f59-034c586d7e57}",
"hidden": false,
"name": "MSYS2: clang32",
"startingDirectory": "%USERPROFILE%",
"icon": "C:/msys64/clang32.ico",
"font":
{
"size": 10
}
},
{
"commandline": "C:/msys64/msys2_shell.cmd -defterm -here -no-start -clangarm64 -shell bash",
"guid": "{ada1f939-0f7b-400c-b755-8cbff4fd40a8}",
"hidden": false,
"name": "MSYS2: clangarm64",
"startingDirectory": "%USERPROFILE%",
"icon": "C:/msys64/clangarm64.ico",
"font":
{
"size": 10
}
},
Copy and paste those 7 new profiles above into the correct location in your Windows Terminal JSON settings file.
Save the JSON file, and close it.
How to change your default shell:
Note that if you want to use another shell, such as fish or zsh, you can use -shell fish or -shell zsh instead of -shell bash in the profile commands above. See here: https://www.msys2.org/docs/terminals/. If you aren't sure, stick with -shell bash.
Back in Windows Terminal, click the little drop-down arrow at the top right of your tabs at the top. You'll now see these 7 new MSYS2 entries you just added!:
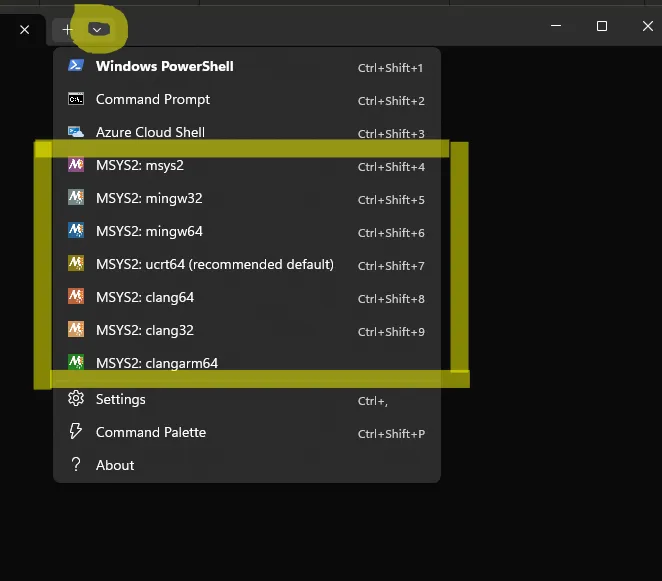
Click each one to test it, and ensure they all run.
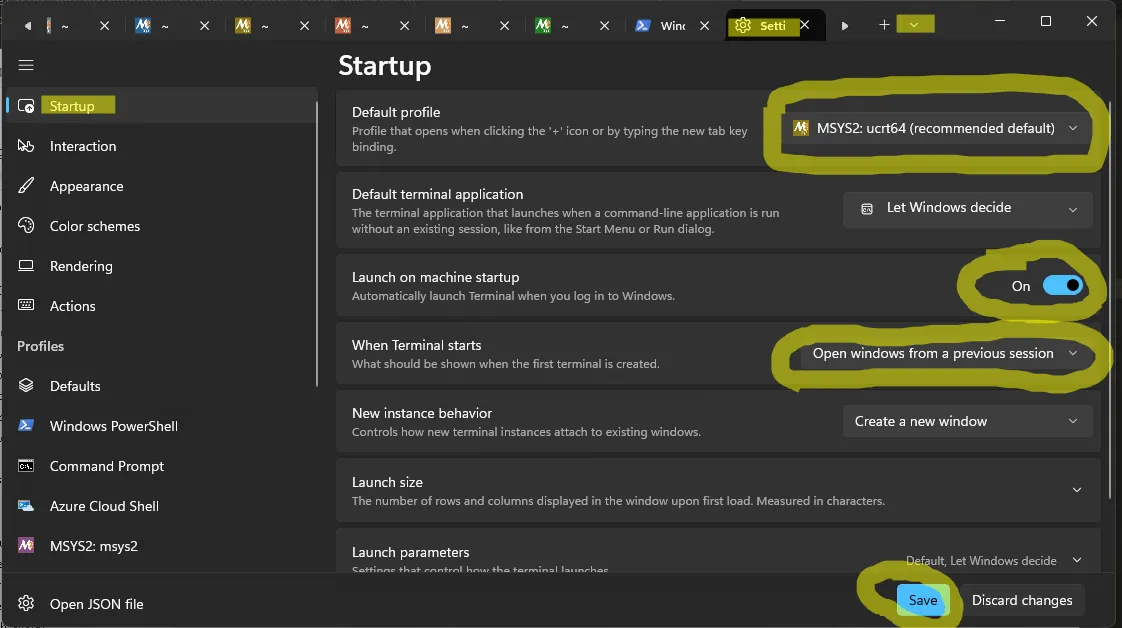
Choose an MSYS2 environment as your default Windows Terminal profile:
Click the little drop-down arrow to the right of the tabs at the top, and go to "Settings" again --> choose the "Startup" tab on the left.
Change the "Default profile" --> "MSYS2: ucrt64 (recommended default)".
Turn "Launch on machine startup" to "On".
Change "When Terminal starts" to "Open windows from a previous session".
Click "Save".
Here are what my Windows Terminal "Startup" settings looks like:
Change your HOME (~) dir from MSYS2's default of C:\msys64\home\my_username to your regular Windows home dir of C:\Users\my_username:
Open up C:\msys64\home\my_username\.bash_profile in a text editor, such as VSCode. Modify it so that it looks like this. Note: you can just comment everything out with # and add this to the top:
HOME="/c/Users/$(whoami)"
if [ -f "$HOME/.profile" ]; then
. "$HOME/.profile"
fi
Close and re-open Windows Terminal. Run echo ~ and echo "$HOME" and ensure they now both show /c/Users/my_username. Run ls -a and ensure you see the contents of your normal Windows home directory for your user. pwd should show that you are currently in that directory too, since we set this via "startingDirectory": "%USERPROFILE%", in the JSON file above.
Install Ubuntu's default ~/.profile and ~/.bashrc files:
Now, create a C:\Users\my_username\.profile file, if you don't already have one, and put the entire contents of this default Ubuntu ~/.profile file into it, from my repo: https://github.com/ElectricRCAircraftGuy/eRCaGuy_dotfiles/blob/master/etc/skel/.profile
If you don't have ~/.profile file yet, the easiest way to do that is to open up your MSYS2: ucrt64 terminal and run the following:
cd ~
wget https://raw.githubusercontent.com/ElectricRCAircraftGuy/eRCaGuy_dotfiles/master/etc/skel/.profile
wget https://raw.githubusercontent.com/ElectricRCAircraftGuy/eRCaGuy_dotfiles/master/etc/skel/.bash_logout
Now, go here for Ubuntu's default ~/.bashrc file: https://github.com/ElectricRCAircraftGuy/eRCaGuy_dotfiles/blob/master/etc/skel/.bashrc. Copy and paste the entire contents of this file into the top of your ~/.bashrc file.
Put a nice # ================== END OF UBUNTU'S DEFAULT ~/.bashrc FILE ==================== marker into the end of your ~/.bashrc file, and add any custom entries you want below that.
IMPORTANT: we do not want to remove the UCRT64 and MINGW64 type entries from our PS1 Prompt String 1 variables (which appear in the terminal before each line where you type), because we like seeing these important markers in our prompt, to remind us which MSYS2 shell we are in. So, go into your ~/.bashrc file and comment out all changes that Ubuntu does to the PS1 variable, like this:
Change this:
if [ "$color_prompt" = yes ]; then
PS1='${debian_chroot:+($debian_chroot)}\[\033[01;32m\]\u@\h\[\033[00m\]:\[\033[01;34m\]\w\[\033[00m\]\$ '
else
PS1='${debian_chroot:+($debian_chroot)}\u@\h:\w\$ '
fi
unset color_prompt force_color_prompt
case "$TERM" in
xterm*|rxvt*)
PS1="\[\e]0;${debian_chroot:+($debian_chroot)}\u@\h: \w\a\]$PS1"
;;
*)
;;
esac
...to this. Notice that the PS1= changes are all commented out by doing this:
unset color_prompt force_color_prompt
case "$TERM" in
xterm*|rxvt*)
;;
*)
;;
esac
IMPORTANT: we do not want to accidentally override any really important system calls or build commands, such as make.
Go into your ~/.bashrc and ~/.profile files and search for anything silly, like overriding the make command. I had this in my ~/.bashrc file from some earlier hacks:
alias make="'/c/Program Files/Microchip/MPLABX/v6.10/gnuBins/GnuWin32/bin/make.exe'"
Don't do that! That could mess up everything when trying to build software in your MSYS2 terminals! Delete or comment out such nonsense, like this:
Now, close and re-open all Windows terminal windows, or run . ~/.profile in each one to re-source your ~/.profile file.
If you don't know what "re-sourcing" means, read my answer here: source (.) vs export (and also some file lock [flock] stuff at the end).
Run alias to see all of your aliases. Look for any silly aliases you don't want, and delete or comment them out from your ~/.bashrc or ~/.profile files if necessary. Again, I had a ridiculous make alias (see above) ruining everything!
Also run echo "$PATH" to look for any silliness in your PATH that shouldn't be there. If you haven't been modifying your PATH before, it should be fine.
Test your new, beautiful Ubuntu settings: run ll and you'll see this alias now works! It is an alias for ls -alF, and comes from your ~/.bashrc file now.
Update MSYS2:
time pacman -Suy
Choose yes (y) if there are packages to upgrade.
Source: https://www.msys2.org/docs/updating/
Install GCC into the MSYS2 UCRT64 environment:
pacman -S mingw-w64-ucrt-x86_64-gcc
gcc --version
Source:
I learned this from the "Getting Started" content right on the home page of the MSYS2 project, here: https://www.msys2.org/.
Install VSCode and add the code executable into your PATH:
Install VSCode from here, if you don't already have it: https://code.visualstudio.com/
The code executable is found in the "$HOME/AppData/Local/Programs/Microsoft VS Code/bin" dir.
Add it to your PATH by adding this line to the bottom of your ~/.bashrc file:
DIR="$HOME/AppData/Local/Programs/Microsoft VS Code/bin"
if [ -d "$DIR" ] ; then
    PATH="$DIR:$PATH"
fi
Close and re-open all terminals, or run . ~/.profile in each one to re-source your ~/.profile and ~/.bashrc files.
Now run code . in a terminal and it will open up a new instance of VSCode in your current directory. Now we're rockin'.
Install and configure git:
This is beyond the scope of this answer, but oddly enough, MSYS2 currently recommends you install and use Git For Windows and Git Bash (based on MSYS2) instead of trying to install git within MSYS2: https://www.msys2.org/docs/git/
So, here are some links to resources I've created to help you install Git for Windows / Git Bash:
- Installing Git For Windows: https://github.com/ElectricRCAircraftGuy/eRCaGuy_dotfiles/issues/27#issue-1950880578
- Adding Git-Bash to the new Windows Terminal
- Running SSH Agent when starting Git Bash on Windows
- Python not working in the command line of git bash
At a minimum: install Git for Windows. Then, add this to the bottom of your ~/.bashrc file to give your MSYS2 environments the most basic of git usage and access:
alias git="$HOME/AppData/Local/Programs/Git/bin/git.exe"
Close and re-open all terminals, or run . ~/.profile to re-source your ~/.profile and ~/.bashrc files, and your MSYS2 environments can now run this:
git --version
Now that you have MSYS2 installed and working, your Windows computer is much more useful and functional!
But, since I can't easily install git into MSYS2, I guess I'll still be using separate terminals: MSYS2 terminals for building, and the Git Bash terminal for git.
What a pain Windows is. Just wipe it and install Linux Ubuntu. Linux Ubuntu is the only OS installed on most of my computers, including for my kids. :)
rem Shell types
if "x%~1" == "x-msys" shift& set /a msys2_shiftCounter+=1& set MSYSTEM=MSYS& goto :checkparams
if "x%~1" == "x-msys2" shift& set /a msys2_shiftCounter+=1& set MSYSTEM=MSYS& goto :checkparams
if "x%~1" == "x-mingw32" shift& set /a msys2_shiftCounter+=1& set MSYSTEM=MINGW32& goto :checkparams
if "x%~1" == "x-mingw64" shift& set /a msys2_shiftCounter+=1& set MSYSTEM=MINGW64& goto :checkparams
if "x%~1" == "x-ucrt64" shift& set /a msys2_shiftCounter+=1& set MSYSTEM=UCRT64& goto :checkparams
if "x%~1" == "x-clang64" shift& set /a msys2_shiftCounter+=1& set MSYSTEM=CLANG64& goto :checkparams
if "x%~1" == "x-clang32" shift& set /a msys2_shiftCounter+=1& set MSYSTEM=CLANG32& goto :checkparams
if "x%~1" == "x-clangarm64" shift& set /a msys2_shiftCounter+=1& set MSYSTEM=CLANGARM64& goto :checkparams
if "x%~1" == "x-mingw" shift& set /a msys2_shiftCounter+=1& (if exist "%WD%..\..\mingw64" (set MSYSTEM=MINGW64) else (set MSYSTEM=MINGW32))& goto :checkparams
C:\>.\msys64\msys2_shell.cmd --help
Usage:
msys2_shell.cmd [options] [login shell parameters]
Options:
-mingw32 | -mingw64 | -ucrt64 | -clang64 | -msys[2] Set shell type
-defterm | -mintty | -conemu Set terminal type
-here Use current directory as working
directory
-where DIRECTORY Use specified DIRECTORY as working
directory
-[use-]full-path Use full current PATH variable
instead of trimming to minimal
-no-start Do not use "start" command and
return login shell resulting
errorcode as this batch file
resulting errorcode
-shell SHELL Set login shell
-help | --help | -? | /? Display this help and exit
Any parameter that cannot be treated as valid option and all
following parameters are passed as login shell command parameters.
'MSYS2 CLANG64.lnk'
'MSYS2 CLANGARM64.lnk'
'MSYS2 MINGW32.lnk'
'MSYS2 MINGW64.lnk'
'MSYS2 MSYS.lnk'
'MSYS2 UCRT64.lnk'
/c/msys64/clang32.exe
/c/msys64/clang64.exe
/c/msys64/clangarm64.exe
/c/msys64/mingw32.exe
/c/msys64/mingw64.exe
/c/msys64/msys2.exe
/c/msys64/ucrt64.exe
/c/msys64/uninstall.exe
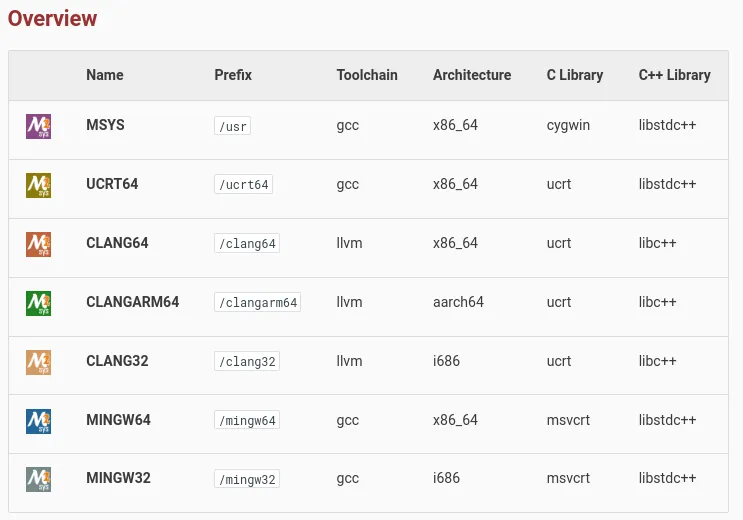
您还可以在线查看并在此表中看到所有7个类型:
我在其他回答中提到或引用了这个答案的链接:
1. [如何在MSYS2上更改HOME目录和启动目录?](link1)
2. [Super User:如何更改我的MinGW/MSYS + mintty的主目录?](link2)
3. [Super User:MinGW Bash配置文件](link3)
4. [在Windows的终端/命令提示符中,VSCode的`code .`命令无法工作](link4)
5. [Super User:在MSYS2上更改默认shell](link5)
C:\msys64\...- RAT