具体来说:
第0列和第1列没有上下文菜单。
所有其他单元格应该有以下上下文菜单:
第一项:"删除" + 同行.第1列的值 第二项:"保存" + 同列.表头文本
-编辑-
右侧的示例展示了任何给定单元格的上下文菜单应该是什么样子。
有一个代理可以做到这一点!- 无需子类化
在IB中,如果您将NSTableView
拖放到窗口/视图上,您会注意到表格有一个menu
出口。
因此,实现上下文菜单的一种非常简单的方法是将该出口连接到一个存根菜单,并将菜单的代理出口连接到实现NSMenuDelegate
协议方法- (void)menuNeedsUpdate:(NSMenu *)menu
的对象。
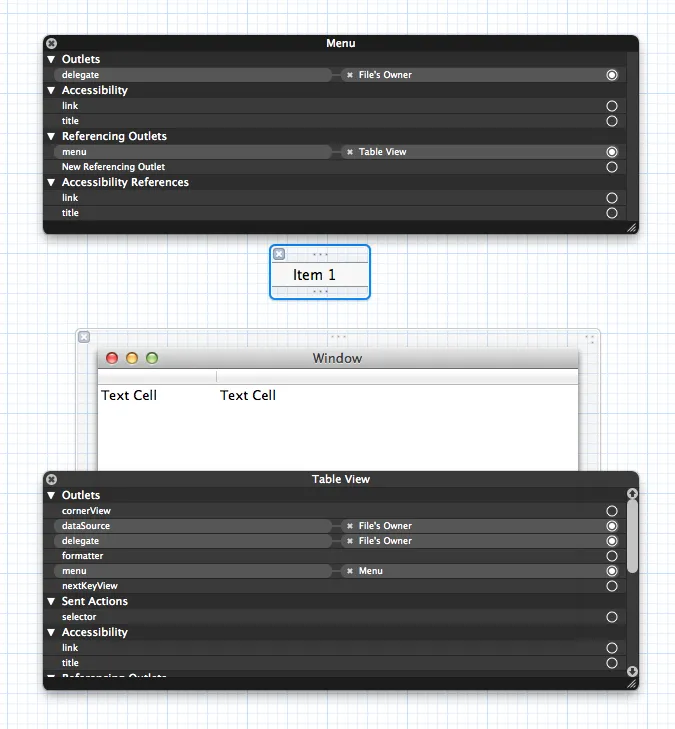
通常情况下,菜单的代理对象是提供表格数据源/代理的同一对象,但也可能是拥有表格的视图控制器。
请查看文档以获取更多信息。
在协议中,你可以做很多聪明的事情,但一个非常简单的实现可能像下面这样:
#pragma mark tableview menu delegates
- (void)menuNeedsUpdate:(NSMenu *)menu
{
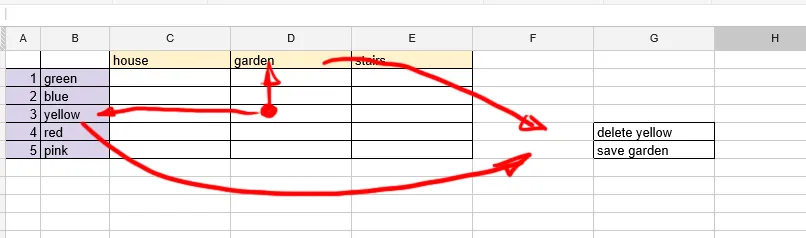
NSInteger clickedrow = [mytable clickedRow];
NSInteger clickedcol = [mytable clickedColumn];
if (clickedrow > -1 && clickedcol > -1) {
//construct a menu based on column and row
NSMenu *newmenu = [self constructMenuForRow:clickedrow andColumn:clickedcol];
//strip all the existing stuff
[menu removeAllItems];
//then repopulate with the menu that you just created
NSArray *itemarr = [NSArray arrayWithArray:[newmenu itemArray]];
for(NSMenuItem *item in itemarr)
{
[newmenu removeItem:[item retain]];
[menu addItem:item];
[item release];
}
}
}
-(NSMenu *)constructMenuForRow:(int)row andColumn:(int)col
{
NSMenu *contextMenu = [[[NSMenu alloc] initWithTitle:@"Context"] autorelease];
NSString *title1 = [NSString stringWithFormat:@"Delete %@",[self titleForRow:row]];
NSMenuItem *item1 = [[[NSMenuItem alloc] initWithTitle:title1 action:@selector(deleteObject:) keyEquivalent:@""] autorelease];
[contextMenu addItem:item1];
//
NSString *title2 = [NSString stringWithFormat:@"Save %@",[self titleForColumn:col]];
NSMenuItem *item2 = [[[NSMenuItem alloc] initWithTitle:title1 action:@selector(saveObject:) keyEquivalent:@""] autorelease];
[contextMenu addItem:item2];
return contextMenu;
}
titleForRow:
和titleForColumn:
取决于你自己。NSMenuItem
提供了属性representedObject
,允许你将任意对象绑定到菜单项,从而向你的方法(例如deleteObject:
)发送信息。
编辑
注意 - 在你的NSDocument
子类中实现- (void)menuNeedsUpdate:(NSMenu *)menu
会阻止出现在标题栏中的自动保存/版本菜单出现在10.8中。NSDocument
子类之外的东西。编辑:比下面的方法更好的方法是使用代理,如被接受的答案所示。
您可以子类化您的UITableView并实现menuForEvent:
方法:
-(NSMenu *)menuForEvent:(NSEvent *)event{
if (event.type==NSRightMouseDown) {
if (self.selectedColumn == 0 || self.selectedColumn ==1) {
return nil;
}else {
//create NSMenu programmatically or get a IBOutlet from one created in IB
NSMenu *menu=[[NSMenu alloc] initWithTitle:@"Custom"];
//code to set the menu items
//Instead of the following line get the value from your datasource array/dictionary
//I used this as I don't know how you have implemented your datasource, but this will also work
NSString *deleteValue = [[self preparedCellAtColumn:1 row:self.selectedRow] title];
NSString *deleteString = [NSString stringWithFormat:@"Delete %@",deleteValue];
NSMenuItem *deleteItem = [[NSMenuItem alloc] initWithTitle:deleteString action:@selector(deleteAction:) keyEquivalent:@""];
[menu addItem:deleteItem];
//save item
//similarly
[menu addItem:saveItem];
return menu;
}
}
return nil;
}
应该就这样了。我还没有尝试过这段代码。但这应该会给你一个想法。
[item1 setTarget:self];
[item2 setTarget:self];
如果没有明确设置目标,则上下文菜单将保持禁用状态。
干杯!
Alex
PS:我本来想把这个作为评论发布的,但是我没有足够的声望:(
Warren Burton的回答很到位。对于那些在使用Swift的人来说,下面的示例片段可能会为你节省从Objective C翻译的工作。在我的情况下,我是将上下文菜单添加到NSOutlineView中的单元格,而不是NSTableView。在这个例子中,菜单构造器查看项目并根据项目类型和状态提供不同的选项。委托(在IB中设置)是一个管理NSOutlineView的ViewController。
func menuNeedsUpdate(menu: NSMenu) {
// get the row/column from the NSTableView (or a subclasse, as here, an NSOutlineView)
let row = outlineView.clickedRow
let col = outlineView.clickedColumn
if row < 0 || col < 0 {
return
}
let newItems = constructMenuForRow(row, andColumn: col)
menu.removeAllItems()
for item in newItems {
menu.addItem(item)
// target this object for handling the actions
item.target = self
}
}
func constructMenuForRow(row: Int, andColumn column: Int) -> [NSMenuItem]
{
let menuItemSeparator = NSMenuItem.separatorItem()
let menuItemRefresh = NSMenuItem(title: "Refresh", action: #selector(refresh), keyEquivalent: "")
let item = outlineView.itemAtRow(row)
if let block = item as? Block {
let menuItem1 = NSMenuItem(title: "Delete \(block.name)", action: #selector(deleteBlock), keyEquivalent: "")
let menuItem2 = NSMenuItem(title: "New List", action: #selector(addList), keyEquivalent: "")
return [menuItem1, menuItem2, menuItemSeparator, menuItemRefresh]
}
if let field = item as? Field {
let menuItem1 = NSMenuItem(title: "Delete \(field.name)", action: #selector(deleteField), keyEquivalent: "")
let menuItem2 = NSMenuItem(title: "New Field", action: #selector(addField), keyEquivalent: "")
return [menuItem1, menuItem2, menuItemSeparator, menuItemRefresh]
}
return [NSMenuItem]()
}
这里是一个在视图控制器中编程设置NSOutlineView的示例。这就是你需要启动上下文菜单的所有管道。无需子类化。
我之前曾经子类化NSOutlineView来覆盖menu(for event: NSEvent),但在Graham的回答这里和Warren的回答的帮助下,我找到了一个更简单的设置。
class OutlineViewController: NSViewController
{
// ...
var outlineView: NSOutlineView!
var contextMenu: NSMenu!
override func viewDidLoad()
{
// ...
outlineView = NSOutlineView()
contextMenu = NSMenu()
contextMenu.delegate = self
outlineView.menu = contextMenu
}
}
extension OutlineViewController: NSMenuDelegate
{
func menuNeedsUpdate(_ menu: NSMenu) {
// clickedRow catches the right-click here
print("menuNeedsUpdate called. Clicked Row: \(outlineView.clickedRow)")
// ... Flesh out the context menu here
}
}
[mTableViewMenu setAutoenablesItems:NO];
这是我发现的最简单的自定义/动态 NSMenu
方法,同时保留系统外观(蓝色选择边框)。子类化 NSTableView
并在 menu(for:)
中设置你的菜单。
重要的部分是在表格视图上设置菜单,但从其super
调用中返回菜单。
override func menu(for event: NSEvent) -> NSMenu? {
let point = convert(event.locationInWindow, from: nil)
let clickedRow = self.row(at: point)
var menuRows = selectedRowIndexes
// The blue selection box should always reflect the
// returned row indexes.
if menuRows.isEmpty || !menuRows.contains(clickedRow) {
menuRows = [clickedRow]
}
// Build your custom menu based on the menuRows indexes
self.menu = <#myMenu#>
return super.menu(for: event)
}
-(NSInteger)numberOfItemsInMenu:(NSMenu *)menu
并在需要时返回0。 - Warren Burton