我已经尝试了2天,想在iPhone上的相机预览视图上展示OpenGLES视图。
相机预览本身可以工作。 EAGLView(OpenGLES)本身也可以工作。
问题是当我尝试将EAGLView放置在相机预览上时。
我能够同时放置两个UIView,但相机预览总是覆盖在EAGLView上(错误!)。当我将相机预览的alpha值设置为0.5时,我可以看到两个UIView,就像我想要的那样,但都变得模糊(这是正常的)。
我尝试过[self.view bringSubviewToFront:(EAGLView)],但没有任何改变。
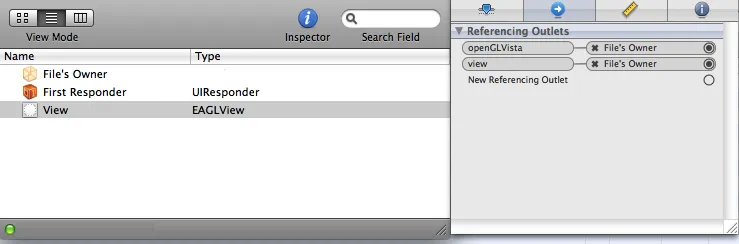
EAGLView在IB中作为类存在。 CameraView通过代码添加为子视图。
这里我放了一些代码,如果需要我可以上传更多。
谢谢!!!
EAGLView
+ (Class)layerClass {
    return [CAEAGLLayer class];
}


//The GL view is stored in the nib file. When it's unarchived it's sent -initWithCoder:
- (id)initWithCoder:(NSCoder*)coder {


    puntosPintar=(GLfloat*)malloc(sizeof(GLfloat)*8);
    puntosPintar[0] = -0.25f;
    puntosPintar[1] = -1.22f;
    puntosPintar[2] = -0.41f;
    puntosPintar[3] = 0.0f;
    puntosPintar[4] = 0.35f;
    puntosPintar[5] = -1.69f;
    puntosPintar[6] = 0.15f;
    puntosPintar[7] = 0.0f;

    if ((self = [super initWithCoder:coder])) {
        // Get the layer
        CAEAGLLayer *eaglLayer = (CAEAGLLayer *)self.layer;

        eaglLayer.opaque = NO;
        eaglLayer.drawableProperties = [NSDictionary dictionaryWithObjectsAndKeys: [NSNumber numberWithBool:NO], kEAGLDrawablePropertyRetainedBacking, kEAGLColorFormatRGBA8, kEAGLDrawablePropertyColorFormat, nil];

        context = [[EAGLContext alloc] initWithAPI:kEAGLRenderingAPIOpenGLES1];

        if (!context || ![EAGLContext setCurrentContext:context]) {
            [self release];
            return nil;
        }


    }
    return self;
}


- (void)drawView {
    const GLubyte squareColors[] = {
        255, 255,   0, 255,
        0,   255, 255, 255,
        0,     0,   0,   0,
        255,   0, 255, 255,
    };

    [EAGLContext setCurrentContext:context];

    glBindFramebufferOES(GL_FRAMEBUFFER_OES, viewFramebuffer);
    glViewport(0, 0, backingWidth, backingHeight);

    glMatrixMode(GL_PROJECTION);
    glLoadIdentity();
    glOrthof(-1.0f, 1.0f, -1.5f, 1.5f, -1.0f, 1.0f);


    glMatrixMode(GL_MODELVIEW);
    glClearColor(0.0f, 0.0f, 0.0f, 0.0f);

    glClear(GL_COLOR_BUFFER_BIT | GL_DEPTH_BUFFER_BIT);

    glClear(GL_COLOR_BUFFER_BIT);

    glVertexPointer(2, GL_FLOAT, 0, puntosPintar);
    glEnableClientState(GL_VERTEX_ARRAY);

    glColorPointer(4, GL_UNSIGNED_BYTE, 0, squareColors);

    glEnableClientState(GL_COLOR_ARRAY);

    glDrawArrays(GL_TRIANGLE_STRIP, 0, 8);

    glBindRenderbufferOES(GL_RENDERBUFFER_OES, viewRenderbuffer);
    [context presentRenderbuffer:GL_RENDERBUFFER_OES];

}


- (void)layoutSubviews {
    [EAGLContext setCurrentContext:context];

    [self destroyFramebuffer];
    [self createFramebuffer];

    [self drawView];


}


- (BOOL)createFramebuffer {


    glGenFramebuffersOES(1, &viewFramebuffer);
    glGenRenderbuffersOES(1, &viewRenderbuffer);

    glBindFramebufferOES(GL_FRAMEBUFFER_OES, viewFramebuffer);
    glBindRenderbufferOES(GL_RENDERBUFFER_OES, viewRenderbuffer);
    [context renderbufferStorage:GL_RENDERBUFFER_OES fromDrawable:(CAEAGLLayer*)self.layer];
    glFramebufferRenderbufferOES(GL_FRAMEBUFFER_OES, GL_COLOR_ATTACHMENT0_OES, GL_RENDERBUFFER_OES, viewRenderbuffer);

    glGetRenderbufferParameterivOES(GL_RENDERBUFFER_OES, GL_RENDERBUFFER_WIDTH_OES, &backingWidth);
    glGetRenderbufferParameterivOES(GL_RENDERBUFFER_OES, GL_RENDERBUFFER_HEIGHT_OES, &backingHeight);
    if (USE_DEPTH_BUFFER) {
        glGenRenderbuffersOES(1, &depthRenderbuffer);
        glBindRenderbufferOES(GL_RENDERBUFFER_OES, depthRenderbuffer);
        glRenderbufferStorageOES(GL_RENDERBUFFER_OES, GL_DEPTH_COMPONENT16_OES, backingWidth, backingHeight);
        glFramebufferRenderbufferOES(GL_FRAMEBUFFER_OES, GL_DEPTH_ATTACHMENT_OES, GL_RENDERBUFFER_OES, depthRenderbuffer);
    }


    if(glCheckFramebufferStatusOES(GL_FRAMEBUFFER_OES) != GL_FRAMEBUFFER_COMPLETE_OES) {
        NSLog(@"failed to make complete framebuffer object %x", glCheckFramebufferStatusOES(GL_FRAMEBUFFER_OES));
        return NO;
    }


    return YES;
}
UIViewController中我想同时显示 相机视图的加载
    [CameraImageHelper startRunning];
    UIView *fafa;
    fafa= [[UIView alloc]initWithFrame:self.view.bounds]; //returns a UIView with the cameraview as a layer of that view. It works well (checked)
    fafa = [CameraImageHelper previewWithBounds:self.view.bounds];
    fafa.alpha=0.5;  //Only way to show both
    [self.view addSubview:fafa];
    [self.view bringSubviewToFront:fafa];
EAGLView的加载 在.h文件中我已经创建了
IBOutlet EAGLView *openGLVista
在视图加载完成后:
openGLVista=[[EAGLView alloc]init];
CameraImageHelper.h
@interface CameraImageHelper : NSObject <AVCaptureVideoDataOutputSampleBufferDelegate>
{
    AVCaptureSession *session;
}
@property (retain) AVCaptureSession *session;

+ (void) startRunning;
+ (void) stopRunning;

+ (UIView *) previewWithBounds: (CGRect) bounds;
@end
CameraImageHelper.m
- (void) initialize
{
    NSError *error;
    AVCaptureDeviceInput *captureInput = [AVCaptureDeviceInput deviceInputWithDevice:[AVCaptureDevice defaultDeviceWithMediaType:AVMediaTypeVideo] error:&error];
    if (!captureInput)
    {
        NSLog(@"Error: %@", error);
        return;
    }


    self.session = [[[AVCaptureSession alloc] init] autorelease];
    [self.session addInput:captureInput];
}

- (id) init
{
    if (self = [super init]) [self initialize];
    return self;
}

- (UIView *) previewWithBounds: (CGRect) bounds
{
    UIView *view = [[[UIView alloc] initWithFrame:bounds] autorelease];

    AVCaptureVideoPreviewLayer *preview = [AVCaptureVideoPreviewLayer layerWithSession: self.session];
    preview.frame = bounds;
    preview.videoGravity = AVLayerVideoGravityResizeAspectFill;
    [view.layer addSublayer: preview];

    return view;
}

- (void) dealloc
{
    self.session = nil;
    [super dealloc];
}

#pragma mark Class Interface

+ (id) sharedInstance // private
{
    if(!sharedInstance) sharedInstance = [[self alloc] init];
    return sharedInstance;
}

+ (void) startRunning
{
    [[[self sharedInstance] session] startRunning];
}

+ (void) stopRunning
{
    [[[self sharedInstance] session] stopRunning];
}


+ (UIView *) previewWithBounds: (CGRect) bounds
{
    return [[self sharedInstance] previewWithBounds: (CGRect) bounds];
}

@end