我想在Flutter中创建一个类似下面图片的弹出窗口内嵌表单:
 .
.
如何使用Flutter实现此功能?
我想在Flutter中创建一个类似下面图片的弹出窗口内嵌表单:
.
如何使用Flutter实现此功能?
给你!showDialog的参数是一个WidgetBuilder,因此您可以返回任何小部件。
   import 'package:flutter/material.dart';

void main() {
  runApp(new MaterialApp(home: new MyApp()));
}

class MyApp extends StatefulWidget {
  @override
  _MyAppState createState() => _MyAppState();
}

class _MyAppState extends State<MyApp> {
  final _formKey = GlobalKey<FormState>();

  @override
  Widget build(BuildContext context) {
    return Scaffold(
      appBar: AppBar(
        title: Text("Flutter"),
      ),
      body: Center(
        child: RaisedButton(
          onPressed: () {
            showDialog(
                context: context,
                builder: (BuildContext context) {
                  return AlertDialog(
                    content: Stack(
                      overflow: Overflow.visible,
                      children: <Widget>[
                        Positioned(
                          right: -40.0,
                          top: -40.0,
                          child: InkResponse(
                            onTap: () {
                              Navigator.of(context).pop();
                            },
                            child: CircleAvatar(
                              child: Icon(Icons.close),
                              backgroundColor: Colors.red,
                            ),
                          ),
                        ),
                        Form(
                          key: _formKey,
                          child: Column(
                            mainAxisSize: MainAxisSize.min,
                            children: <Widget>[
                              Padding(
                                padding: EdgeInsets.all(8.0),
                                child: TextFormField(),
                              ),
                              Padding(
                                padding: EdgeInsets.all(8.0),
                                child: TextFormField(),
                              ),
                              Padding(
                                padding: const EdgeInsets.all(8.0),
                                child: RaisedButton(
                                  child: Text("Submitß"),
                                  onPressed: () {
                                    if (_formKey.currentState.validate()) {
                                      _formKey.currentState.save();
                                    }
                                  },
                                ),
                              )
                            ],
                          ),
                        ),
                      ],
                    ),
                  );
                });
          },
          child: Text("Open Popup"),
        ),
      ),
    );
  }
}
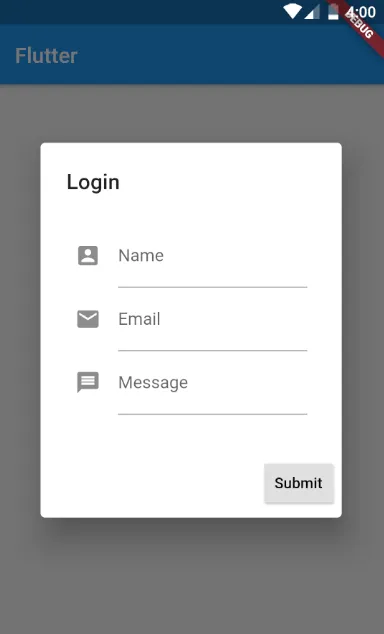
showDialog用于显示像AlertDialog这样的对话框小部件。 - BoazRaisedButton(
child: Text("Open Popup"),
onPressed: () {
showDialog(
context: context,
builder: (BuildContext context) {
return AlertDialog(
scrollable: true,
title: Text('Login'),
content: Padding(
padding: const EdgeInsets.all(8.0),
child: Form(
child: Column(
children: <Widget>[
TextFormField(
decoration: InputDecoration(
labelText: 'Name',
icon: Icon(Icons.account_box),
),
),
TextFormField(
decoration: InputDecoration(
labelText: 'Email',
icon: Icon(Icons.email),
),
),
TextFormField(
decoration: InputDecoration(
labelText: 'Message',
icon: Icon(Icons.message ),
),
),
],
),
),
),
actions: [
ElevatedButton(
child: Text("Submit"),
onPressed: () {
// your code
})
],
);
});
},
),
输出:
截图(不使用任何第三方包):
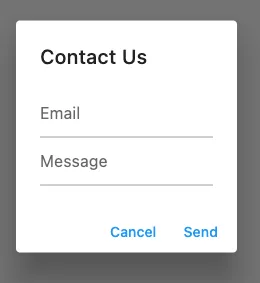
代码:只需调用此方法:
void showDialogWithFields() {
  showDialog(
    context: context,
    builder: (_) {
      var emailController = TextEditingController();
      var messageController = TextEditingController();
      return AlertDialog(
        title: Text('Contact Us'),
        content: ListView(
          shrinkWrap: true,
          children: [
            TextFormField(
              controller: emailController,
              decoration: InputDecoration(hintText: 'Email'),
            ),
            TextFormField(
              controller: messageController,
              decoration: InputDecoration(hintText: 'Message'),
            ),
          ],
        ),
        actions: [
          TextButton(
            onPressed: () => Navigator.pop(context),
            child: Text('Cancel'),
          ),
          TextButton(
            onPressed: () {
              // Send them to your email maybe?
              var email = emailController.text;
              var message = messageController.text;
              Navigator.pop(context);
            },
            child: Text('Send'),
          ),
        ],
      );
    },
  );
}
content: SingleChildScrollView(child: Column(....)) - Hardik
showDialog(
        context: context,
        builder: (BuildContext context) {
          return AlertDialog(
            contentPadding: EdgeInsets.zero,
            content: Stack(
              overflow: Overflow.visible,
              children: <Widget>[
                Positioned(
                  right: -15.0,
                  top: -15.0,
                  child: InkResponse(
                    onTap: () {
                      Navigator.of(context).pop();
                    },
                    child: CircleAvatar(
                      radius: 12,
                      child: Icon(Icons.close, size: 18,),
                      backgroundColor: Colors.red,
                    ),
                  ),
                ),
                Form(
                  key: _formKey,
                  child: Column(
                    mainAxisSize: MainAxisSize.min,
                    children: <Widget>[
                      Container(
                        height: 60,
                        width: MediaQuery.of(context).size.width,
                        decoration: BoxDecoration(
                          color:Colors.yellow.withOpacity(0.2),
                          border: Border(
                            bottom: BorderSide(color: Colors.grey.withOpacity(0.3))
                          )
                        ),
                        child: Center(child: Text("Contact Me", style:TextStyle(color: Colors.black54, fontWeight: FontWeight.w700, fontSize: 20, fontStyle: FontStyle.italic, fontFamily: "Helvetica"))),
                      ),
                      Padding(
                        padding: EdgeInsets.all(20.0),
                        child: Container(
                          height: 50,
                          decoration: BoxDecoration(
                            border: Border.all(color: Colors.grey.withOpacity(0.2) )
                          ),
                            child: Row(
                              crossAxisAlignment: CrossAxisAlignment.start,
                              children: [
                                Expanded(
                                  flex:1,
                                  child: Container(
                                    width: 30,
                                    child: Center(child: Icon(Icons.person, size: 35,color:Colors.grey.withOpacity(0.4))),
                                    decoration: BoxDecoration(
                                        border: Border(
                                            right: BorderSide(color: Colors.grey.withOpacity(0.2))
                                        )
                                    ),
                                  ),
                                ),
                                Expanded(
                                  flex: 4,
                                  child: TextFormField(
                                    decoration: InputDecoration(
                                        hintText: "Name",
                                        contentPadding: EdgeInsets.only(left:20),
                                        border: InputBorder.none,
                                        focusedBorder: InputBorder.none,
                                        errorBorder: InputBorder.none,
                                        hintStyle: TextStyle(color:Colors.black26, fontSize: 18, fontWeight: FontWeight.w500 )
                                    ),

                                  ),
                                )
                              ],
                            )
                        ),
                      ),
                      Padding(
                        padding: const EdgeInsets.all(20.0),
                        child: RaisedButton(
                          padding: EdgeInsets.zero,
                          child: Container(
                              width:MediaQuery.of(context).size.width,
                              height: 60,
                            decoration: BoxDecoration(
                               gradient: LinearGradient(
                                 begin: Alignment.topCenter,
                                 end: Alignment.bottomCenter,
                                 colors: [
                                   Color(0xffc9880b),
                                   Color(0xfff77f00),
                                 ]
                               )
                            ),
                            child: Center(child: Text("Submit", style: TextStyle(color:Colors.white70, fontSize: 20, fontWeight: FontWeight.w800),)),
                          ),
                          onPressed: () {
                            if (_formKey.currentState.validate()) {
                              _formKey.currentState.save();
                            }
                          },
                        ),
                      )
                    ],
                  ),
                ),
              ],
            ),
          );
        });
onTap: () {
                            showDialog(
                              context: context,
                              builder: (BuildContext context) {
                                return Scaffold(
                                  backgroundColor: Colors.transparent,
                                  body: IconButton(
                                    icon: Icon(Icons.ac_unit),
                                    onPressed: () {
                                      Navigator.pop(context);
                                    },
                                  ),
                                );
                              },
                            );
                          },
showDialog()或showGeneralDialog()。 - CopsOnRoadWrap或Column,并设置mainAxisSize: MainAxisSize.min。 - CopsOnRoad