如何使用 SwiftUI 针对以下情况隐藏 keyboard?
情况 1
我有一个TextField,需要在用户点击“返回”按钮时隐藏 keyboard。
情况 2
我有一个TextField,需要在用户点击外部区域时隐藏 keyboard。
我可以通过使用 SwiftUI 来实现这个功能吗?
注意:
我没有问关于 UITextField 的问题。 我想通过使用 SwifUI.TextField 来完成此操作。
如何使用 SwiftUI 针对以下情况隐藏 keyboard?
情况 1
我有一个TextField,需要在用户点击“返回”按钮时隐藏 keyboard。
情况 2
我有一个TextField,需要在用户点击外部区域时隐藏 keyboard。
我可以通过使用 SwiftUI 来实现这个功能吗?
注意:
我没有问关于 UITextField 的问题。 我想通过使用 SwifUI.TextField 来完成此操作。
对我来说,最简单的解决方案是直接使用这里的库。
SwiftUI的支持有些有限,我通过在@main结构体中放置以下代码来使用它:
import IQKeyboardManagerSwift

@main
struct MyApp: App {

    init(){
        IQKeyboardManager.shared.enable = true
        IQKeyboardManager.shared.shouldResignOnTouchOutside = true

    }

    ...
}
   extension UIApplication {
     func dismissKeyboard() {
       sendAction(#selector(UIResponder.resignFirstResponder), to: nil, from: nil, for: nil)
       } }
   .toolbar{
    ToolbarItemGroup(placement: .keyboard){
         Spacer()
         Button("Done"){
            UIApplication.shared.dismissKeyboard()
          }
      }
  }
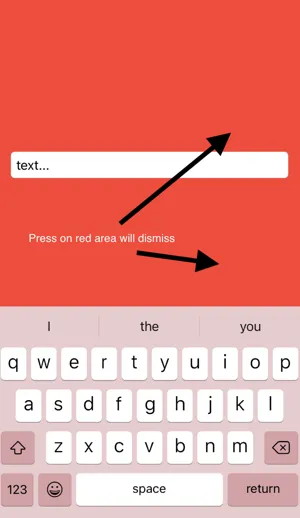
关于我使用的点击“外部”的简单解决方案:
首先,在所有视图之前提供一个ZStack。 在其中,放置一个背景(使用您选择的颜色)并提供一个点击手势。 在手势调用中,调用我们上面看到的“sendAction”:
import SwiftUI

struct MyView: View {
    private var myBackgroundColor = Color.red
    @State var text = "text..."

var body: some View {
    ZStack {
        self.myBackgroundColor.edgesIgnoringSafeArea(.all)
            .onTapGesture(count: 1) {
                UIApplication.shared.sendAction(#selector(UIResponder.resignFirstResponder), to: nil, from: nil, for: nil)
        }
        TextField("", text: $text)
            .textFieldStyle(RoundedBorderTextFieldStyle())
            .padding()
    }
  }
}
extension UIApplication {
   func endEditing() {
       sendAction(#selector(UIResponder.resignFirstResponder), to: nil, from: nil, for: nil)
  }
}
根据 @Sajjon 所述的答案,这里提供了一种解决方案,可以让您根据自己的选择在点击、长按、拖动、放大和旋转手势时关闭键盘。
此解决方案适用于 XCode 11.4
struct MyView: View {
    @State var myText = ""

    var body: some View {
        VStack {
            DismissingKeyboardSpacer()

            HStack {
                TextField("My Text", text: $myText)

                Button("Return", action: {})
                    .dismissKeyboard(on: [.longPress])
            }

            DismissingKeyboardSpacer()
        }
    }
}

struct DismissingKeyboardSpacer: View {
    var body: some View {
        ZStack {
            Color.black.opacity(0.0001)

            Spacer()
        }
        .dismissKeyboard(on: Gestures.allCases)
    }
}
enum All {
    static let gestures = all(of: Gestures.self)

    private static func all<CI>(of _: CI.Type) -> CI.AllCases where CI: CaseIterable {
        return CI.allCases
    }
}

enum Gestures: Hashable, CaseIterable {
    case tap, longPress, drag, magnification, rotation
}

protocol ValueGesture: Gesture where Value: Equatable {
    func onChanged(_ action: @escaping (Value) -> Void) -> _ChangedGesture<Self>
}

extension LongPressGesture: ValueGesture {}
extension DragGesture: ValueGesture {}
extension MagnificationGesture: ValueGesture {}
extension RotationGesture: ValueGesture {}

extension Gestures {
    @discardableResult
    func apply<V>(to view: V, perform voidAction: @escaping () -> Void) -> AnyView where V: View {

        func highPrio<G>(gesture: G) -> AnyView where G: ValueGesture {
            AnyView(view.highPriorityGesture(
                gesture.onChanged { _ in
                    voidAction()
                }
            ))
        }

        switch self {
        case .tap:
            return AnyView(view.gesture(TapGesture().onEnded(voidAction)))
        case .longPress:
            return highPrio(gesture: LongPressGesture())
        case .drag:
            return highPrio(gesture: DragGesture())
        case .magnification:
            return highPrio(gesture: MagnificationGesture())
        case .rotation:
            return highPrio(gesture: RotationGesture())
        }
    }
}

struct DismissingKeyboard: ViewModifier {
    var gestures: [Gestures] = Gestures.allCases

    dynamic func body(content: Content) -> some View {
        let action = {
            let forcing = true
            let keyWindow = UIApplication.shared.connectedScenes
                .filter({$0.activationState == .foregroundActive})
                .map({$0 as? UIWindowScene})
                .compactMap({$0})
                .first?.windows
                .filter({$0.isKeyWindow}).first
            keyWindow?.endEditing(forcing)
        }

        return gestures.reduce(AnyView(content)) { $1.apply(to: $0, perform: action) }
    }
}

extension View {
    dynamic func dismissKeyboard(on gestures: [Gestures] = Gestures.allCases) -> some View {
        return ModifiedContent(content: self, modifier: DismissingKeyboard(gestures: gestures))
    }
}
这种方法可以让你在间距中隐藏键盘!
首先添加此功能(鸣谢:来自SwiftUI can't tap in Spacer of HStack的Casper Zandbergen)
extension Spacer {
    public func onTapGesture(count: Int = 1, perform action: @escaping () -> Void) -> some View {
        ZStack {
            Color.black.opacity(0.001).onTapGesture(count: count, perform: action)
            self
        }
    }
}
接下来添加以下两个函数(感谢rraphael,他来自于这个问题)
extension UIApplication {
    func endEditing() {
        sendAction(#selector(UIResponder.resignFirstResponder), to: nil, from: nil, for: nil)
    }
}
private func endEditing() {
   UIApplication.shared.endEditing()
}
最后,你现在可以简单地调用...
Spacer().onTapGesture {
    self.endEditing()
}
现在,这将使得所有的空白区域都能够关闭键盘。不再需要一个大的白色背景视图了!
你可以假设地将这种扩展技术应用于任何需要支持TapGestures的控件,并与self.endEditing()组合调用onTapGesture函数,以在任何情况下关闭键盘。
一种更清晰的 SwiftUI 本地方式,可以通过轻触来关闭键盘,而不会阻塞任何复杂的表单等... 感谢 @user3441734 指出 GestureMask 是一种干净的方法。
监听 UIWindow.keyboardWillShowNotification / willHide
通过在根视图中设置 EnvironmentKey 来传递当前键盘状态
已在 iOS 14.5 下测试通过。
Form { }
    .dismissKeyboardOnTap()
// Root view
    .environment(\.keyboardIsShown, keyboardIsShown)
    .onDisappear { dismantleKeyboarMonitors() }
    .onAppear { setupKeyboardMonitors() }

// Monitors

    @State private var keyboardIsShown = false
    @State private var keyboardHideMonitor: AnyCancellable? = nil
    @State private var keyboardShownMonitor: AnyCancellable? = nil

    func setupKeyboardMonitors() {
        keyboardShownMonitor = NotificationCenter.default
            .publisher(for: UIWindow.keyboardWillShowNotification)
            .sink { _ in if !keyboardIsShown { keyboardIsShown = true } }

        keyboardHideMonitor = NotificationCenter.default
            .publisher(for: UIWindow.keyboardWillHideNotification)
            .sink { _ in if keyboardIsShown { keyboardIsShown = false } }
    }

    func dismantleKeyboarMonitors() {
        keyboardHideMonitor?.cancel()
        keyboardShownMonitor?.cancel()
    }
struct HideKeyboardGestureModifier: ViewModifier {
    @Environment(\.keyboardIsShown) var keyboardIsShown

    func body(content: Content) -> some View {
        content
            .gesture(TapGesture().onEnded {
                UIApplication.shared.resignCurrentResponder()
            }, including: keyboardIsShown ? .all : .none)
    }
}

extension UIApplication {
    func resignCurrentResponder() {
        sendAction(#selector(UIResponder.resignFirstResponder),
                   to: nil, from: nil, for: nil)
    }
}

extension View {

    /// Assigns a tap gesture that dismisses the first responder only when the keyboard is visible to the KeyboardIsShown EnvironmentKey
    func dismissKeyboardOnTap() -> some View {
        modifier(HideKeyboardGestureModifier())
    }

    /// Shortcut to close in a function call
    func resignCurrentResponder() {
        UIApplication.shared.resignCurrentResponder()
    }
}
extension EnvironmentValues {
    var keyboardIsShown: Bool {
        get { return self[KeyboardIsShownEVK] }
        set { self[KeyboardIsShownEVK] = newValue }
    }
}

private struct KeyboardIsShownEVK: EnvironmentKey {
    static let defaultValue: Bool = false
}
.onSubmit 和 @FocusState通过使用 .onSubmit 和 @FocusState,您可以在按下回车键时关闭键盘,或者选择另一个TextField来接收焦点:
struct ContentView: View {
  private enum Field: Int, CaseIterable {
    case username, password
  }

  @State private var username: String = ""
  @State private var password: String = ""

  @FocusState private var focusedField: Field?

  var body: some View {
    NavigationView {
      Form {
        TextField("Username", text: $username)
          .focused($focusedField, equals: .username)
        SecureField("Password", text: $password)
          .focused($focusedField, equals: .password)
      }
      .onSubmit {
        fieldInFocus = nil
      }
    }
  }
}
或者,如果您想使用.onSubmit将焦点带到不同的TextField:
  .onSubmit {
      } if fieldInFocus == .email {
        fieldInFocus = .password
      } else if fieldInFocus == .password {
        fieldInFocus = nil
      }
  }
import Combine
import SwiftUI

private class KeyboardListener: ObservableObject {
    @Published var keyabordIsShowing: Bool = false
    var cancellable = Set<AnyCancellable>()

    init() {
        NotificationCenter.default
            .publisher(for: UIResponder.keyboardWillShowNotification)
            .sink { [weak self ] _ in
                self?.keyabordIsShowing = true
            }
            .store(in: &cancellable)

       NotificationCenter.default
            .publisher(for: UIResponder.keyboardWillHideNotification)
            .sink { [weak self ] _ in
                self?.keyabordIsShowing = false
            }
            .store(in: &cancellable)
    }
}

private struct DismissingKeyboard: ViewModifier {
    @ObservedObject var keyboardListener = KeyboardListener()

    fileprivate func body(content: Content) -> some View {
        ZStack {
            content
            Rectangle()
                .background(Color.clear)
                .opacity(keyboardListener.keyabordIsShowing ? 0.01 : 0)
                .frame(width: UIScreen.main.bounds.width, height: UIScreen.main.bounds.height)
                .onTapGesture {
                    let keyWindow = UIApplication.shared.connectedScenes
                        .filter({ $0.activationState == .foregroundActive })
                        .map({ $0 as? UIWindowScene })
                        .compactMap({ $0 })
                        .first?.windows
                        .filter({ $0.isKeyWindow }).first
                    keyWindow?.endEditing(true)
                }
        }
    }
}

extension View {
    func dismissingKeyboard() -> some View {
        ModifiedContent(content: self, modifier: DismissingKeyboard())
    }
}
使用方法:
 var body: some View {
        NavigationView {
            Form {
                picker
                button
                textfield
                text
            }
            .dismissingKeyboard()
extension UIView{

 override open func touchesBegan(_ touches: Set<UITouch>, with event: UIEvent?) {
     UIApplication.shared.sendAction(#selector(UIResponder.resignFirstResponder), to: nil, from: nil, for: nil)

  }
}
iOS 13+
iOS13+的一个简单技巧是为每个文本字段设置一个“禁用”状态变量。显然不是理想的解决方案,但在某些情况下可能会完成任务。
一旦您设置了disabled = True,那么所有链接的响应者都会自动辞职。
@State var isEditing: Bool
@State var text: String
....
TextField("Text", text: self.$text).disabled(!self.isEditing)