如何在全屏显示片段?

4

如果我使用父布局作为容器……片段不可见, 如果我使用子布局作为容器……它会在wrap_content中显示片段,而不是全屏幕……即使我的片段布局高度是match_parent
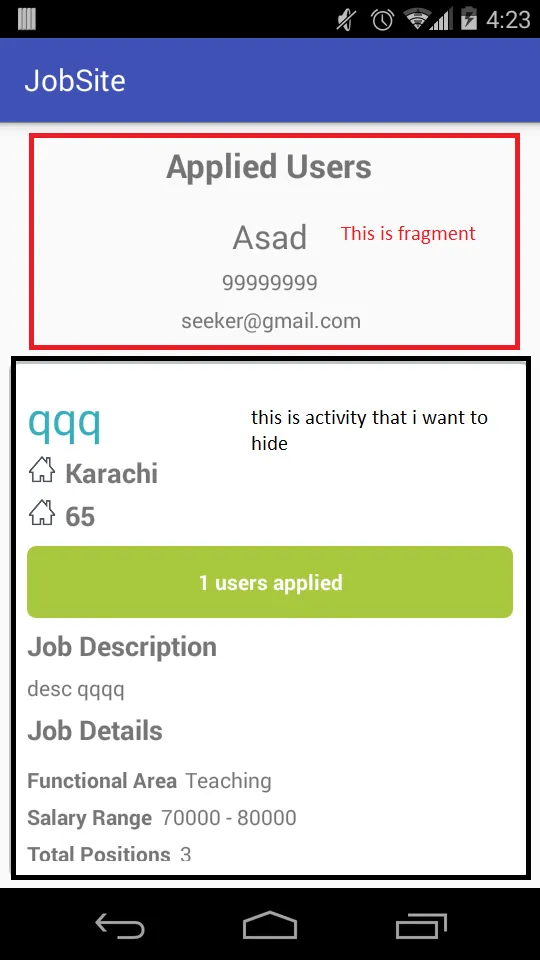
enter image description here

如何将片段全屏打开?

<LinearLayout xmlns:android="http://schemas.android.com/apk/res/android"
    android:layout_width="match_parent"
    android:layout_height="match_parent"
    android:orientation="vertical"
    android:id="@+id/container">  <!-- this id identifies fragment container -->

    <LinearLayout
        style="@style/innerContainer"
        android:layout_margin="6dp"
        android:background="@drawable/container">

    </LinearLayout>

</LinearLayout>

片段布局

<LinearLayout xmlns:android="http://schemas.android.com/apk/res/android"
    xmlns:tools="http://schemas.android.com/tools"
    android:layout_width="match_parent"
    android:layout_height="match_parent"
    android:orientation="vertical"
    tools:context="com.example.thevisionspark.jobsite.AppliedUsers">

    <LinearLayout
        style="@style/innerContainer">

        <TextView
            style="@style/headings"
            android:text="Applied Users"
            android:layout_gravity="center_horizontal"/>


    </LinearLayout>


</LinearLayout>

碎片加载代码
FragmentTransaction fm = getSupportFragmentManager().beginTransaction();
                    AppliedUsers frag = new AppliedUsers();
                    frag.setArguments(bundle);

                    if(getSupportFragmentManager().getFragments() == null)
                        fm.add(R.id.container, frag).commit();

                    else fm.replace(R.id.container, frag).commit();

你能添加一张屏幕截图吗? - yanivtwin
还有,@style/innerContainer是什么? - yanivtwin
@style/innerContainer 这只是一个样式,它设置了与父容器高度和宽度相匹配的填充。 - Asad
好的,你能添加一张结果的截图吗?没有截图很难猜测。 - yanivtwin
3个回答

1
您可以使用按钮来启动片段,在该按钮的单击侦听器中将活动窗口小部件的可见性设置为GONE,如下所示。
yourButton.setOnClickListener(new View.OnClickListener() {
        @Override
        public void onClick(View v) {
            yourWidget.setVisibility(View.GONE);
            anotherWidget.setVisibility(View.GONE);


            Fragment yourFragment = new YourFragment();
            FragmentManager fragmentManager = getFragmentManager();

            FragmentTransaction fragmentTransaction = fragmentManager.beginTransaction();
            fragmentTransaction.add(R.id.your_activity_layout, YourFragment);
            fragmentTransaction.addToBackStack(null);
            fragmentTransaction.commit();
        }
    });

现在,在回调接口中创建一个抽象方法。
public interface MakeVisible {

void makeVisible();
}

现在在您的活动内部。
public class Activity extends FragmentActivity implements MakeVisible{
@Override
public void makeVisible() {
   yourWidget.setVisibility(View.VISIBLE);
    anotherWidget.setVisibility(View.VISIBLE);


}

最后在你的片段中执行此操作。
@Override
public void onDetach() {
    MakeVisible makeVisible = (MakeVisible) getActivity();
    makeVisible.makeVisible();
    super.onDetach();
}

0

跟着它走 -

<LinearLayout
    android:layout_width="match_parent"
    android:layout_height="wrap_content"
    android:orientation="vertical">

        <include
            layout="@layout/layout_toolbar"
            android:layout_width="match_parent"
            android:layout_height="wrap_content"/>

    <android.support.v4.widget.NestedScrollView
        android:layout_width="match_parent"
        android:layout_height="match_parent">

        <FrameLayout
            android:id="@+id/flMain"
            android:layout_width="match_parent"
            android:layout_height="match_parent">
        </FrameLayout>

    </android.support.v4.widget.NestedScrollView>

</LinearLayout>

这是主要的布局。在这里,id为flMainFrameLayout是片段的容器。以下代码是片段的代码 -

public class CustomFragment  extends Fragment {

    @Override
    public void onCreate(Bundle savedInstanceState) {
        super.onCreate(savedInstanceState);
    }

    @Nullable
    @Override
    public View onCreateView(LayoutInflater inflater, ViewGroup container, Bundle savedInstanceState) {
        super.onCreateView(inflater, container, savedInstanceState);

        View customeFragment = inflater.inflate(R.layout.layout_fragment, container, false);


        return customeFragment;
    }
}

以下代码是关于 FragmentTransaction 的。

CustomeFragment customeFragment = new CustomeFragment();
getFragmentManager().beginTransaction()  .replace(R.id.flMain, customeFragment).addToBackStack(null).commit();

如果你遇到任何问题,请在这里留下评论。

我添加了屏幕截图,请您检查。 - Asad
请提供容器布局的完整代码。我指的是您附加为截图的主屏幕。 - AGM Tazim
你不能在同一个活动中同时使用Activity和Fragment。Fragment可以作为活动的子活动使用。您可以在一个活动中使用两个片段。因此,请将您在屏幕截图上标记为活动的片段转换为片段,或者使用CardView。 - AGM Tazim

0
将您的活动设置为FrameLayout
第一个子项将保持与您想要隐藏的布局相同,
第二个子项将是这样的:
<LinearLayout xmlns:android="http://schemas.android.com/apk/res/android"
    android:layout_width="match_parent"
    android:layout_height="match_parent"
    android:orientation="vertical"
    android:id="@+id/container">  <!-- this id identifies fragment container -->
</LinearLayout>

内部元素 (带有"@ drawable/container"背景) 应该被放置到碎片中,

试一下。


网页内容由stack overflow 提供, 点击上面的
可以查看英文原文,
原文链接