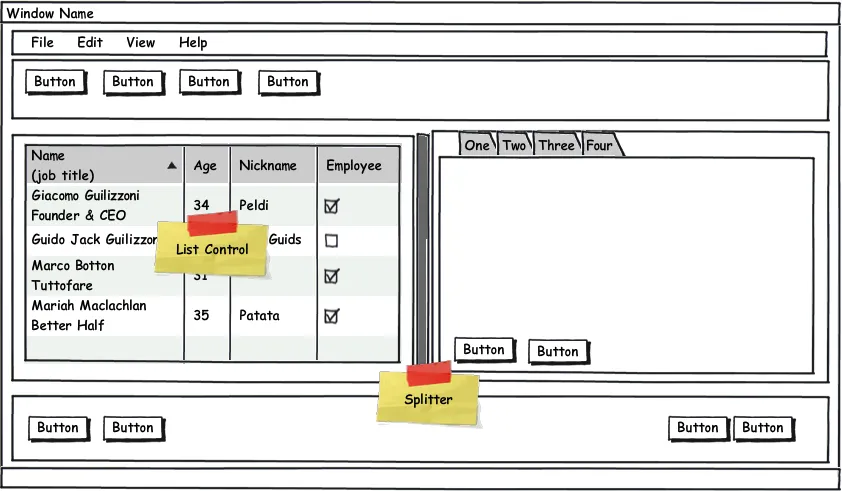
我在使用wxPython中的sizers布局表单方面遇到了一些挑战,如果有人能为我提供一个在图像中展示的布局方案,我将不胜感激。
请分享相关资源。
谢谢。
1) Add a Frame widget, select a wx.Frame.

2) Customize wx.Frame properties:
     Give the Frame a MenuBar (the property dialog for the menubar appears).
     Customize MenuBar: Add File, Edit...
     Go back to the Frame properties' View (click the Frame icon on the wxglade Tree View).
     (not nice but it's the way I found to go in and out from Menu and StatusBar dialogs).
     Give the wx.Frame a StatusBar. Go back (click the Frame icon in the wxglade Tree View).

3) Create 3 vertical slots from the default BoxSizer (right-click on the sizer + add * 3)
      1st slot:
          Add a BoxSizer with 5 horizontal slots
          Set proportion=0 to the sizer, set border=5 and mark wxALL
          Add 4 Buttons and a Spacer in those slots
          Mark EXPAND and set proportion=1 in the Spacer properties.

      2nd slot:
          Add a SplitterWindow. Select Vertical type.
          Optionally set border=5 with wxALL
          Add a BoxSizer to each section of the SplitterWindow
          At its left, add a ListCtrl
          At its right, add a NoteBook
          Customize NoteBook:
              Add 4 sheets.
              Add BoxSizer with 2 vertical slots to first notebook sheet.
                  1st slot: insert a wx.Panel.
                  2nd slot: add a BoxSizer with 3 horizontal slots.
                      Set proportion=0 to the sizer.
                      Add 2 buttons and 1 Spacer in those slots.
                      Mark EXPAND and set proportion=1 in the Spacer properties.

      3rd slot:
          Add a BoxSizer with 5 horizontal slots.
          Set proportion=0 to the sizer, set border=5 with wxALL
          Add 2 Buttons, 1 Spacer and 2 Buttons more.
          Mark EXPAND and set proportion=1 in the Spacer properties.

4) Give background colour to the Frame.
  (Choose wisely, you still have 5 minutes left of the 15 allotted).
最后一点注意事项:根据我的经验,在Linux和Windows中使用sizers和背景有一些差异。在Linux中,不要像步骤3中所示使用默认Frame的BoxSizer。相反,在其上添加wx.Panel,为该Panel添加BoxSizer,并继续从此sizer构建。
出于好奇,我决定手工编写类似的东西需要多长时间。大约花了我35分钟左右。我跳过了菜单栏。哦,无妨。以下是代码:
import wx

########################################################################
class TabPanel(wx.Panel):
    """"""

    #----------------------------------------------------------------------
    def __init__(self, parent):
        """Constructor"""
        wx.Panel.__init__(self, parent)

        btnOne = wx.Button(self, label="button_10")
        btnTwo = wx.Button(self, label="button_11")

        sizer = wx.BoxSizer(wx.HORIZONTAL)
        sizer.Add(btnOne, 0, wx.ALIGN_BOTTOM)
        sizer.Add(btnTwo, 0, wx.ALIGN_BOTTOM)
        self.SetSizer(sizer)

########################################################################
class LeftPanel(wx.Panel):
    """"""

    #----------------------------------------------------------------------
    def __init__(self, parent):
        """Constructor"""
        wx.Panel.__init__(self, parent)
        self.list_ctrl = wx.ListCtrl(self, size=(-1,100),
                         style=wx.LC_REPORT
                         |wx.BORDER_SUNKEN
                         )
        self.list_ctrl.InsertColumn(0, 'Subject')
        self.list_ctrl.InsertColumn(1, 'Due')
        self.list_ctrl.InsertColumn(2, 'Location', width=125)

        sizer = wx.BoxSizer(wx.VERTICAL)
        sizer.Add(self.list_ctrl, 1, wx.EXPAND)
        self.SetSizer(sizer)

########################################################################
class RightPanel(wx.Panel):
    """"""

    #----------------------------------------------------------------------
    def __init__(self, parent):
        """Constructor"""
        wx.Panel.__init__(self, parent)

        notebook = wx.Notebook(self)
        page1 = TabPanel(notebook)
        page2 = TabPanel(notebook)
        page3 = TabPanel(notebook)

        notebook.AddPage(page1, "Page_1")
        notebook.AddPage(page2, "Page_2")
        notebook.AddPage(page3, "Page_3")

        sizer = wx.BoxSizer(wx.VERTICAL)
        sizer.Add(notebook, 1, wx.EXPAND)
        self.SetSizer(sizer)

########################################################################
class MainPanel(wx.Panel):
    """"""

    #----------------------------------------------------------------------
    def __init__(self, parent):
        """Constructor"""
        wx.Panel.__init__(self, parent)

        mainSizer = wx.BoxSizer(wx.VERTICAL)
        btnSizer = wx.BoxSizer(wx.HORIZONTAL)

        # create row of buttons
        for i in range(4):
            btn = wx.Button(self, label="button_%s" % i)
            btnSizer.Add(btn, 0, wx.ALL, 5)
        mainSizer.Add(btnSizer)

        # create splitter
        splitter = wx.SplitterWindow(self)
        leftPanel = LeftPanel(splitter)
        rightPanel = RightPanel(splitter)
        splitter.SplitVertically(leftPanel, rightPanel)
        mainSizer.Add(splitter, 1, wx.EXPAND)

        # add second row of buttons
        btnSizer2 = wx.BoxSizer(wx.HORIZONTAL)
        btn5 = wx.Button(self, label="button_5")
        btn6 = wx.Button(self, label="button_6")
        btn7 = wx.Button(self, label="button_7")
        btn8 = wx.Button(self, label="button_8")
        btnSizer2.Add(btn5)
        btnSizer2.Add(btn6)
        btnSizer2.Add((1,1), 1, wx.EXPAND)
        btnSizer2.Add(btn7)
        btnSizer2.Add(btn8)
        mainSizer.Add(btnSizer2)

        self.SetSizer(mainSizer)


########################################################################
class MainFrame(wx.Frame):
    """"""

    #----------------------------------------------------------------------
    def __init__(self):
        """Constructor"""
        wx.Frame.__init__(self, None, title="Sample", size=(600,800))
        panel = MainPanel(self)
        statusbar = self.CreateStatusBar()
        statusbar.SetStatusText("Test")
        self.Show()

if __name__ == "__main__":
    app = wx.App(False)
    frame = MainFrame()
    app.MainLoop()