因为我不使用故事板来创建我的视图,所以我想知道是否可以在编程上或其他方式中使用“使用安全区域指南”选项。
我尝试将我的视图锚定到
view.safeAreaLayoutGuide
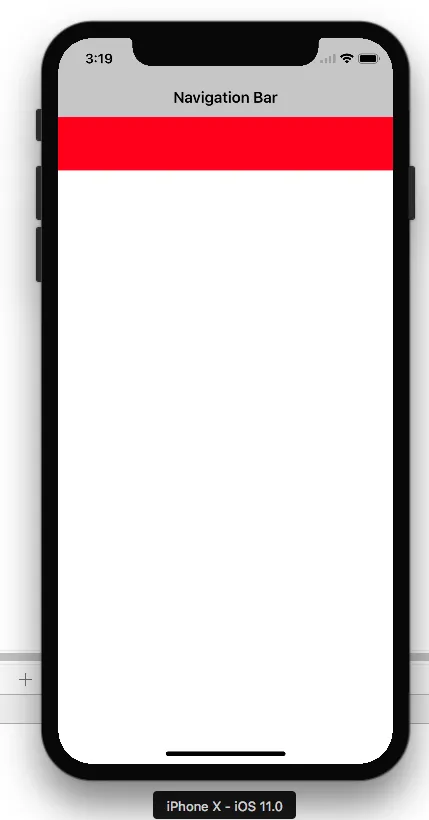
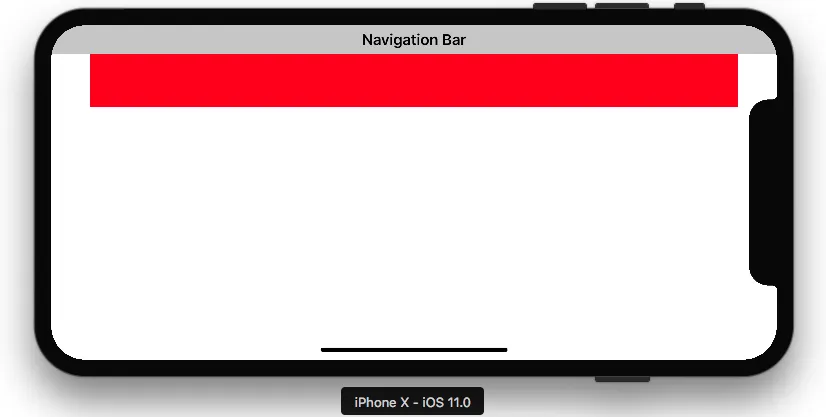
但它们仍然会重叠在iPhone X模拟器的顶部缺口上。
因为我不使用故事板来创建我的视图,所以我想知道是否可以在编程上或其他方式中使用“使用安全区域指南”选项。
我尝试将我的视图锚定到
view.safeAreaLayoutGuide
但它们仍然会重叠在iPhone X模拟器的顶部缺口上。
这里是示例代码(来自:安全区域布局指南):
如果您使用代码创建约束,请使用UIView的safeAreaLayoutGuide属性获取相关的布局锚点。让我们在代码中重新创建上面的Interface Builder示例,以查看它的外观:
假设我们将绿色视图作为视图控制器中的属性:
private let greenView = UIView()
我们可能会有一个函数在viewDidLoad中被调用,用于设置视图和约束:
private func setupView() {
  greenView.translatesAutoresizingMaskIntoConstraints = false
  greenView.backgroundColor = .green
  view.addSubview(greenView)
}
像往常一样,使用根视图的layoutMarginsGuide创建前导和尾随边距约束:
 let margins = view.layoutMarginsGuide
 NSLayoutConstraint.activate([
    greenView.leadingAnchor.constraint(equalTo: margins.leadingAnchor),
    greenView.trailingAnchor.constraint(equalTo: margins.trailingAnchor)
 ])
现在,除非你的目标是iOS 11及更高版本,否则你需要使用 #available 包装安全区域布局指南约束,并在早期版本的iOS中退回到顶部和底部布局指南:
if #available(iOS 11, *) {
  let guide = view.safeAreaLayoutGuide
  NSLayoutConstraint.activate([
   greenView.topAnchor.constraintEqualToSystemSpacingBelow(guide.topAnchor, multiplier: 1.0),
   guide.bottomAnchor.constraintEqualToSystemSpacingBelow(greenView.bottomAnchor, multiplier: 1.0)
   ])
} else {
   let standardSpacing: CGFloat = 8.0
   NSLayoutConstraint.activate([
   greenView.topAnchor.constraint(equalTo: topLayoutGuide.bottomAnchor, constant: standardSpacing),
   bottomLayoutGuide.topAnchor.constraint(equalTo: greenView.bottomAnchor, constant: standardSpacing)
   ])
}
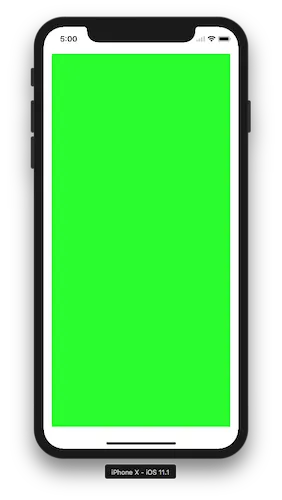
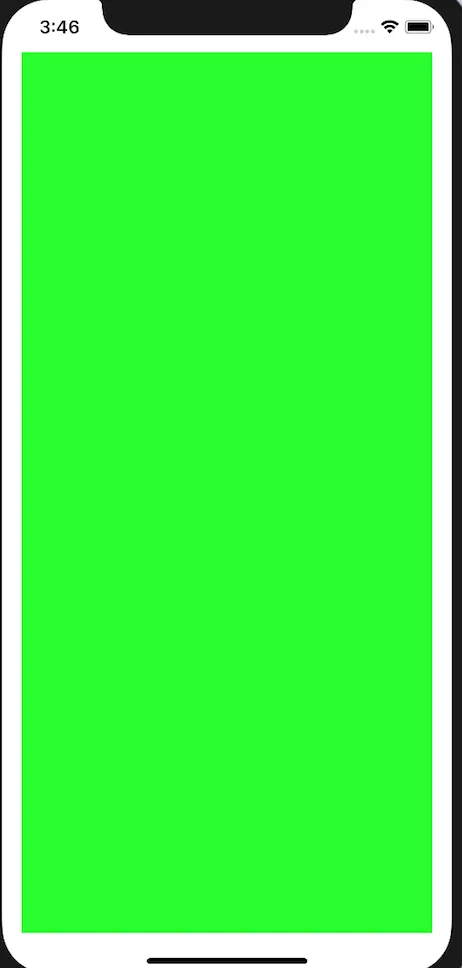
结果:
这是苹果开发者官方文档,介绍了关于安全区域布局指南
安全区域用于处理iPhone X的用户界面设计。以下是基本指南,说明如何使用安全区域布局进行iPhone-X用户界面设计。
实际上我正在使用一个扩展程序并控制它是否为iOS 11。
extension UIView {

  var safeTopAnchor: NSLayoutYAxisAnchor {
    if #available(iOS 11.0, *) {
      return safeAreaLayoutGuide.topAnchor
    }
    return topAnchor
  }

  var safeLeftAnchor: NSLayoutXAxisAnchor {
    if #available(iOS 11.0, *){
      return safeAreaLayoutGuide.leftAnchor
    }
    return leftAnchor
  }

  var safeRightAnchor: NSLayoutXAxisAnchor {
    if #available(iOS 11.0, *){
      return safeAreaLayoutGuide.rightAnchor
    }
    return rightAnchor
  }

  var safeBottomAnchor: NSLayoutYAxisAnchor {
    if #available(iOS 11.0, *) {
      return safeAreaLayoutGuide.bottomAnchor
    }
    return bottomAnchor
  }
}
self.safeAreaLayoutGuide 而不是 self.layoutMarginsGuide。在此答案中使用的安全区域指南对我来说可以正确地保持在安全区域内!我建议更改的一件事是使用 leadingAnchor 和 trailingAnchor 而不是 leftAnchor 和 rightAnchor。太棒了! - sudoExclaimationExclaimationSafeAreaLayoutGuide是UIView的属性。
safeAreaLayoutGuide的顶部指示视图的未遮挡的上边缘(例如,如果存在状态栏或导航栏,则不在其后面)。其他边缘同理。
使用safeAreaLayoutGuide可以避免我们的对象从圆角、导航栏、选项卡栏、工具栏和其他祖先视图中裁剪/重叠。
我们可以创建safeAreaLayoutGuide对象并设置相应的约束。
纵向和横向的约束如下:
        self.edgesForExtendedLayout = []//Optional our as per your view ladder

        let newView = UIView()
        newView.backgroundColor = .red
        self.view.addSubview(newView)
        newView.translatesAutoresizingMaskIntoConstraints = false
        if #available(iOS 11.0, *) {
            let guide = self.view.safeAreaLayoutGuide
            newView.trailingAnchor.constraint(equalTo: guide.trailingAnchor).isActive = true
            newView.leadingAnchor.constraint(equalTo: guide.leadingAnchor).isActive = true
            newView.topAnchor.constraint(equalTo: guide.topAnchor).isActive = true
            newView.heightAnchor.constraint(equalToConstant: 100).isActive = true

        }
        else {
            NSLayoutConstraint(item: newView, attribute: .top, relatedBy: .equal, toItem: view, attribute: .top, multiplier: 1.0, constant: 0).isActive = true
            NSLayoutConstraint(item: newView, attribute: .leading, relatedBy: .equal, toItem: view, attribute: .leading, multiplier: 1.0, constant: 0).isActive = true
            NSLayoutConstraint(item: newView, attribute: .trailing, relatedBy: .equal, toItem: view, attribute: .trailing, multiplier: 1.0, constant: 0).isActive = true

            newView.heightAnchor.constraint(equalToConstant: 100).isActive = true
        }
viewDidAppear 中设置约束条件。viewDidAppear 会被多次调用,因此每次调用时都会复制你的约束条件。请注意避免这种情况。 - Yevhen Dubinin如果你们像我一样使用SnapKit,那么解决方案就是将你的约束锚定到view.safeAreaLayoutGuide,像这样:
yourView.snp.makeConstraints { (make) in
    if #available(iOS 11.0, *) {
        //Bottom guide
        make.bottom.equalTo(view.safeAreaLayoutGuide.snp.bottomMargin)
        //Top guide
        make.top.equalTo(view.safeAreaLayoutGuide.snp.topMargin)
        //Leading guide
        make.leading.equalTo(view.safeAreaLayoutGuide.snp.leadingMargin)
        //Trailing guide
        make.trailing.equalTo(view.safeAreaLayoutGuide.snp.trailingMargin)

     } else {
        make.edges.equalToSuperview()
     }
}
我使用这个方法来替代在layoutMarginsGuide上添加前导和尾随边距限制:
UILayoutGuide *safe = self.view.safeAreaLayoutGuide;
yourView.translatesAutoresizingMaskIntoConstraints = NO;
[NSLayoutConstraint activateConstraints:@[
                                           [safe.trailingAnchor constraintEqualToAnchor:yourView.trailingAnchor],
                                           [yourView.leadingAnchor constraintEqualToAnchor:safe.leadingAnchor],
                                           [yourView.topAnchor constraintEqualToAnchor:safe.topAnchor],
                                           [safe.bottomAnchor constraintEqualToAnchor:yourView.bottomAnchor]
                                          ]];
Swift 4.2 和 5.0。 假设您想要在 视图Bg 上添加前导,尾随,顶部和底部约束。因此,您可以使用以下代码。
let guide = self.view.safeAreaLayoutGuide
viewBg.trailingAnchor.constraint(equalTo: guide.trailingAnchor).isActive = true
viewBg.leadingAnchor.constraint(equalTo: guide.leadingAnchor).isActive = true
viewBg.topAnchor.constraint(equalTo: guide.topAnchor).isActive = true
viewBg.bottomAnchor.constraint(equalTo: guide.bottomAnchor).isActive = true
使用UIWindow或UIView的safeAreaInsets属性,其中包括.bottom、.top、.left和.right参数。
// #available(iOS 11.0, *)
// height - UIApplication.shared.keyWindow!.safeAreaInsets.bottom

// On iPhoneX
// UIApplication.shared.keyWindow!.safeAreaInsets.top =  44
// UIApplication.shared.keyWindow!.safeAreaInsets.bottom = 34

// Other devices
// UIApplication.shared.keyWindow!.safeAreaInsets.top =  0
// UIApplication.shared.keyWindow!.safeAreaInsets.bottom = 0

// example
let window = UIApplication.shared.keyWindow!
let viewWidth = window.frame.size.width
let viewHeight = window.frame.size.height - window.safeAreaInsets.bottom
let viewFrame = CGRect(x: 0, y: 0, width: viewWidth, height: viewHeight)
let aView = UIView(frame: viewFrame)
aView.backgroundColor = .red
view.addSubview(aView)
aView.autoresizingMask = [.flexibleWidth, .flexibleHeight]
class ViewController: UIViewController {

    var greenView = UIView()

    override func viewDidLoad() {
        super.viewDidLoad()
        greenView.backgroundColor = .green
        view.addSubview(greenView)
    }
    override func viewWillLayoutSubviews() {
        super.viewWillLayoutSubviews()

        greenView.translatesAutoresizingMaskIntoConstraints = false
        let views : [String:Any] = ["greenView":greenView]
        view.addConstraints(NSLayoutConstraint.constraints(withVisualFormat: "H:|-[greenView]-|", options: [], metrics: nil, views: views))
        view.addConstraints(NSLayoutConstraint.constraints(withVisualFormat: "V:|-[greenView]-|", options: [], metrics: nil, views: views))
    }
}
Objective-C 的安全区域扩展
@implementation UIView (SafeArea)

- (NSLayoutAnchor *)safeTopAnchor{

    if (@available(iOS 11.0, *)){
        return self.safeAreaLayoutGuide.topAnchor;
    } else {
        return self.topAnchor;
    }

}


- (NSLayoutAnchor *)safeBottomAnchor{

    if (@available(iOS 11.0, *)) {
        return self.safeAreaLayoutGuide.bottomAnchor;
    } else {
        return self.bottomAnchor;
    }

}

@end
这个扩展可以帮助您将UIVIew限制在其父视图和父视图+安全区域内:
extension UIView {

    ///Constraints a view to its superview
    func constraintToSuperView() {
        guard let superview = superview else { return }
        translatesAutoresizingMaskIntoConstraints = false

        topAnchor.constraint(equalTo: superview.topAnchor).isActive = true
        leftAnchor.constraint(equalTo: superview.leftAnchor).isActive = true
        bottomAnchor.constraint(equalTo: superview.bottomAnchor).isActive = true
        rightAnchor.constraint(equalTo: superview.rightAnchor).isActive = true
    }

    ///Constraints a view to its superview safe area
    func constraintToSafeArea() {
        guard let superview = superview else { return }
        translatesAutoresizingMaskIntoConstraints = false

        topAnchor.constraint(equalTo: superview.safeAreaLayoutGuide.topAnchor).isActive = true
        leftAnchor.constraint(equalTo: superview.safeAreaLayoutGuide.leftAnchor).isActive = true
        bottomAnchor.constraint(equalTo: superview.safeAreaLayoutGuide.bottomAnchor).isActive = true
        rightAnchor.constraint(equalTo: superview.safeAreaLayoutGuide.rightAnchor).isActive = true
    }

}
view.safeAreaInsets怎么样?你试过了吗? - Karthikeyan Bose