我是一个SwiftUI的新手,仍然不理解如何在列表的顶部制作粘性栏。就像在Apple Music应用程序中列出艺术家或歌曲时的字母一样(请查看示例)。
我探索了List和NavigationView的功能,但没有找到解决方法。
LazyVStack 提供了一个具有 pinnedView 参数的初始化器,正是做到了这一点。
在LazyVStack初始化器中使用pinnedViews。
LazyVStack(pinnedViews: [.sectionHeaders]) {
    Section(header: Text("Sticky Header")) {
        ForEach(0...3) { item in
            Text(item)
        }
    }
}
.listStyle(PlainListStyle()),并在iOS 13+上使用Section。 struct ContentView: View {
var content = MyData()
var body: some View {
List {
ForEach(content.sections, id: \.title) { section in
Section(content: {
ForEach(section.rows, id: \.self) { row in
Text(row)
}
}, header: {
Text(section.title)
})
}
}
.listStyle(PlainListStyle())
}
}
给定:
struct MyData {
  struct Section {
    var title: String
    var rows: [String]
  }

  var sections: [Section] = []
}
SwiftUI的列表视图内置支持分区和分区头,就像UIKit中的UITableView一样。要在某些单元格周围添加一个分区,请先将Section放在它周围。
我们想做的是创建一个具有两个部分的列表视图:一个用于重要任务,另一个用于不太重要的任务。下面是实现方式:
struct ContentView: View {
    var body: some View {
        List {
            Section(header: Text("Important tasks")) {
                TaskRow()
                TaskRow()
                TaskRow()
            }

            Section(header: Text("Other tasks")) {
                TaskRow()
                TaskRow()
                TaskRow()
            }
        }
    }
}
    struct LatestMagazineView: View {
    @Environment(\.dismiss) var dismiss
    let columns = [GridItem(.flexible()),GridItem(.flexible())]
    @State  var searchText: String = ""
    var body: some View {

        ZStack {
            VStack(spacing:0) {
                Color.orange.ignoresSafeArea().frame(height: 25)
                ScrollView{
                    VStack(spacing: 0){

                        AsyncImage(url: URL(string: "")){img in
                            img.resizable().frame(height: 225)

                        }placeholder: {
                            Image("Anoop").resizable().frame(height: 225)
                        }
                        Image("soft").resizable().frame(width: UIScreen.main.bounds.width, height: 65, alignment: .leading)


                        LazyVGrid(columns: columns, spacing: 10, pinnedViews: [.sectionHeaders]){
                            Section(header:
                                        VStack{
                                TextField("Enter Search Text...", text: $searchText).font(.title)

                                    .padding(4)
                                    .padding(.leading,searchText.isEmpty ? 29 : 4)

                                    .foregroundColor(.white)

                                    .cornerRadius(8)
                                    .overlay(
                                        RoundedRectangle(cornerRadius: 22)
                                            .stroke(Color.white, lineWidth: 2)
                                    )}.padding(6).background(Color.yellow)
                            ) {
                                ForEach(0..<21){_ in
                                    VStack(alignment: .leading){
                                        AsyncImage(url: URL(string: "")){ img in
                                            img .resizable()
                                                .frame(height: 255)
                                        }placeholder: {
                                            Image("soft")
                                                .resizable()
                                                .frame(height: 255)
                                        }
                                    }.padding(8).background(Color.white).cornerRadius(4).shadow(radius: 1)
                                }
                            }
                        }
                    }
                }
            }
        }
    }
}
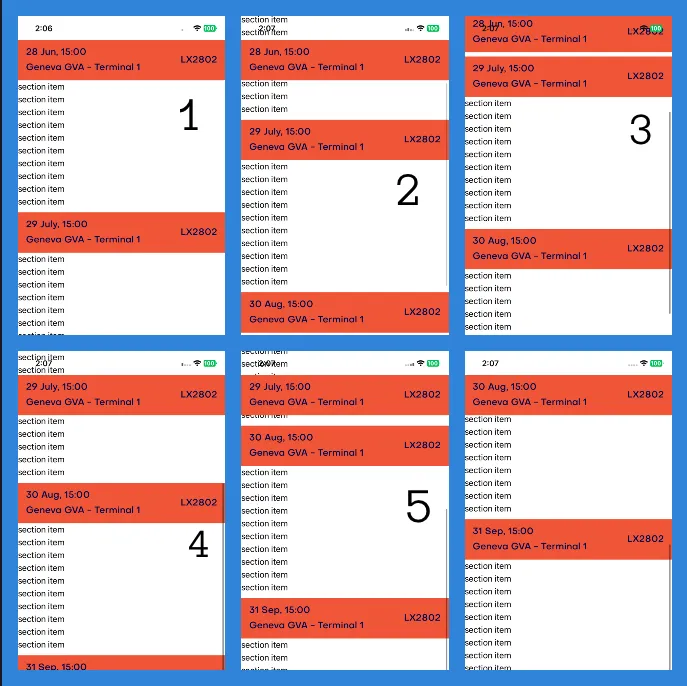
SwiftUI 如何使粘性标题视图或标题保持在列表中每个部分/单元格的顶部。
步骤:
1- 添加滚动视图
2- 在滚动视图中使用 forEach
3- 在 forEach 中使用 LazyVStack,并将 pinnedView 添加为 LazyVStack 中的部分标题
4- 在 LazyVStack 中使用带有标题的 Section
示例代码:
@State var headerTitleArray = ["28 Jun, 15:00","29 July, 15:00","30 Aug, 15:00","31 Sep, 15:00","1 Oct, 15:00"]
ScrollView {
    ForEach(0..<headerTitleArray.count, id: \.self) { listIndex in

        LazyVStack(alignment: .leading, spacing: 0, pinnedViews: [.sectionHeaders]) {

            Section {
                ForEach(0..<10, id: \.self) { landmark in
                //MARK: - Items in per section
                    Text("section items")
                }

            } header: {

                //MARK: - Seaction header title

                Text("\(headerTitleArray(listIndex))")
                .font(AppFont(size: 18,type: "Medium"))
                .foregroundColor(AppColors.labelColor)
                .padding(.vertical,12)
                .padding(.horizontal,16)
        }
    }
}//foreach } //scrollView