尝试填充中心区域,不确定哪里出了问题。
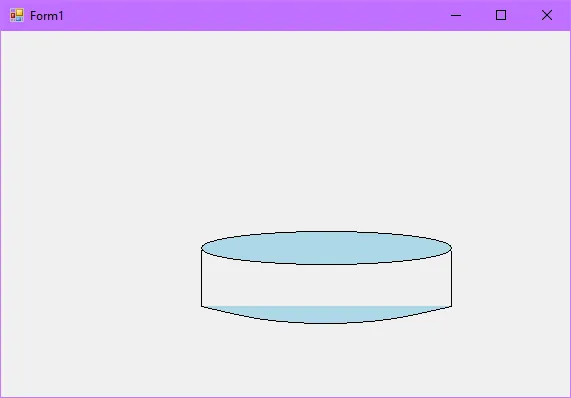
Imports System.Drawing.Drawing2D

Public Class Form1
    Private Sub Form1_Load(sender As Object, e As EventArgs) Handles MyBase.Load

    End Sub

    Private Sub Form1_Paint(sender As System.Object, e As System.Windows.Forms.PaintEventArgs) Handles MyBase.Paint
        Dim gp As GraphicsPath = CreatePath(New Rectangle(New Point(200, 200), New Size(250, 100)))
        e.Graphics.FillPath(New SolidBrush(Color.LightBlue), gp)
        e.Graphics.DrawPath(New Pen(Color.Black), gp)

    End Sub

    Private Function CreatePath(ByVal area As Rectangle) As GraphicsPath

        Dim gp As New GraphicsPath()
        Dim rect As Rectangle = New Rectangle(area.Location, New Size(area.Width, area.Height \ 3))
        gp.AddEllipse(rect)

        Dim hadj As Integer = area.Height \ 4
        gp.AddLine(New Point(area.X, area.Y + area.Height - hadj), New Point(area.X, area.Y + (rect.Height \ 3) + 8))

        Dim gh As Integer = area.Width \ 4
        Dim pts(4) As PointF
        pts(0) = New PointF(area.X, area.Y + area.Height - hadj)
        pts(1) = New Point(area.X + gh, area.Y + area.Height - (hadj \ 2))
        pts(2) = New Point(area.X + gh * 2, area.Y + area.Height - (hadj \ 3))
        pts(3) = New Point(area.X + gh * 3, area.Y + area.Height - (hadj \ 2))
        pts(4) = New Point(area.X + area.Width, area.Y + area.Height - hadj)
        gp.AddCurve(pts)

        gp.AddLine(New PointF(area.X + area.Width, area.Y + (rect.Height \ 3) + 9), New PointF(area.X + area.Width, area.Y + area.Height - hadj))
        Return gp
    End Function
End Class
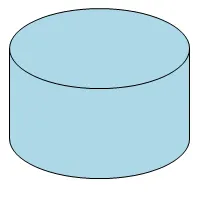
e.Graphics.SmoothingMode = SmoothingMode.AntiAlias:) - JimiupperRect和lowerRect矩形,就是为了这个目的。然后,CylinderMiddleRect方法计算两个矩形之间的距离。这个距离用于构建内部矩形,其边提供连接线。因此,是的,您可以使用任何大小的两个矩形(有意义的)。在这里,upperRect和lowerRect之间的差异仅在于Y位置。 - JimiY距离决定了圆柱体的形状,而矩形的高度提供了透视。 - Jimi