我目前正在尝试将这个浅景深着色器与GPUImage一起使用:http://blenderartists.org/forum/showthread.php?237488-GLSL-depth-of-field-with-bokeh-v2-4-(update)
目前我得到的是这样的:
这是我的bokeh滤镜,它是GPUImageTwoInputFilter的一个子类:
最后,这就是我使用该过滤器的方式:
precision mediump float;

varying highp vec2 textureCoordinate;
varying highp vec2 textureCoordinate2;
uniform sampler2D inputImageTexture;
uniform sampler2D inputImageTexture2;
uniform float inputImageTextureWidth;
uniform float inputImageTextureHeight;

#define PI 3.14159265

float width = inputImageTextureWidth; //texture width
float height = inputImageTextureHeight; //texture height

vec2 texel = vec2(1.0/width,1.0/height);

//uniform variables from external script

uniform float focalDepth;  //focal distance value in meters, but you may use autofocus option below
uniform float focalLength; //focal length in mm
uniform float fstop; //f-stop value
bool showFocus = false; //show debug focus point and focal range (red = focal point, green = focal range)

float znear = 0.1; //camera clipping start
float zfar = 5.0; //camera clipping end

//------------------------------------------
//user variables

int samples = 3; //samples on the first ring
int rings = 3; //ring count

bool manualdof = false; //manual dof calculation
float ndofstart = 1.0; //near dof blur start
float ndofdist = 2.0; //near dof blur falloff distance
float fdofstart = 1.0; //far dof blur start
float fdofdist = 3.0; //far dof blur falloff distance

float CoC = 0.03;//circle of confusion size in mm (35mm film = 0.03mm)

bool vignetting = false; //use optical lens vignetting?
float vignout = 1.3; //vignetting outer border
float vignin = 0.0; //vignetting inner border
float vignfade = 22.0; //f-stops till vignete fades

bool autofocus = false; //use autofocus in shader? disable if you use external focalDepth value
vec2 focus = vec2(0.5, 0.5); // autofocus point on screen (0.0,0.0 - left lower corner, 1.0,1.0 - upper right)
float maxblur = 1.0; //clamp value of max blur (0.0 = no blur,1.0 default)

float threshold = 0.5; //highlight threshold;
float gain = 2.0; //highlight gain;

float bias = 0.5; //bokeh edge bias
float fringe = 0.7; //bokeh chromatic aberration/fringing

bool noise = false; //use noise instead of pattern for sample dithering
float namount = 0.0001; //dither amount

bool depthblur = false; //blur the depth buffer?
float dbsize = 1.25; //depthblursize

/*
 next part is experimental
 not looking good with small sample and ring count
 looks okay starting from samples = 4, rings = 4
 */

bool pentagon = false; //use pentagon as bokeh shape?
float feather = 0.4; //pentagon shape feather

//------------------------------------------


float penta(vec2 coords) //pentagonal shape
{
    float scale = float(rings) - 1.3;
    vec4  HS0 = vec4( 1.0,         0.0,         0.0,  1.0);
    vec4  HS1 = vec4( 0.309016994, 0.951056516, 0.0,  1.0);
    vec4  HS2 = vec4(-0.809016994, 0.587785252, 0.0,  1.0);
    vec4  HS3 = vec4(-0.809016994,-0.587785252, 0.0,  1.0);
    vec4  HS4 = vec4( 0.309016994,-0.951056516, 0.0,  1.0);
    vec4  HS5 = vec4( 0.0        ,0.0         , 1.0,  1.0);

    vec4  one = vec4( 1.0 );

    vec4 P = vec4((coords),vec2(scale, scale));

    vec4 dist = vec4(0.0);
    float inorout = -4.0;

    dist.x = dot( P, HS0 );
    dist.y = dot( P, HS1 );
    dist.z = dot( P, HS2 );
    dist.w = dot( P, HS3 );

    dist = smoothstep( -feather, feather, dist );

    inorout += dot( dist, one );

    dist.x = dot( P, HS4 );
    dist.y = HS5.w - abs( P.z );

    dist = smoothstep( -feather, feather, dist );
    inorout += dist.x;

    return clamp( inorout, 0.0, 1.0 );
}

float bdepth(vec2 coords) //blurring depth
{
    float d = 0.0;
    float kernel[9];
    vec2 offset[9];

    vec2 wh = vec2(texel.x, texel.y) * dbsize;

    offset[0] = vec2(-wh.x,-wh.y);
    offset[1] = vec2( 0.0, -wh.y);
    offset[2] = vec2( wh.x -wh.y);

    offset[3] = vec2(-wh.x,  0.0);
    offset[4] = vec2( 0.0,   0.0);
    offset[5] = vec2( wh.x,  0.0);

    offset[6] = vec2(-wh.x, wh.y);
    offset[7] = vec2( 0.0,  wh.y);
    offset[8] = vec2( wh.x, wh.y);

    kernel[0] = 1.0/16.0;   kernel[1] = 2.0/16.0;   kernel[2] = 1.0/16.0;
    kernel[3] = 2.0/16.0;   kernel[4] = 4.0/16.0;   kernel[5] = 2.0/16.0;
    kernel[6] = 1.0/16.0;   kernel[7] = 2.0/16.0;   kernel[8] = 1.0/16.0;


    for( int i=0; i<9; i++ )
    {
        float tmp = texture2D(inputImageTexture2, coords + offset[i]).r;
        d += tmp * kernel[i];
    }

    return d;
}


vec3 color(vec2 coords,float blur) //processing the sample
{
    vec3 col = vec3(0.0);

    col.r = texture2D(inputImageTexture, coords + vec2(0.0,1.0)*texel*fringe*blur).r;
    col.g = texture2D(inputImageTexture, coords + vec2(-0.866,-0.5)*texel*fringe*blur).g;
    col.b = texture2D(inputImageTexture, coords + vec2(0.866,-0.5)*texel*fringe*blur).b;

    vec3 lumcoeff = vec3(0.299,0.587,0.114);
    float lum = dot(col.rgb, lumcoeff);
    float thresh = max((lum-threshold)*gain, 0.0);
    return col+mix(vec3(0.0),col,thresh*blur);
}

vec2 rand(vec2 coord) //generating noise/pattern texture for dithering
{
    float noiseX = ((fract(1.0-coord.s*(width/2.0))*0.25)+(fract(coord.t*(height/2.0))*0.75))*2.0-1.0;
    float noiseY = ((fract(1.0-coord.s*(width/2.0))*0.75)+(fract(coord.t*(height/2.0))*0.25))*2.0-1.0;

    if (noise)
    {
        noiseX = clamp(fract(sin(dot(coord ,vec2(12.9898,78.233))) * 43758.5453),0.0,1.0)*2.0-1.0;
        noiseY = clamp(fract(sin(dot(coord ,vec2(12.9898,78.233)*2.0)) * 43758.5453),0.0,1.0)*2.0-1.0;
    }
    return vec2(noiseX,noiseY);
}

vec3 debugFocus(vec3 col, float blur, float depth)
{
    float edge = 0.002*depth; //distance based edge smoothing
    float m = clamp(smoothstep(0.0,edge,blur),0.0,1.0);
    float e = clamp(smoothstep(1.0-edge,1.0,blur),0.0,1.0);

    col = mix(col,vec3(1.0,1.0,0.0),(1.0-m)*0.6);
    col = mix(col,vec3(0.0,1.0,1.0),((1.0-e)-(1.0-m))*0.2);

    return col;
}

float linearize(float depth)
{
    return -zfar * znear / (depth * (zfar - znear) - zfar);
}

float vignette()
{
    float dist = distance(textureCoordinate.xy, vec2(0.5,0.5));
    dist = smoothstep(vignout+(fstop/vignfade), vignin+(fstop/vignfade), dist);
    return clamp(dist,0.0,1.0);
}

void main()
{
    //scene depth calculation

    float depth = linearize(texture2D(inputImageTexture2, textureCoordinate2.xy).x);

    if (depthblur)
    {
        depth = linearize(bdepth(textureCoordinate2.xy));
    }

    //focal plane calculation

    float fDepth = focalDepth;

    if (autofocus)
    {
        fDepth = linearize(texture2D(inputImageTexture2, focus).x);
    }

    //dof blur factor calculation

    float blur = 0.0;

    if (manualdof)
    {
        float a = depth-fDepth; //focal plane
        float b = (a-fdofstart)/fdofdist; //far DoF
        float c = (-a-ndofstart)/ndofdist; //near Dof
        blur = (a>0.0)?b:c;
    }

    else
    {
        float f = focalLength; //focal length in mm
        float d = fDepth*1000.0; //focal plane in mm
        float o = depth*1000.0; //depth in mm

        float a = (o*f)/(o-f);
        float b = (d*f)/(d-f);
        float c = (d-f)/(d*fstop*CoC);

        blur = abs(a-b)*c;
    }

    blur = clamp(blur,0.0,1.0);

    // calculation of pattern for ditering

    vec2 noise = rand(textureCoordinate.xy)*namount*blur;

    // getting blur x and y step factor

    float w = (1.0/width)*blur*maxblur+noise.x;
    float h = (1.0/height)*blur*maxblur+noise.y;

    // calculation of final color

    vec3 col = vec3(0.0);

    if(blur < 0.05) //some optimization thingy
    {
        col = texture2D(inputImageTexture, textureCoordinate.xy).rgb;
    }

    else
    {
        col = texture2D(inputImageTexture, textureCoordinate.xy).rgb;
        float s = 1.0;
        int ringsamples;

        for (int i = 1; i <= rings; i += 1)
        {
            ringsamples = i * samples;

            for (int j = 0 ; j < ringsamples ; j += 1)
            {
                float step = PI*2.0 / float(ringsamples);
                float pw = (cos(float(j)*step)*float(i));
                float ph = (sin(float(j)*step)*float(i));
                float p = 1.0;
                if (pentagon)
                {
                    p = penta(vec2(pw,ph));
                }
                col += color(textureCoordinate.xy + vec2(pw*w,ph*h),blur)*mix(1.0,(float(i))/(float(rings)),bias)*p;
                s += 1.0*mix(1.0,(float(i))/(float(rings)),bias)*p;
            }
        }
        col /= s; //divide by sample count
    }

    if (showFocus)
    {
        col = debugFocus(col, blur, depth);
    }

    if (vignetting)
    {
        col *= vignette();
    }

    gl_FragColor.rgb = col;
    gl_FragColor.a = 1.0;
}
这是我的bokeh滤镜,它是GPUImageTwoInputFilter的一个子类:
@implementation GPUImageBokehFilter

- (id)init;
{
    NSString *fragmentShaderPathname = [[NSBundle mainBundle] pathForResource:@"BokehShader" ofType:@"fsh"];
    NSString *fragmentShaderString = [NSString stringWithContentsOfFile:fragmentShaderPathname encoding:NSUTF8StringEncoding error:nil];

    if (!(self = [super initWithFragmentShaderFromString:fragmentShaderString]))
    {
        return nil;
    }

    focalDepthUniform = [filterProgram uniformIndex:@"focalDepth"];
    focalLengthUniform = [filterProgram uniformIndex:@"focalLength"];
    fStopUniform = [filterProgram uniformIndex:@"fstop"];

    [self setFocalDepth:1.0];
    [self setFocalLength:35.0];
    [self setFStop:2.2];

    return self;
}


#pragma mark -
#pragma mark Accessors

- (void)setFocalDepth:(float)focalDepth {
    _focalDepth = focalDepth;
    [self setFloat:_focalDepth forUniform:focalDepthUniform program:filterProgram];
}

- (void)setFocalLength:(float)focalLength {
    _focalLength = focalLength;
    [self setFloat:_focalLength forUniform:focalLengthUniform program:filterProgram];
}

- (void)setFStop:(CGFloat)fStop {
    _fStop = fStop;
    [self setFloat:_fStop forUniform:fStopUniform program:filterProgram];
}

@end
最后,这就是我使用该过滤器的方式:
@implementation ViewController {
    GPUImageBokehFilter *bokehFilter;
    GPUImagePicture *bokehMap;
    UIImage *inputImage;
}

- (void)viewDidLoad
{
    [super viewDidLoad];

    inputImage = [UIImage imageNamed:@"stones"];
    bokehMap = [[GPUImagePicture alloc] initWithImage:[UIImage imageNamed:@"bokehmask"]];
    _backgroundImage.image = inputImage;

    bokehFilter = [[GPUImageBokehFilter alloc] init];

    [self processImage];
}
- (IBAction)dataInputUpdated:(id)sender {
    [self processImage];
}
- (void *)processImage {
    dispatch_async(dispatch_get_global_queue( DISPATCH_QUEUE_PRIORITY_DEFAULT, 0), ^{
        GPUImagePicture *gpuPicture = [[GPUImagePicture alloc] initWithImage:inputImage];
        [gpuPicture addTarget:bokehFilter];
        [gpuPicture processImage];
        [bokehMap addTarget:bokehFilter];
        [bokehMap processImage];
        [bokehFilter useNextFrameForImageCapture];
        [bokehFilter setFloat:inputImage.size.width forUniformName:@"inputImageTextureWidth"];
        [bokehFilter setFloat:inputImage.size.height forUniformName:@"inputImageTextureHeight"];

        UIImage *blurredImage = [bokehFilter imageFromCurrentFramebuffer];
        dispatch_async(dispatch_get_main_queue(), ^{
            [self displayNewImage:blurredImage];
        });
    });
}
- (void)displayNewImage:(UIImage*)newImage {
    [UIView transitionWithView:_backgroundImage
                      duration:.6f
                       options:UIViewAnimationOptionTransitionCrossDissolve
                    animations:^{
                        _backgroundImage.image = newImage;
                    } completion:nil];
}

...
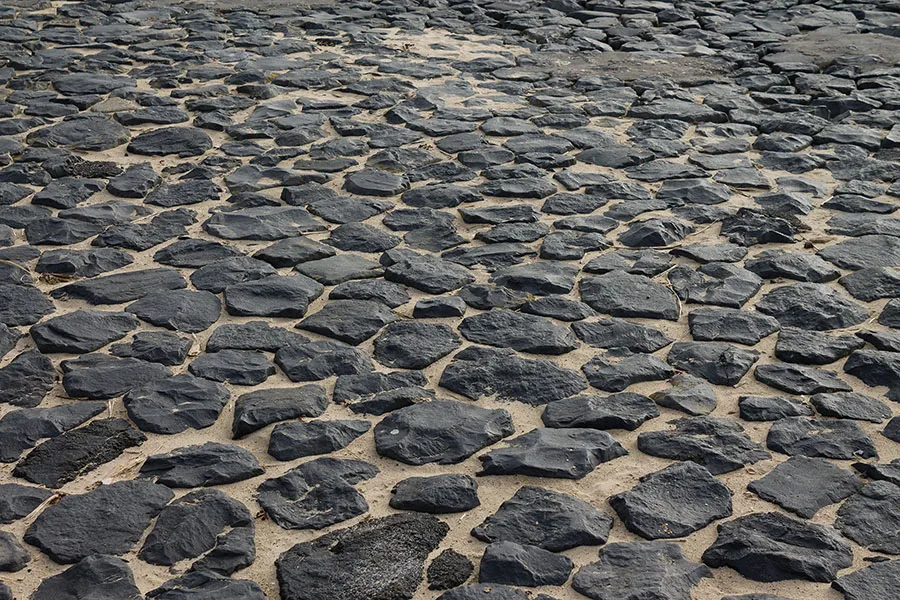
第一张图片是我想要模糊的图片,第二张是一个随机渐变图案,用于测试着色器的深度图:

当我在 iPhone 上启动应用程序时,会出现以下情况:

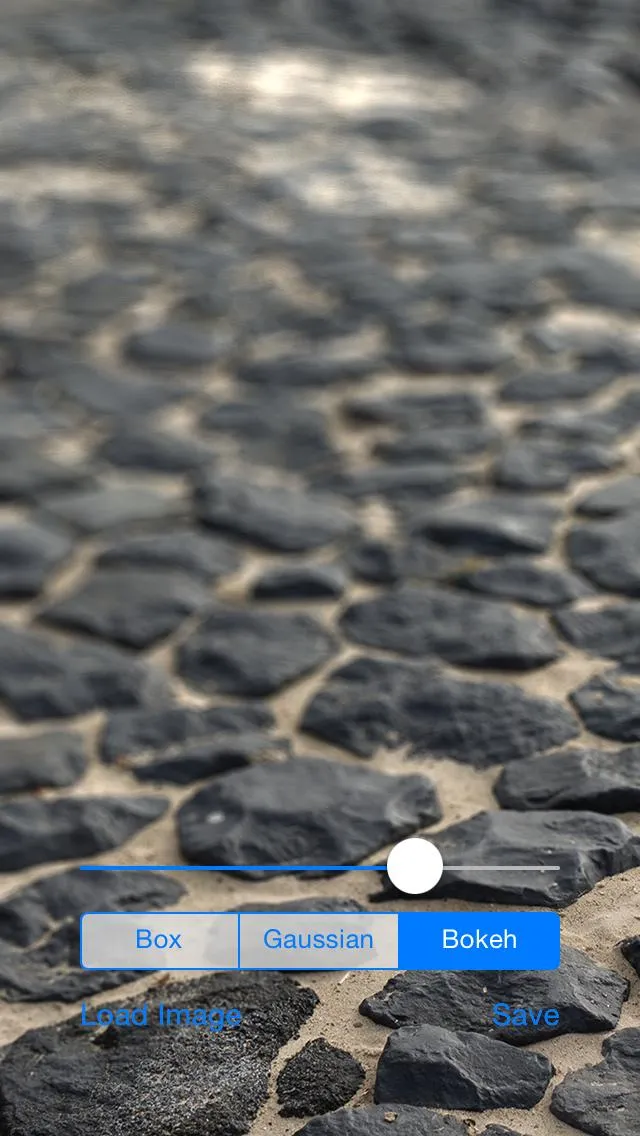
移动滑块后(触发 dataInputChanged 方法),会得到以下结果:
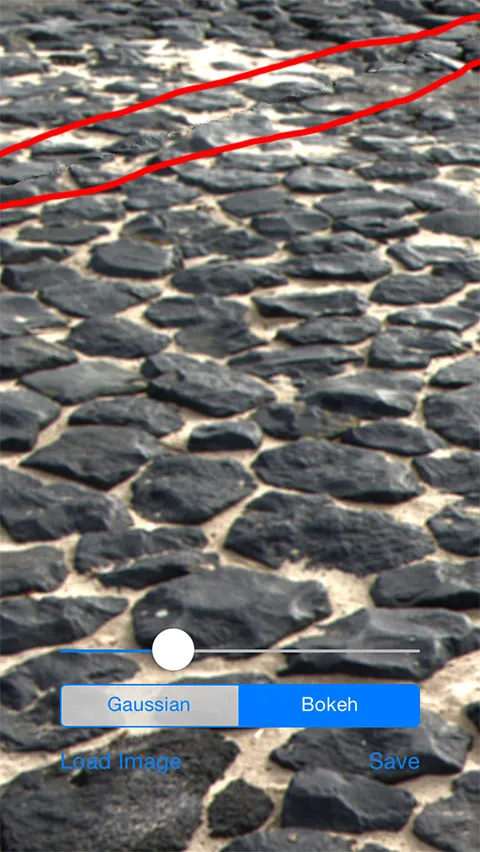
尽管这看起来比第一张图片好多了,但我仍然有一些问题:
- 有一条对角噪线(我在图片上标记了红线),似乎没有被模糊。
- 尽管不应该如此,但图片左上角模糊了。
为什么会出现这种奇怪的行为?着色器输出不应该每次都相同吗? 另外,如何使其遵守深度图?我的 GLSL 着色器知识非常有限,请耐心指导。
[bokehMap processImage];和[bokehFilter useNextFrameForImageCapture];的顺序错误。它们需要被翻转,这样你就可以在触发更新滤镜输出的处理之前告诉滤镜你将从中捕获。尝试交换它们并看看会发生什么。除此之外,这是一个非常昂贵的着色器,我想知道是否用一个三输入滤镜来代替它,并且还接受图像的高斯模糊版本进行混合(就像倾斜移位一样)是否更好。 - Brad Larson