在SwiftUI中如何在按钮上放置背景图片和文本/图标?

3

我正在尝试在SwiftUI中实现类似于这样的效果:

enter image description here

我可以创建带圆角的按钮,也可以将文本放置在其中心位置,但这就是全部了。
我需要能够放置背景图像以及底部标题/文本和顶部图标!
目前为止,我有以下内容:
                            Button(action: {
                                    //self.dismiss?()
            
                                    
                                })
                                {
                               

                                    HStack(spacing: 10) {
                                        Image(systemName: "pencil").renderingMode(.template)
                                        Text(audio.name)
                                            //.font(.headline)
                                            .frame(width: 160, height: 200)
                                        
                                            .background(Color.gray)
                                            .addBorder(Color.white, width: 1, cornerRadius: 10)
                                    }


                                }

当我尝试运行我的代码时,我得到了一个带有圆角的按钮和居中的文本,但是由于某些原因,Image(systemName: "pencil")在按钮外面!请问有人可以指导我如何实现这个效果吗?值得一提的是,背景图片来自远程服务器。
3个回答

4

首先,为了处理加载图像的后端,创建一个可观察对象来处理状态和网络。

import Combine


class ImageManager: ObservableObject {

    // Property that fires an update onto the interface when it has any changes to its value
    @Published var image: UIImage? = nil

    init(link: String) {
        // Standard way of loading data from a link.
        guard let url = URL(string: link) else { return }
        let task = URLSession.shared.dataTask(with: url) { (data, response, error) in
            if let error = error {
                // handle the error here !
                print(error)
            } else if let data = data {
                // Never forget to update on the main thread ! 
                DispatchQueue.main.async {
                    self.image = UIImage(data: data)
                }
            }
        }
        task.resume()
    } 
}

其次,按照以下步骤构建可以与Observable对象通信的ImageView:

struct ImageLoader: View {

     // The property wrapper '@ObservedObject' makes our ImageLoader change its interface according to updates received from our ImageManager
     @ObservedObject private var manager: ImageManager

     init(link: String) {
         manager = ImageManager(link: link)
     }

     var body: some View {
         Image(uiImage: manager.image ?? UIImage())
            .resizable()
            .aspectRatio(contentMode: .fill)
            // Make the view greyish as long there is no image loaded to present
            .redacted(reason: manager.image == nil ? .placeholder:[])
    }
}

第三步,构建最终视图。你可以使用覆盖层将视图添加到卡片的顶部,同时使用.frame(maxWidth:, maxHeight, alignment:)来高效地构建覆盖层视图,避免过多的附加视图。
struct MovieCard: View {

    @State var thumbnailLink = "https://media.senscritique.com/media/000010045541/source_big/Tomb_Raider.png"

     var body: some View {
        ImageLoader(link: thumbnailLink)
            .frame(width: 200, height: 200)
            // Overlay is a very simple way to add content on top of your view ! 
            .overlay(
                 VStack {
                     // Using the system heart icon see https://developer.apple.com/sf-symbols/
                     Image(systemName: "suit.heart.fill")
                        .font(.title3)
                        .padding()
                        // Using maxWidth, maxHeight and alignement is usefull to not use additionnal views in your code (such as spacers, stacks, etc…)
                        .frame(maxWidth: .infinity, maxHeight: .infinity, alignment: .topLeading)
                        .foregroundColor(.red)
                
                     Text("Movie title")
                        .font(Font.body.bold())
                        .foregroundColor(.white)
                        .padding()
                        .frame(maxWidth: .infinity)
                        .background(Color.red.opacity(0.7))
                }
            )
            .clipShape(RoundedRectangle(cornerRadius: 12, style: .continuous))
            .shadow(color: Color.black.opacity(0.3), radius: 6, x: 0, y: 3)
            .onTapGesture {
                // Handle the action when the card is touched
            }
        }
    }

enter image description here


这也很棒。如果背景图片在远程服务器上怎么办? - drago
1
只需构建一个简单的ImageLoader对象,关注URLSession、加载状态等,并将
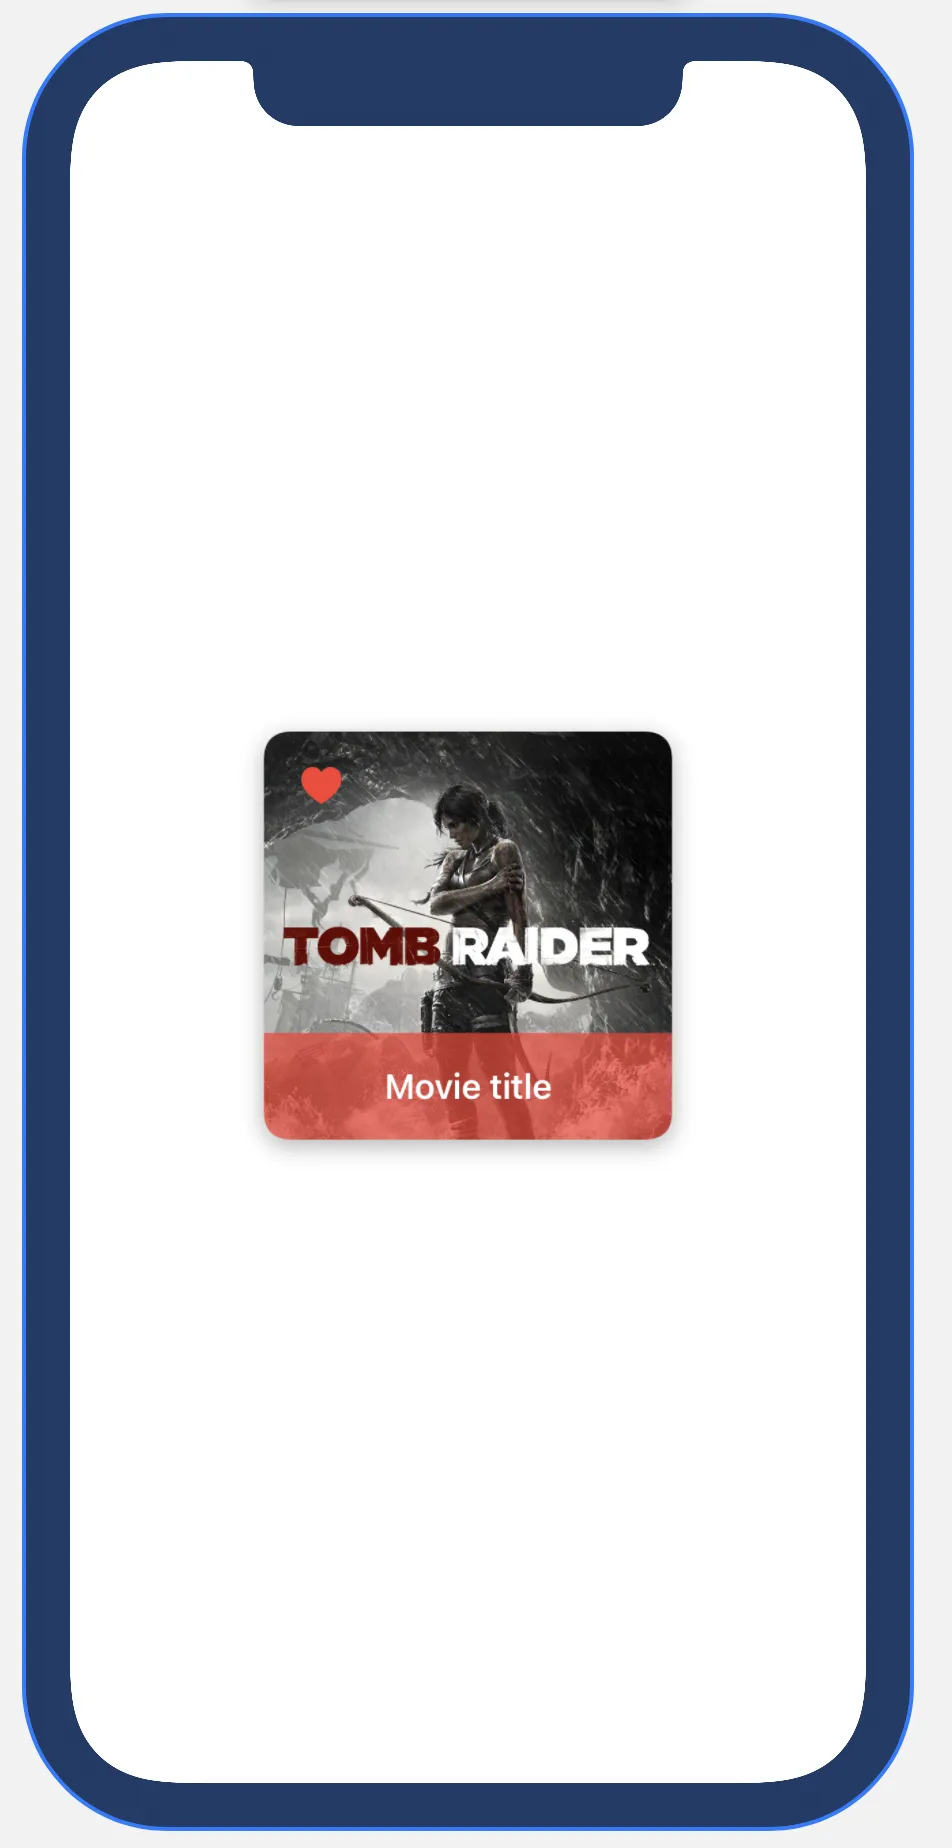
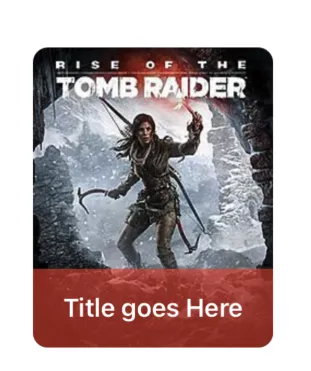
Image("Tomb_Raider")替换为您的ImageLoader对象。 - Hans Rietmann
2
我会在我的回答中添加更多内容,以便提供适当的细节。 - Hans Rietmann
1
我们开始吧!我在上面详细解释了一些内容。希望它能帮助你更好地理解处理这个问题的一种方式。祝你玩得愉快! - Hans Rietmann

2
将框架和背景修饰符移动到hstack中:
            HStack {
                        Image(systemName: "pencil").renderingMode(.template)
                        Spacer()
                        Text("title goes here")
                        Spacer()
                }.frame(width: 160, height: 200)
                
                .background(Color.gray)
            }

您还可以在ImageText之间添加Spacer(),并在Text后面添加Spacer(),以正确对齐所有内容。

2

有许多要注意的元素,因此我已在相关位置下方添加了注释。

Button(action: { }) {
    Image("Tomb_Raider")
        //declare your image as resizable, otherwise it will keep its original size
        .resizable()
        //declare the frame of the image (i.e. the size you want it to resize to)
        .frame(width: 160, height: 200)
        // place the red rectangle with text in an overlay
        // as opposed to HStack where elements are side by side
        // here the image will be placed under the rest
        .overlay(
            //This HStack places the text in the middle with some padding
            HStack {
                Spacer()
                Text("Title goes Here")
                    .font(.headline)
                    .foregroundColor(.white)
                    .padding(.vertical)
                 Spacer()
            }   
                //set the background of the text to be semitransparent red
                .background(Color.red.opacity(0.6)),
                //this defines the alignment of the overlay
                alignment: .bottom)
        //clip everything to get rounded corners
        .clipShape(RoundedRectangle(cornerRadius: 10))
    }
        

这就是最终的结果:

在此输入图片描述


这太棒了。感谢评论。如果背景图片在远程服务器上怎么办? - drago
没问题。我已经从这里下载了图片:https://upload.wikimedia.org/wikipedia/en/thumb/2/29/Rise_of_the_Tomb_Raider.jpg/220px-Rise_of_the_Tomb_Raider.jpg,并将其放置在资产目录中。 - LuLuGaGa
不好意思,我的意思是如果背景图片是远程加载的会怎么样。 - drago
不是的。它被本地保存了。我想构建一些东西来回答你的布局问题。 - LuLuGaGa
好的!感谢您。 - drago

网页内容由stack overflow 提供, 点击上面的
可以查看英文原文,
原文链接