如何在OpenCV中合并两张图片?

22
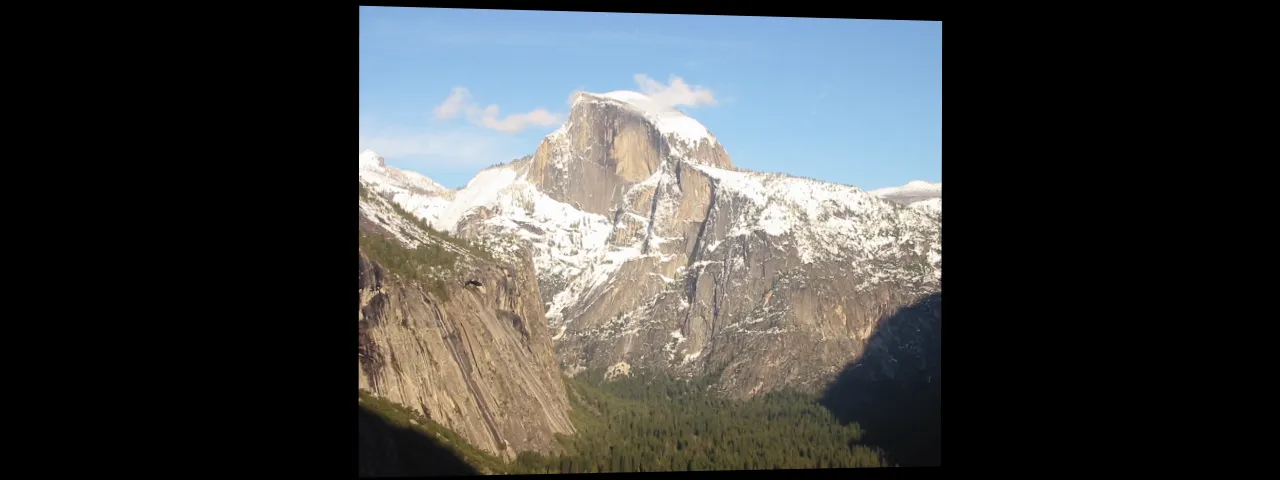
我已经计算出单应性矩阵,进行了透视变换。我能够在一个窗口中显示两个图像,但无法将它们合并。这是我的样例图像: image1 image2 我正在使用的代码是这个:
cv::warpPerspective(image2,warpresult2,homography,cv::Size(2*image2.cols,image2.rows));


Mat imgResult(image1.rows,2*image1.cols,image1.type());

Mat roiImgResult_Left = imgResult(Rect(0,0,image1.cols,image1.rows)); 
Mat roiImgResult_Right = imgResult(Rect(image1.cols,0,image2.cols,image2.rows)); 

Mat roiImg1 = image1(Rect(0,0,image1.cols,image1.rows));
Mat roiImg2 = warpresult2(Rect(0,0,image2.cols,image2.rows));

roiImg1.copyTo(roiImgResult_Left); //Img1 will be on the left of imgResult
roiImg2.copyTo(roiImgResult_Right); //Img2 will be on the right of imgResult

imshow("Finalimg",imgResult);
imwrite("C:\\OpenCv_Projects\\outputimage.jpg",imgResult);
cvWaitKey(0);

我认为问题在于我给定的roiImgResult_right坐标。
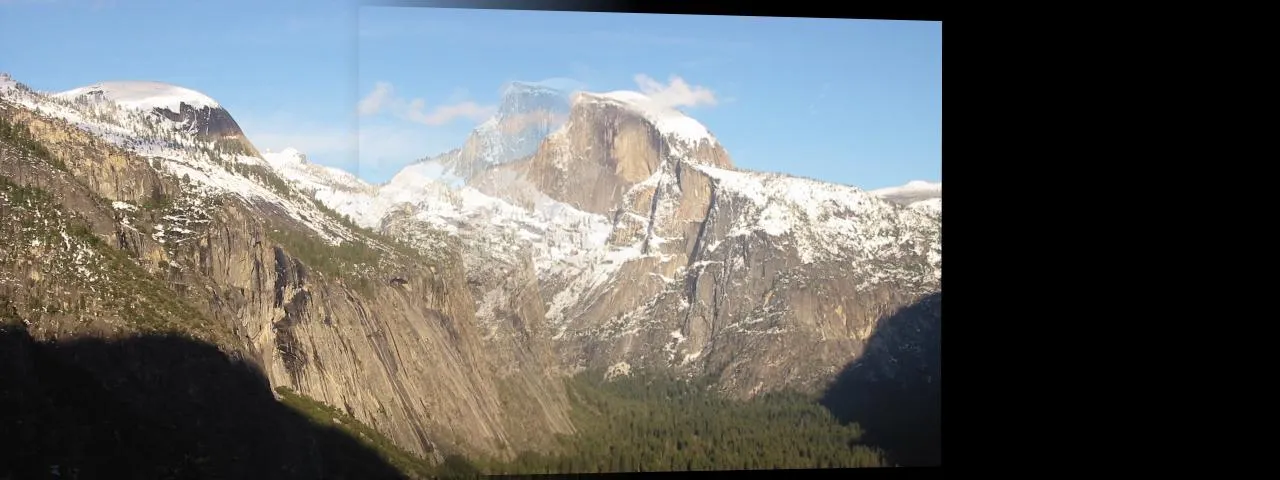
输出图像如下-> Output images 正如您所看到的,图像没有正确合并,并且右侧有黑色区域。如何去除它?

4个回答

17

OpenCV已经实现了图像拼接。如果你使用"-D BUILD_EXAMPLES"编译,可以使用二进制文件stitching_detailed。用法很简单:./stitching_detailed img1 img2 ...

或者,你可以直接使用stitcher类(示例来自这里):

#include "opencv2/highgui/highgui.hpp"
#include "opencv2/stitching/stitcher.hpp"

using namespace std;
using namespace cv;

bool try_use_gpu = false;
string result_name = "result.jpg";

int main(int argc, char* argv[])
{
    vector<Mat> imgs;
    // add images...

    Mat pano;
    Stitcher stitcher = Stitcher::createDefault(try_use_gpu);
    stitcher.stitch(imgs, pano);
    imwrite(result_name, pano);
}

1
我不想使用stitching_detailed或stitcher类。我想将其编码为我正在进行的项目的一部分。顺便说一句,谢谢 :) - ankit
我遇到了一个错误 - 无法打开包含文件:'opencv2/stitching/stitcher.hpp':没有这个文件或目录。如何解决这个错误。我的opencv文件夹中没有stitcher.hpp文件。我正在使用opencv2.3.1版本。 - ankit
当我使用上述代码时,我得到了这个错误:error C2248: 'cv::Stitcher::Stitcher':无法访问类'cv::Stitcher'中声明的私有成员。如何访问拼接函数? - Vinshi
Stitcher::Stitch是公共的,所以你必须指的是其他东西。也许你正在调用私有构造函数。 - erikreed
我已经查看了这个缝合类的源代码和文档,并且我确认我的评论是正确的。不仅如此,在你给我的链接中的printUsage函数中,你可以看到“旋转模型图像拼接器”(请不要混淆旋转模型(即使用旋转的运动模型)和扭曲表面,因为这两者是不同的东西),而且如果你尝试测试它(就像我做的那样),你会发现以下情况:在相机上应用纯旋转会得到很好的结果,但在相机上应用平移会得到非常糟糕的结果。 - rbaleksandar
显示剩余3条评论

7
  • 图像混合:您可以使用拉普拉斯金字塔混合。在此处查看使用opencv的示例代码here。您可以使用任何您喜欢的蒙版(也就是二进制蒙版)。

  • 创建全景图:如果您想制作全景图,则可以使用最小割拼接。我找到了这段代码,可以完成全景图processing


你所建议的是下一步。首先,我必须确保最终图像不会显示两座山峰而不是一座。感谢您的努力。 - ankit
图像混合可以在同一座山的相同部分使用,如果不是,请使用创建全景图的方法。 - 0x90

2
如果你更仔细地做,比如不要裁剪和堆叠,而是使用alphaBlend,那么你会发现一些奇怪的事情。
这是匹配的图像:

enter image description here

这是包装后的图片2:

enter image description here

这是进行Alpha混合的蒙版:

enter image description here

这是alphaBlended:

enter image description here


我们可以很容易地在混合图像中找到鬼影。这是因为warpPerspectiveperspectiveTransform无法真正找到真实的相机投影方程。主要是因为图像面板是一个面板,而不是一个圆柱面球面或更复杂的形状。所以我们所做的工作还不够。
好消息是OpenCV提供了高级拼接API,我们可以通过OpenCV拼接API轻松地进行拼接。以下是结果。

enter image description here

代码:

//! 2018.01.16 14:43:26 CST
//! 2018.01.16 17:32:15 CST
#include <iostream>
#include <fstream>
#include "opencv2/imgcodecs.hpp"
#include "opencv2/highgui.hpp"
#include "opencv2/stitching.hpp"
using namespace std;
using namespace cv;

Stitcher::Status stitchImages(vector<Mat>&imgs,string fname, Stitcher::Mode mode = Stitcher::PANORAMA, bool try_gpu=false) {
    Ptr<Stitcher> stitcher = Stitcher::create(mode, try_gpu);
    Mat pano;
    Stitcher::Status status = stitcher->stitch(imgs, pano);
    if (status != Stitcher::OK){
        cout << "Can't stitch images, error code = " << int(status) << endl;
        return -1;
    }
    imwrite(fname, pano);
    return status;
}

int main(int argc, char* argv[])
{

    vector<string>fnames = {
        "img1.jpg", "img2.jpg"
    };

    vector<Mat> imgs;
    for(auto fname: fnames) {
        imgs.emplace_back(imread(fname));
    }
    stitchImages(imgs, "scans.png",Stitcher::SCANS );
    stitchImages(imgs, "pano.png",Stitcher::PANORAMA );
}

一些有用的链接:
  1. OpenCV 拼接:https://docs.opencv.org/3.3.0/d8/d19/tutorial_stitcher.html

  2. OpenCV C++ 中的 Alpha Blending:使用透明掩码在 OpenCV 中合并 2 张图像

  3. OpenCV Python 中的 Alpha Blending:在 OpenCV Python 中使用渐变掩码混合


1
你可以使用addWeighted()函数轻松地混合两个图像。 但是要求两个图像的大小相同。
如果图像大小不同,请先调整这两个图像的大小。 然后调用以下函数。
addWeighted(src1, alpha, src2, beta, 0.0, dst);

声明两个Mat文件。
src1 = imread("c://test//blend1.jpg");
src2 = imread("c://test//blend2.jpg");

也声明 alphabeta,然后将结果保存到 Mat dst 中。
你也可以在这里获取详细信息 使用Opencv混合图像

网页内容由stack overflow 提供, 点击上面的
可以查看英文原文,
原文链接