在我的应用程序中,我想要将气泡设置为文本视图,在文本视图中,我添加了
使用这段代码,我会得到像这样的图片: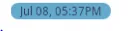 我想要一个像这样的气泡形状的图片:
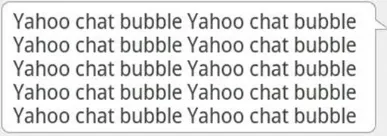
setBackgroundResource()代码,如您所见。使用这段代码,我会得到像这样的图片:
我想要一个像这样的气泡形状的图片:
<?xml version="1.0" encoding="utf-8"?>
<shape xmlns:android="http://schemas.android.com/apk/res/android"
android:shape="rectangle" >
    <solid android:color="#EDF5E4" />
    <corners android:bottomLeftRadius="@dimen/corner_radius"
    android:bottomRightRadius="@dimen/corner_radius"
    android:topLeftRadius="@dimen/corner_radius"
    id:topRightRadius="@dimen/corner_radius" />
setBackgroundResource() XML中进行设置。