我假设您正在使用自动布局:在自动布局中,如果您有前导和/或顶部约束,则在使用 CGAffineTransformMakeScale 进行缩放后,前导/顶部约束将被重新应用,您的控件将移动以确保仍满足约束条件。
您可以关闭自动布局(这是简单的答案),或者:
等到 viewDidAppear(因为在 IB 中定义的约束将被应用,并且控件将放置在我们想要的位置,其 center 属性将是可靠的);
现在,我们已经拥有了所讨论控件的 center,将前导和顶部约束替换为 NSLayoutAttributeCenterX 和 NSLayoutAttributeCenterY 约束,使用 center 属性的值来设置 NSLayoutConstraint 的 constant。
因此:
- (void)viewDidAppear:(BOOL)animated
{
[super viewDidAppear:animated];
[self replaceLeadingAndTopWithCenterConstraints:self.imageView];
}
- (void)replaceLeadingAndTopWithCenterConstraints:(UIView *)subview
{
CGPoint center = subview.center;
NSLayoutConstraint *leadingConstraint = [self findConstraintOnItem:subview
attribute:NSLayoutAttributeLeading];
if (leadingConstraint)
{
NSLog(@"Found leading constraint");
[subview.superview removeConstraint:leadingConstraint];
[subview.superview addConstraint:[NSLayoutConstraint constraintWithItem:subview
attribute:NSLayoutAttributeCenterX
relatedBy:NSLayoutRelationEqual
toItem:subview.superview
attribute:NSLayoutAttributeTop
multiplier:1.0
constant:center.x]];
}
NSLayoutConstraint *topConstraint = [self findConstraintOnItem:subview
attribute:NSLayoutAttributeTop];
if (topConstraint)
{
NSLog(@"Found top constraint");
[subview.superview removeConstraint:topConstraint];
[subview.superview addConstraint:[NSLayoutConstraint constraintWithItem:subview
attribute:NSLayoutAttributeCenterY
relatedBy:NSLayoutRelationEqual
toItem:subview.superview
attribute:NSLayoutAttributeLeft
multiplier:1.0
constant:center.y]];
}
}
- (NSLayoutConstraint *)findConstraintOnItem:(UIView *)item attribute:(NSLayoutAttribute)attribute
{
for (NSLayoutConstraint *constraint in item.superview.constraints)
{
if (constraint.firstItem == item && constraint.firstAttribute == attribute)
return constraint;
if (constraint.secondItem == item && constraint.secondAttribute == attribute)
return constraint;
}
return nil;
}
你的实现细节可能会因为控件约束的定义方式而有所不同(在我的例子中,leading和top是基于父视图的,这样做更容易),但希望它能说明解决方案,即移除那些约束并添加基于中心点的新约束。
如果你不想像我上面那样迭代查找相关约束,你可以为顶部和leading约束定义一个IBOutlet,这样可以大大简化流程。这个示例代码来自一个项目,由于各种原因,我不能使用NSLayoutConstraint引用的IBOutlet。但是,如果你坚持使用自动布局,使用IBOutlet引用约束肯定是更容易的方法。
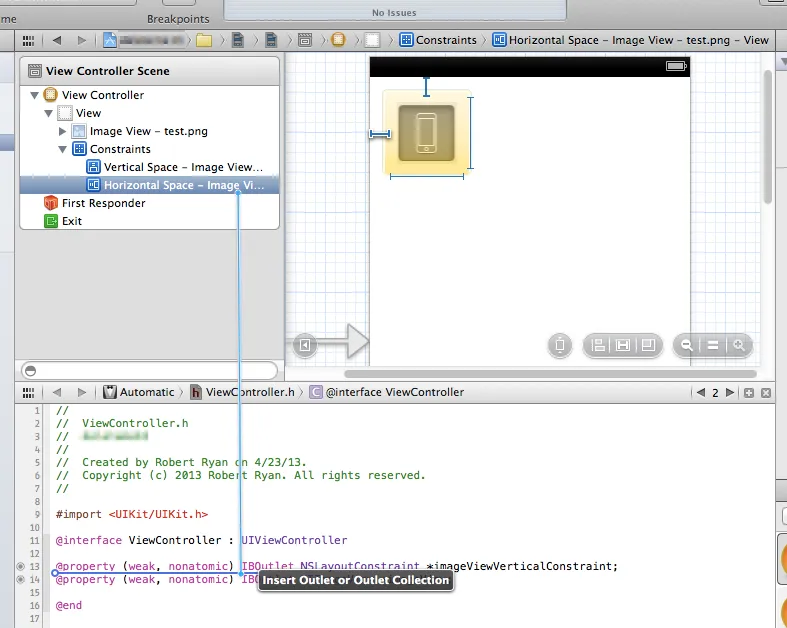
例如,如果你去Interface Builder,你可以突出显示相关约束,然后使用
control拖动到助手编辑器中,以创建你的IBOutlet:
如果你这样做了,就不需要遍历所有的约束了,你现在只需要说,例如:
if (self.imageViewVerticalConstraint)
{
[self.view removeConstraint:self.imageViewVerticalConstraint];
}
坦白地说,我希望Interface Builder能够直接定义这样的约束(即不是“控件的前端到父视图左侧”的约束,而是“控件的中心到父视图左侧”的约束),但我认为这在IB中无法实现,因此我要通过编程方式修改我的约束。通过这个过程,我现在可以缩放控件而不会因为约束而移动。
正如0x7fffffff所指出的,如果你对层应用了一个`CATransform3DMakeScale`,它不会自动应用约束,因此你不会看到它像对视图应用`CGAffineTransformMakeScale`那样移动。但是,如果你重新应用了约束(`setNeedsLayout`或对任何`UIView`对象进行任何更改都会导致约束被重新应用),那么视图就会移动。因此,如果在重新应用约束之前将层的变换恢复为恒等变换,则可能可以“偷懒”,但最安全的方法可能是关闭自动布局或修复约束。
CATransform3DMakeScale,它不会自动应用约束条件,所以你看不到它像对视图应用CGAffineTransformMakeScale那样移动。但是,如果你重新应用约束条件(setNeedsLayout或者对任何UIView对象进行任何更改都可以导致约束条件被重新应用),视图就会移动。因此,如果在重新应用约束条件之前将图层的变换恢复为标识,你可能能够“偷懒”,但最好还是关闭自动布局或修复约束条件。 - Rob