如何为不同的UIbutton状态设置不同的字体?感谢您在此方面提供帮助。
7个回答
10
这是一个非常棒的问题,它促使我创建了一个UIButton的子类,允许设置状态字体!
我还编写了一些示例代码,展示如何设置字体。如果您在使用Interface Builder,则将按钮的类设置为ConfigurableButton。在代码中,按钮也必须声明为ConfigurableButton,因为我添加了新属性和setFont:forState:方法。
请留下评论以寻求改进意见!
视图控制器实现
#import "ViewController.h"
#import "ConfigurableButton.h"

@interface ViewController ()

@property (weak, nonatomic) IBOutlet ConfigurableButton *toggleButton;

@end

@implementation ViewController

- (void)viewDidLoad {
    [super viewDidLoad];

    //Set the fonts for button's states
    _toggleButton.normalFont        = [UIFont fontWithName:@"BradleyHandITCTT-Bold" size:14];
    _toggleButton.highlightedFont   = [UIFont fontWithName:@"Chalkduster" size:14];
    _toggleButton.selectedFont      = [UIFont fontWithName:@"Zapfino" size:14];
    _toggleButton.disabledFont      = [UIFont fontWithName:@"Arial" size:14];
}

@end
ConfigurableButton.h
#import <UIKit/UIKit.h>

IB_DESIGNABLE

/**
 * A button that allows fonts to be assigned to each of the button's states.
 *
 * A state font can be specified using setFont:forState, or through one of the
 * four state Font properties.
 *
 * If a font is not specified for a given state, then
 * the System font will be displayed with a font size of 15.
 */
@interface ConfigurableButton : UIButton

@property (strong, nonatomic) UIFont *normalFont;
@property (strong, nonatomic) UIFont *highlightedFont;
@property (strong, nonatomic) UIFont *selectedFont;
@property (strong, nonatomic) UIFont *disabledFont;

/**
 * Set a font for a button state.
 *
 * @param font  the font
 * @param state a control state -- can be
 *      UIControlStateNormal
 *      UIControlStateHighlighted
 *      UIControlStateDisabled
 *      UIControlStateSelected
 */
- (void) setFont:(UIFont *)font forState:(NSUInteger)state;

@end
ConfigurableButton.m
#import "ConfigurableButton.h"

@implementation ConfigurableButton

//Sets one of the font properties, depending on which state was passed
- (void) setFont:(UIFont *)font forState:(NSUInteger)state
{
    switch (state) {
        case UIControlStateNormal:
        {
            self.normalFont = font;
            break;
        }

        case UIControlStateHighlighted:
        {
            self.highlightedFont = font;
            break;
        }

        case UIControlStateDisabled:
        {
            self.disabledFont = font;
            break;
        }

        case UIControlStateSelected:
        {
            self.selectedFont = font;
            break;
        }

        default:
        {
            self.normalFont = font;
            break;
        }
    }
}

/**
 * Overrides layoutSubviews in UIView, to set the font for the button's state,
 * before calling [super layoutSubviews].
 */
- (void) layoutSubviews
{
    NSUInteger state = self.state;

    switch (state) {
        case UIControlStateNormal:
        {
            [self setTitleFont:_normalFont];
            break;
        }

        case UIControlStateHighlighted:
        {
            [self setTitleFont:_highlightedFont];
            break;
        }

        case UIControlStateDisabled:
        {
            [self setTitleFont:_disabledFont];
            break;
        }

        case UIControlStateSelected:
        {
            [self setTitleFont:_selectedFont];
            break;
        }

        default:
        {
            [self setTitleFont:_normalFont];
            break;
        }

    }

    [super layoutSubviews];
}

/**
 * Private
 *
 * Convenience method that falls back to the System font,
 * if no font is configured.
 */
- (void) setTitleFont:(UIFont *)font
{
    if (!font) {
        font = [UIFont systemFontOfSize:15];
    }

    self.titleLabel.font = font;
}

@end
- Sheamus
6
最简单的解决方案是为每个
UIControl状态设置一个属性标题:var attributes = [String : AnyObject]()
attributes[NSForegroundColorAttributeName] = UIColor.redColor()
attributes[NSFontAttributeName] = UIFont.systemFontOfSize(15)
let normal = NSAttributedString(string: "normal", attributes: attributes)
button.setAttributedTitle(normal, forState: .Normal)
attributes[NSForegroundColorAttributeName] = UIColor.redColor()
attributes[NSFontAttributeName] = UIFont.boldSystemFontOfSize(15)
let selected = NSAttributedString(string: "selected", attributes: attributes)
button.setAttributedTitle(selected, forState: .Selected)
- atxe
1
2019年的“Feel Cool”功能 - dengST30
5
通常,我这样编码:
itemButton.setAttributedTitle(NSAttributedString(string: "title", attributes: [NSAttributedString.Key.font : UIFont.font(ofSize: 16.0, weight: .medium), NSAttributedString.Key.foregroundColor: UIColor.white.withAlphaComponent(0.5)]), for: .normal)
itemButton.setAttributedTitle(NSAttributedString(string: "title", attributes: [NSAttributedString.Key.font : UIFont.font(ofSize: 20.0, weight: .medium), NSAttributedString.Key.foregroundColor: UIColor.white]), for: .selected)
- responser
2
这是我的工作代码块。
您可以在界面生成器中看到可设计的 MyButton 的字体效果,如下图所示。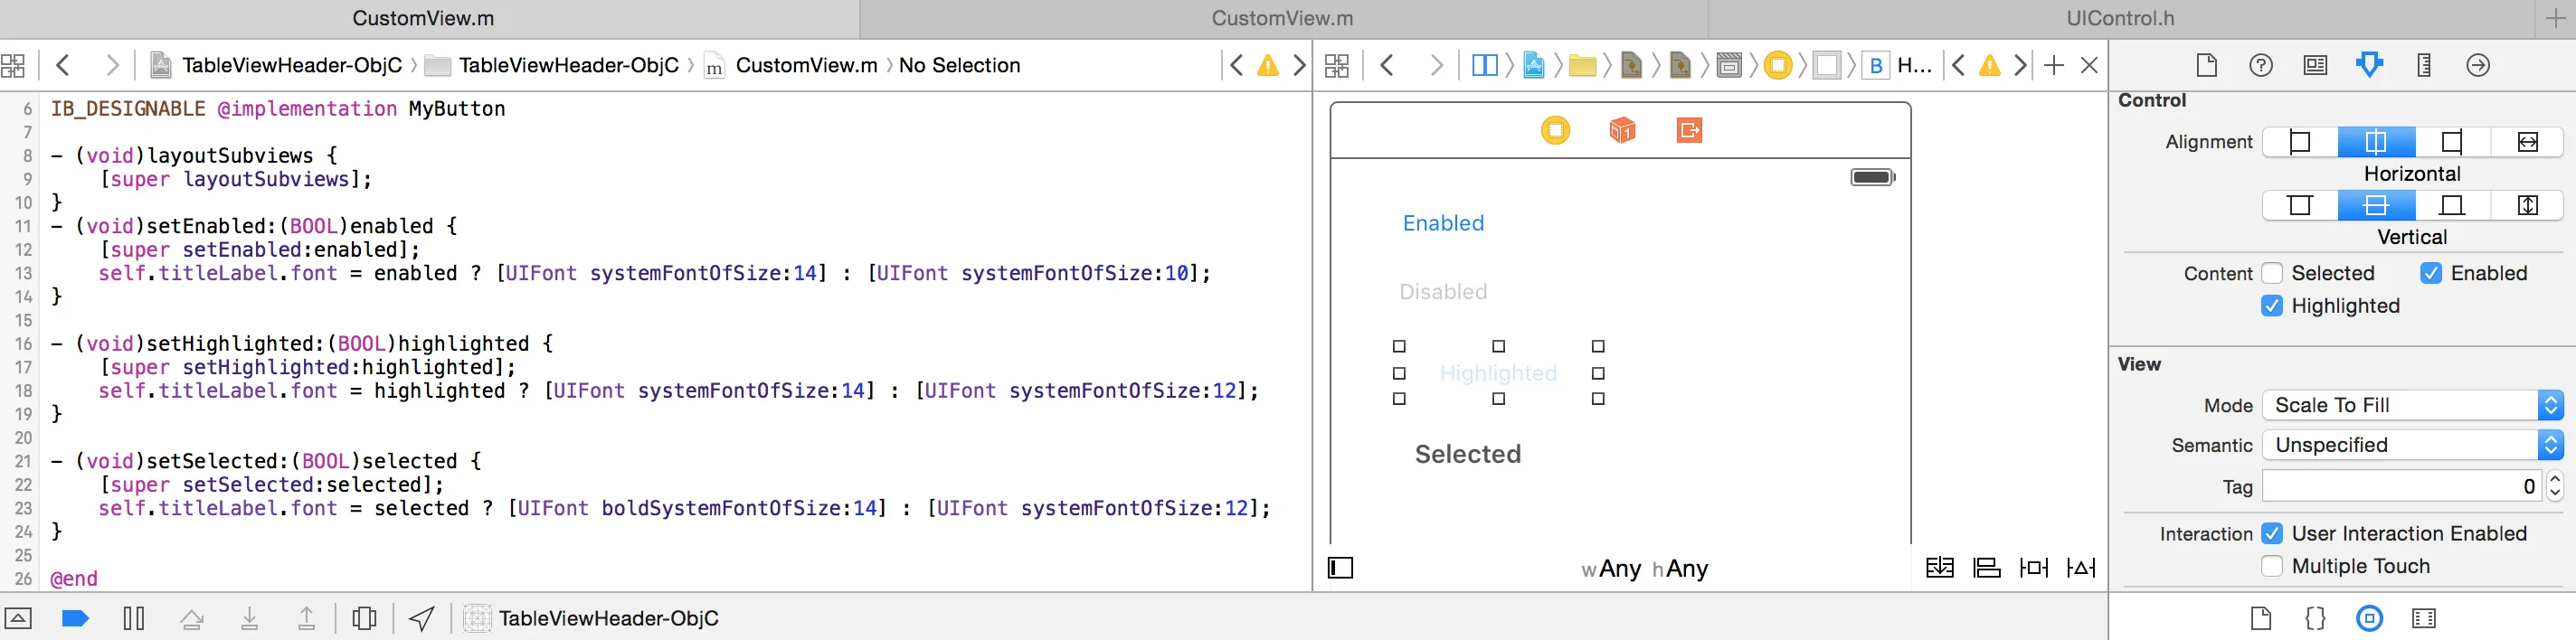
IB_DESIGNABLE 只是一个小改进,使结果可以在界面构建器上可视化 :-)@interface MyButton : UIButton
@end
IB_DESIGNABLE @implementation MyButton
// Here you can override the look & feel for each state
// Actually not only fontSize, but any writable properties ^_^
- (void)setEnabled:(BOOL)enabled {
[super setEnabled:enabled];
self.titleLabel.font = enabled ? [UIFont systemFontOfSize:14] : [UIFont systemFontOfSize:10];
}
- (void)setHighlighted:(BOOL)highlighted {
[super setHighlighted:highlighted];
self.titleLabel.font = highlighted ? [UIFont systemFontOfSize:14] : [UIFont systemFontOfSize:12];
}
- (void)setSelected:(BOOL)selected {
[super setSelected:selected];
self.titleLabel.font = selected ? [UIFont boldSystemFontOfSize:14] : [UIFont systemFontOfSize:12];
}
@end
您可以在界面生成器中看到可设计的 MyButton 的字体效果,如下图所示。
- Ducky
1
@inforeqd 请告诉我这个解决方案是否适用于您。 - Ducky
2
只需创建您的自定义按钮。重写布局子视图。设置所需字体。
// Interface
@interface EezyButton : UIButton

@end
//Implementation
#import "EezyButton.h"

@implementation EezyButton

- (void)layoutSubviews{
    if (self.state == UIControlStateNormal) {
        [self.titleLabel setFont:[UIFont systemFontOfSize:12]];
    }
    else if (self.state == UIControlStateHighlighted){
        [self.titleLabel setFont:[UIFont systemFontOfSize:25]];

    }
    else if (self.state == UIControlStateDisabled){
        [self.titleLabel setFont:[UIFont systemFontOfSize:12]];
    }
    else if (self.state == UIControlStateSelected){
        [self.titleLabel setFont:[UIFont systemFontOfSize:28]];
    }
    [super layoutSubviews];
}

@end
- Raj iOS
1
使用自定义字体的 Swift 5 版本:
todayButton.setAttributedTitle(NSAttributedString(string: "today", attributes: [.font: UIFont(name: "Font-Name", size: 16)!]), for: .normal)

todayButton.setAttributedTitle(NSAttributedString(string: "today", attributes: [.font: UIFont(name: "Font-Name", size: 24!]), for: .selected)
如果您使用它,请不要忘记在Interface Builder中设置按钮类型为Custom
- Diego Carrera
-1
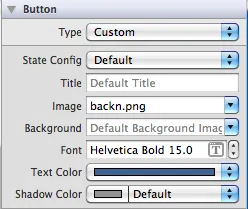
您可以在设计视图上设置字体以获取更多详细信息:
您可以在界面构建器中设置所有这些内容,除非您有非常强烈的理由要在代码中执行。以下是在IB中执行此操作的方法 -
打开右侧边栏,然后单击“状态配置”,您将看到按钮的各种状态:默认、突出显示、已选择和禁用。现在,您可以为每个状态设置不同的图像,不同的字体类型和字体颜色。希望这可以帮助您...
Thanks..!
- Dinesh
7
我认为Dinesh想说的是,您可以使用不同的字体创建图像,然后将按钮设置为该图像。 - Michael Dautermann
现在我更新了答案,你可以按照图片中的状态配置更改组合框中的字体,以便为uibutton的不同状态更改字体。 - Dinesh
这并没有回答问题。他们想要为不同的UIbutton状态“设置不同的字体”,而不是图像。 - daihovey
@daidai,它说你可以设置不同的图像,但也可以为每个状态设置“不同的字体类型和字体颜色”,而且屏幕截图(尽管有点老)似乎也是这样的,对吧? - CupawnTae
解决方案是覆盖按钮和布局子视图,因为问题涉及字体而不是任何地方提到的图片。 - codelover
显示剩余2条评论
网页内容由stack overflow 提供, 点击上面的可以查看英文原文,
原文链接
原文链接