我正在尝试让TextView覆盖在ImageView上。类似这样的效果:
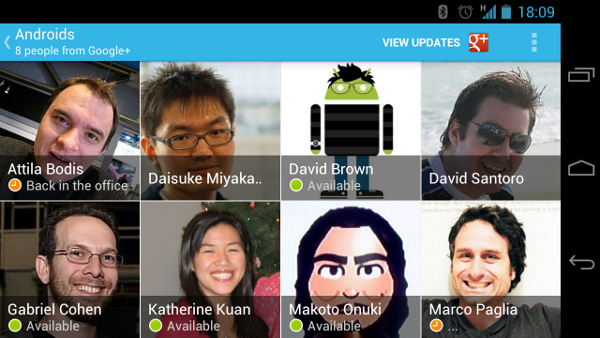
有人能帮我编写代码吗?
有人能帮我编写代码吗?
您可以创建一个帧布局,在其中放置一个ImageView和一个LinearLayout(其背景透明,其中包含一个TextView)。
半透明颜色可以放在颜色文件中:#80000000 以下是代码片段:
 <FrameLayout
            xmlns:android="http://schemas.android.com/apk/res/android"
            android:id="@+id/mainlayout"
            android:layout_width="fill_parent"
            android:layout_height="fill_parent"
            android:foregroundGravity="bottom"
            android:orientation="vertical" >

            <ImageView
                android:id="@+id/ivFullScreenAd"
                android:layout_width="fill_parent"
                android:layout_height="fill_parent"
                android:layout_marginBottom="8dp"
                android:src="@drawable/home_page_ad" />

            <LinearLayout
                android:layout_width="fill_parent"
                android:layout_height="wrap_content"
                android:layout_gravity="bottom"
                android:background="@color/translucent"
                android:orientation="vertical" >

                <TextView
                    android:id="@+id/detailTitle"
                    android:layout_width="wrap_content"
                    android:layout_height="wrap_content"
                    android:layout_gravity="left"
                    android:paddingLeft="10dip"
                    android:textAppearance="?android:attr/textAppearanceLarge"
                    android:text="Please swipe up"
                    android:textColor="@color/white"
                    android:textIsSelectable="true"
                    android:textSize="20sp" />
            </LinearLayout>
        </FrameLayout>
<RelativeLayout>
    <FrameLayout>
        <ImageView />
        <TextView />
    </FrameLayout>
</RelativeLayout>
<?xml version="1.0" encoding="utf-8"?>
<FrameLayout xmlns:android="http://schemas.android.com/apk/res/android"
   android:id="@+id/layout_practitioner"
    android:layout_width="match_parent"
    android:layout_height="match_parent"
    android:orientation="vertical" >

    <ImageView
        android:id="@+id/item_image"
        android:layout_width="match_parent"
        android:layout_height="match_parent"
        android:scaleType="centerCrop"
        android:contentDescription="@string/contentDescriptionContent"
    />

    <LinearLayout
        android:id="@+id/layout_login"
        android:layout_width="match_parent"
        android:layout_height="match_parent"
        android:orientation="vertical"
        android:layout_gravity="center"
        android:background="#CC515116"
        android:visibility="gone"
        android:gravity="center" >

            <TextView
                android:layout_width="wrap_content"
                android:layout_height="wrap_content"
                android:textColor="@android:color/white"
                android:text="@string/text_enter_pass_password"
                android:paddingBottom="7dp"
                android:textSize="20sp"
             />

            <EditText
                android:id="@+id/edit_practitioner_pin"
                android:layout_width="wrap_content"
                android:layout_height="40dp"
                android:layout_gravity="center"
                android:background="@drawable/edittext_shape"
                android:ems="6"
                android:gravity="center"
                android:inputType="numberPassword"
                android:maxLength="4"
                android:layout_marginBottom="10dp"
                android:layout_marginTop="10dp"
                android:visibility="visible"
            />

             <Button
                 android:id="@+id/pract_button"
                 android:layout_width="70dp"
                 android:layout_height="30dp"
                 android:background="@drawable/buton_shape"
                 android:layout_marginBottom="35dp"
                 android:text="@string/btn_ok"
             />
    </LinearLayout>


 <LinearLayout
    android:layout_width="match_parent"
    android:layout_height="wrap_content"
    android:orientation="vertical"
    android:layout_gravity="bottom"
    android:background="#bbffffff"
    android:focusable="false"
    android:focusableInTouchMode="false" >

     <TextView android:id="@+id/item_text"
         android:layout_width="match_parent"
         android:layout_height="wrap_content"
         android:layout_marginTop="3dp"
         android:textColor="@color/text_black"
         android:gravity="bottom|center"
         android:textSize="20sp"
         android:textAllCaps="true"
         android:paddingBottom="0dp"
      />

     <TextView
         android:id="@+id/text_pratiotioner_group_name"
         android:layout_width="match_parent"
         android:layout_height="match_parent"
         android:textColor="@color/sub_title_color"
         android:visibility="visible"
         android:gravity="bottom|center"
         android:textAllCaps="true"
     />

</LinearLayout>

</FrameLayout>
虽然这是一个老问题,但如果有人对卡片视图版本感兴趣,那么这里就有...
<android.support.v7.widget.CardView
    android:layout_width="wrap_content"
    android:layout_height="wrap_content"
    app:cardCornerRadius="5dp"
    app:cardElevation="5dp"
    android:layout_weight="0.5"
    app:cardPreventCornerOverlap="false"
    app:cardUseCompatPadding="true"
    android:clickable="true">

     <FrameLayout
         android:layout_width="match_parent"
         android:layout_height="wrap_content"
         android:orientation="vertical"
         android:gravity="center_vertical"
         android:layout_centerInParent="true">

     <RelativeLayout
        android:layout_width="match_parent"
        android:layout_height="wrap_content"
        android:padding="16dp"
        android:background="#89969F">
    <ImageView
        android:id="@+id/iv_overlay"
        android:layout_width="196dp"
        android:layout_height="196dp"
        android:clickable="true"
        android:src="@drawable/your_image"
        android:layout_centerInParent="true" />


    </RelativeLayout>

         <LinearLayout
             android:layout_width="fill_parent"
             android:layout_height="wrap_content"
             android:layout_gravity="bottom"
             android:background="#80000000"
             android:orientation="vertical" >

             <TextView
                 android:layout_width="wrap_content"
                 android:layout_height="wrap_content"
                 android:singleLine="true"
                 android:textSize="22sp"
                 android:textStyle="bold"
                 android:gravity="center_vertical"
                 android:text="Settings"
                 android:textColor="@color/white"
                 android:layout_gravity="center"
                 android:layout_alignParentTop="false"
                 android:layout_alignParentBottom="true"
                 android:layout_centerHorizontal="true"
                 android:padding="8dp" />

         </LinearLayout>
     </FrameLayout>
</android.support.v7.widget.CardView>
<LinearLayout

        android:layout_width="wrap_content"
        android:layout_height="wrap_content"
        android:background="@drawable/your_image"
        android:orientation="vertical" >
   <TextView
        android:id="@+id/bottom_textview"
        android:layout_width="fill_parent"
        android:layout_height="fill_parent"
        <!-- layout_gravity="supply accordingly" -->
        android:gravity="center"/>

</LinearLayout>