在dlib中有一个示例python程序,可以检测面部标记的位置。 face_landmark_detection.py
该程序可以检测面部特征,并用原始照片中的点和线表示标记。
我想知道是否可以获得每个点的坐标位置。比如a(10, 25)。'a'代表嘴角。
稍微修改了程序以一次处理一张图片后,我尝试输出dets和形状的值,但没有成功。
>>>print(dets)
<dlib.dlib.rectangles object at 0x7f3eb74bf950>
>>>print(dets[0])
[(1005, 563) (1129, 687)]
表示面部标记点的参数以及参数的数据类型仍然未知。 这是简化后的代码:
import dlib
from skimage import io

#shape_predictor_68_face_landmarks.dat is the train dataset in the same directory
predictor_path = "shape_predictor_68_face_landmarks.dat"

detector = dlib.get_frontal_face_detector()
predictor = dlib.shape_predictor(predictor_path)
win = dlib.image_window()

#FDT.jpg is the picture file to be processed in the same directory
img = io.imread("FDT.jpg")

win.set_image(img)

dets = detector(img)

print("Number of faces detected: {}".format(len(dets)))
for k, d in enumerate(dets):
    print("Detection {}: Left: {} Top: {} Right: {} Bottom: {}".format(
        k, d.left(), d.top(), d.right(), d.bottom()))
    # Get the landmarks/parts for the face in box d.
    shape = predictor(img, d)
    #print(shape)
    print("Part 0: {}, Part 1: {} ...".format(shape.part(0),
                                              shape.part(1)))
# Draw the face landmarks on the screen.
win.add_overlay(shape)

win.add_overlay(dets)
dlib.hit_enter_to_continue()
---------------------------2016年3月10日更新---------------------------
今天,我想起了Python中的help()方法,并进行了一次尝试。
>>>help(predictor)

Help on shape_predictor in module dlib.dlib object:

class shape_predictor(Boost.Python.instance)
 |  This object is a tool that takes in an image region containing
some object and outputs a set of point locations that define the pose
of the object. The classic example of this is human face pose
prediction, where you take an image of a human face as input and are
expected to identify the locations of important facial landmarks such
as the corners of the mouth and eyes, tip of the nose, and so forth.
在原始代码中,变量
shape是预测方法的输出。>>>help(shape)
形状描述
形状的描述
class full_object_detection(Boost.Python.instance)
 |  This object represents the location of an object in an image along
with the positions of each of its constituent parts.
----------------------------------------------------------------------
 |  Data descriptors defined here:
 |
 |  num_parts
 |      The number of parts of the object.
 |
 |  rect
 |      The bounding box of the parts.
 |
 |  ----------------------------------------------------------------------
似乎变量
shape与点的坐标位置有关。>>>print(shape.num_parts)
68
>>>print(shape.rect)
[(1005, 563) (1129, 687)]
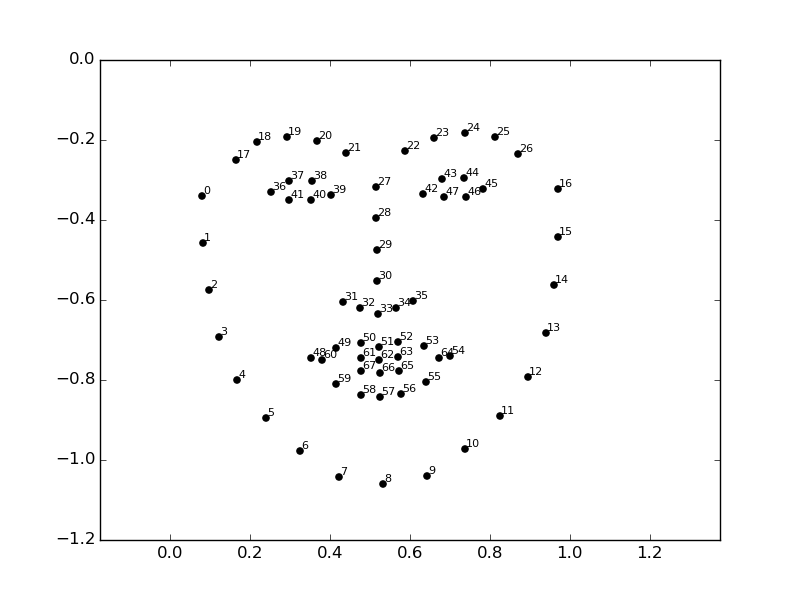
我假设有68个标记的面部关键点。
>>> print(shape.part(68))
Traceback (most recent call last):
  File "<stdin>", line 1, in <module>
IndexError: Index out of range
>>> print(shape.part(65))
(1072, 645)
>>> print(shape.part(66))
(1065, 647)
>>> print(shape.part(67))
(1059, 646)
如果这是真的,那么剩下的问题就是哪个部分对应哪个面部标记点。