使用UIBezierPath
(如果您使用iOS 6或更早版本,请不要忘记链接并导入QuartzCore)
示例代码
你可以使用一个动画来沿着路径移动,方便的是,CAKeyframeAnimation支持CGPath,它可以从UIBezierPath中获取。Swift 3
func animate(view : UIView, fromPoint start : CGPoint, toPoint end: CGPoint)
{
let animation = CAKeyframeAnimation(keyPath: "position")
let path = UIBezierPath()
path.move(to: start)
let c1 = CGPoint(x: start.x + 64, y: start.y)
let c2 = CGPoint(x: end.x, y: end.y - 128)
path.addCurve(to: end, controlPoint1: c1, controlPoint2: c2)
animation.path = path.cgPath;
animation.fillMode = kCAFillModeForwards
animation.isRemovedOnCompletion = false
animation.duration = 1.0
animation.timingFunction = CAMediaTimingFunction(name:kCAMediaTimingFunctionEaseIn)
view.layer.add(animation, forKey:"trash")
}
理解UIBezierPath
贝塞尔路径(或准确地说是贝塞尔曲线)的工作方式与在Photoshop、Fireworks、Sketch等软件中找到的路径完全相同。它们有两个“控制点”,每个顶点一个。例如,我刚刚制作的动画:
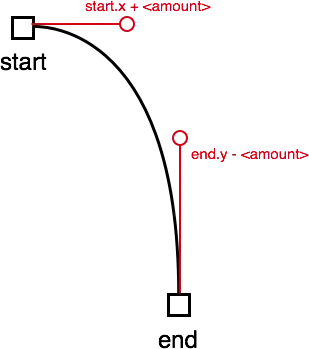
Works the bezier path like that. See the
documentation on the specifics, but it's basically two points that "pull" the arc towards a certain direction.
绘制路径
UIBezierPath 的一个很酷的功能是,您可以使用
CAShapeLayer 在屏幕上绘制它们,从而帮助您可视化它将要遵循的路径。
// Drawing the path
let *layer          = CAShapeLayer()
layer.path          = path.cgPath
layer.strokeColor   = UIColor.black.cgColor
layer.lineWidth     = 1.0
layer.fillColor     = nil

self.view.layer.addSublayer(layer)
改进原始示例
计算自己的贝塞尔路径的想法是,您可以使其完全动态化,因此,动画可以根据多个因素更改要执行的曲线,而不仅仅像我在示例中所做的那样硬编码。例如,控制点可以按以下方式计算:
// Calculate the control points
let factor : CGFloat = 0.5

let deltaX : CGFloat = end.x - start.x
let deltaY : CGFloat = end.y - start.y

let c1 = CGPoint(x: start.x + deltaX * factor, y: start.y)
let c2 = CGPoint(x: end.x                    , y: end.y - deltaY * factor)
这段代码使得点的分布类似于前面的图形,但是会根据三角形的大小变化,并乘以一个因子,该因子相当于“张力”值。