你可以轻松地使用
GPUImage创建一些东西。它带有大量的模糊、噪声生成器和滤镜。你可以将它们连接在一起,建立复杂的GPU加速效果。
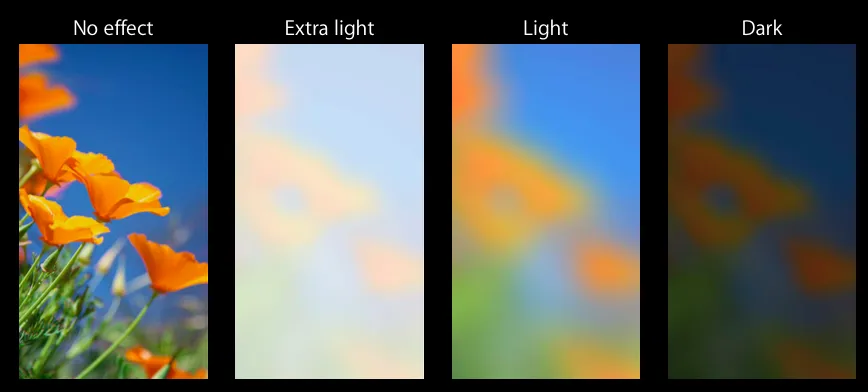
为了给你一个好的起点,这里有一个快速而简单的原型函数,它使用GPUImage来实现你想要的功能。如果将'orUseNoise'设置为YES,它将基于柏林噪声而不是图像创建模糊图像。调整指出的值以改变所需的效果。
- (UIImage *)blurWithGPUImage:(UIImage *)sourceImage orUseNoise:(bool) useNoise {
GPUImagePicture *stillImageSource = [[GPUImagePicture alloc] initWithImage:sourceImage];
GPUImageGaussianBlurFilter *gaussFilter = [[GPUImageGaussianBlurFilter alloc] init];
[gaussFilter setBlurRadiusInPixels:6];
[gaussFilter setBlurPasses:1];
if(useNoise) {
GPUImagePerlinNoiseFilter* perlinNouse = [[GPUImagePerlinNoiseFilter alloc] init];
[perlinNouse setColorStart:(GPUVector4){1.0, 1.0, 1.0f, 1.0}];
[perlinNouse setColorFinish:(GPUVector4){0.5,0.5, 0.5f, 1.0}];
[perlinNouse setScale:200];
[stillImageSource addTarget:perlinNouse];
[perlinNouse addTarget:gaussFilter];
} else {
[stillImageSource addTarget:gaussFilter];
}
[gaussFilter useNextFrameForImageCapture];
[stillImageSource processImage];
UIImage *outputImage = [gaussFilter imageFromCurrentFramebuffer];
UIGraphicsBeginImageContext(self.view.frame.size);
CGContextRef outputContext = UIGraphicsGetCurrentContext();
CGContextScaleCTM(outputContext, 1.0, -1.0);
CGContextTranslateCTM(outputContext, 0, -self.view.frame.size.height);
CGContextDrawImage(outputContext, self.view.frame, outputImage.CGImage);
CGContextSaveGState(outputContext);
UIColor* tint = [UIColor colorWithWhite:1.0f alpha:0.6];
CGContextSetFillColorWithColor(outputContext, tint.CGColor);
CGContextFillRect(outputContext, self.view.frame);
CGContextRestoreGState(outputContext);
outputImage = UIGraphicsGetImageFromCurrentImageContext();
UIGraphicsEndImageContext();
return outputImage;
}
这是一个简单的堆栈:
GPUImagePicture -> GPUImagePerlinNoiseFilter -> GPUImageGaussianBlurFilter
还有一些处理代码,使其能够正确地输出图像。
你可以尝试更改堆栈以使用其他滤镜。
注意:即使你使用噪声而不是图像,你仍需要提供一个图像,直到你将该部分剪切掉为止。


CALayer而不是UIView上。我有一个CAGradientLayer,我想在上面显示模糊效果。 - Harsha