新的iOS 7电话应用程序有一个收藏夹部分。在该部分中,联系人的名称出现在旁边带有联系人首字母的填充圆圈旁边。
这是如何绘制的?使用drawrect还是已经创建了一个对象来完成此操作?
这是如何绘制的?使用drawrect还是已经创建了一个对象来完成此操作?
UIView子类,它可以实现您想要的功能。它会正确地调整圆形中一个或多个字母的大小和位置。以下是在不同大小(32、64、128、256)下使用1-3个字母的效果图: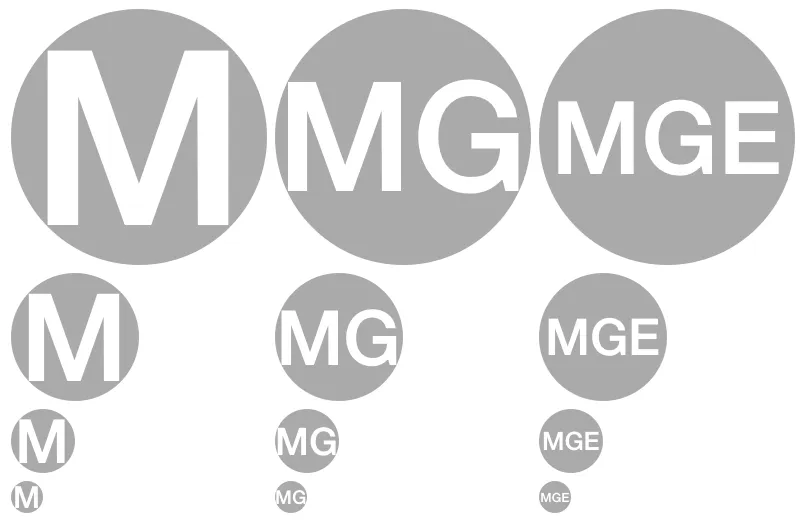
text属性设置为运行时属性,将backgroundColor设置为您想要的圆形颜色即可。
@interface MELetterCircleView : UIView

/**
 * The text to display in the view. This should be limited to
 * just a few characters.
 */
@property (nonatomic, strong) NSString *text;

@end


@interface MELetterCircleView ()

@property (nonatomic, strong) UIColor *circleColor;

@end

@implementation MELetterCircleView

- (instancetype)initWithFrame:(CGRect)frame text:(NSString *)text
{
    NSParameterAssert(text);
    self = [super initWithFrame:frame];
    if (self)
    {
        self.text = text;
    }

    return self;
}

// Override to set the circle's background color.
// The view's background will always be clear.
-(void)setBackgroundColor:(UIColor *)backgroundColor
{
    self.circleColor = backgroundColor;
    [super setBackgroundColor:[UIColor clearColor]];
}


- (void)drawRect:(CGRect)rect
{
    CGContextRef context = UIGraphicsGetCurrentContext();

    [self.circleColor setFill];
    CGContextAddArc(context, CGRectGetMidX(rect), CGRectGetMidY(rect),
                             CGRectGetWidth(rect)/2, 0, 2*M_PI, YES);
    CGContextFillPath(context);

    [self drawSubtractedText:self.text inRect:rect inContext:context];

}

- (void)drawSubtractedText:(NSString *)text inRect:(CGRect)rect
                 inContext:(CGContextRef)context
{
    CGContextSaveGState(context);

    // Magic blend mode
    CGContextSetBlendMode(context, kCGBlendModeDestinationOut);


    CGFloat pointSize =
           [self optimumFontSizeForFont:[UIFont boldSystemFontOfSize:100.f]
                                 inRect:rect
                               withText:text];

    UIFont *font = [UIFont boldSystemFontOfSize:pointSize];

    // Move drawing start point for centering label.
    CGContextTranslateCTM(context, 0,
                           (CGRectGetMidY(rect) - (font.lineHeight/2)));

    CGRect frame = CGRectMake(0, 0, CGRectGetWidth(rect), font.lineHeight)];
    UILabel *label = [[UILabel alloc] initWithFrame:frame];
    label.font = font;
    label.text = text;
    label.textAlignment = NSTextAlignmentCenter;
    label.backgroundColor = [UIColor clearColor];
    [label.layer drawInContext:context];

    // Restore the state of other drawing operations
    CGContextRestoreGState(context);
}

-(CGFloat)optimumFontSizeForFont:(UIFont *)font inRect:(CGRect)rect
                        withText:(NSString *)text
{
    // For current font point size, calculate points per pixel
    CGFloat pointsPerPixel = font.lineHeight / font.pointSize;

    // Scale up point size for the height of the label.
    // This represents the optimum size of a single letter.
    CGFloat desiredPointSize = rect.size.height * pointsPerPixel;

    if ([text length] == 1)
    {
            // In the case of a single letter, we need to scale back a bit
            //  to take into account the circle curve.
            // We could calculate the inner square of the circle,
            // but this is a good approximation.
        desiredPointSize = .80*desiredPointSize;
    }
    else
    {
        // More than a single letter. Let's make room for more.
        desiredPointSize = desiredPointSize / [text length];
    }

    return desiredPointSize;
}
@end