Android:如何在保持宽高比的同时将图像拉伸到屏幕宽度?

119

我想下载一张大小未知但总是大致上是正方形的图片,并将其显示在屏幕上,使其水平填满屏幕,垂直拉伸以保持图像的纵横比,在任何屏幕尺寸下都能实现。这是我的(不起作用的)代码。它可以水平拉伸图像,但不能垂直拉伸,因此它被压缩了...

ImageView mainImageView = new ImageView(context);
    mainImageView.setImageBitmap(mainImage); //downloaded from server
    mainImageView.setScaleType(ScaleType.FIT_XY);
    //mainImageView.setAdjustViewBounds(true); 
    //with this line enabled, just scales image down
    addView(mainImageView,new LinearLayout.LayoutParams( 
            LayoutParams.FILL_PARENT, LayoutParams.FILL_PARENT));

所有的安卓设备的宽高比都完全相同吗?如果不是,那么要想将图像按照原始比例缩放以适应整个宽度/高度是不可能的。 - NoozNooz42
4
不,我不希望图片填满屏幕,只需按比例缩放至屏幕宽度即可。垂直方向上图片占用多少屏幕空间并不重要,只要图像比例正确即可。 - fredley
1
类似问题,好答案:https://dev59.com/Z2445IYBdhLWcg3w1tgS - Pēteris Caune
1
“adjustViewBounds” 没有起作用吗? - Darpan
17个回答

133

我使用自定义视图实现了这个功能。将layout_width设置为“fill_parent”,将layout_height设置为“wrap_content”,并将其指向适当的drawable:

public class Banner extends View {

  private final Drawable logo;

  public Banner(Context context) {
    super(context);
    logo = context.getResources().getDrawable(R.drawable.banner);
    setBackgroundDrawable(logo);
  }

  public Banner(Context context, AttributeSet attrs) {
    super(context, attrs);
    logo = context.getResources().getDrawable(R.drawable.banner);
    setBackgroundDrawable(logo);
  }

  public Banner(Context context, AttributeSet attrs, int defStyle) {
    super(context, attrs, defStyle);
    logo = context.getResources().getDrawable(R.drawable.banner);
    setBackgroundDrawable(logo);
  }

  @Override protected void onMeasure(int widthMeasureSpec,
      int heightMeasureSpec) {
    int width = MeasureSpec.getSize(widthMeasureSpec);
    int height = width * logo.getIntrinsicHeight() / logo.getIntrinsicWidth();
    setMeasuredDimension(width, height);
  }
}

12
谢谢!这应该是正确的答案! :) 我在这篇文章中做了一些调整,增加了一点灵活性:https://dev59.com/Z2445IYBdhLWcg3w1tgS。我使用了一个ImageView,因此可以在XML中设置Drawable或像普通的ImageView一样在代码中使用它来设置图像。效果很好! - Patrick Boos
1
真是个天才!太厉害了!谢谢,这解决了我在不同屏幕尺寸下顶部图像横向不对的问题!非常感谢你! - JPM
1
注意logo为空的情况(如果你正在从互联网下载内容)。否则,这个程序非常好用,请按照Patrick的帖子中的XML片段进行操作。 - Artem Russakovskii
46
我无法相信在Android上做一些在iOS和Windows Phone上轻而易举的事情是如此困难。 - mxcl
1
我已经做了一些更改,但是不想在其他地方发布它们,能否将这个答案变成社区维基?我的更改都是处理此处提到的特殊情况的事项,以及通过布局定义选择哪一侧进行调整大小的能力。 - Steve Pomeroy
显示剩余7条评论

24

最终,我手动生成了尺寸,效果很好:

DisplayMetrics dm = new DisplayMetrics();
context.getWindowManager().getDefaultDisplay().getMetrics(dm);
int width = dm.widthPixels;
int height = width * mainImage.getHeight() / mainImage.getWidth(); //mainImage is the Bitmap I'm drawing
addView(mainImageView,new LinearLayout.LayoutParams( 
        width, height));

我一直在寻找这种解决方案来解决我的问题。借助这个计算,我成功地加载了图像而不会减少它的纵横比。 - Stephen

21

我刚刚阅读了ImageView的源代码,如果不使用本主题中的子类解决方案,基本上是不可能的。在ImageView.onMeasure方法中,我们会遇到以下代码:

        // Get the max possible width given our constraints
        widthSize = resolveAdjustedSize(w + pleft + pright, mMaxWidth, widthMeasureSpec);

        // Get the max possible height given our constraints
        heightSize = resolveAdjustedSize(h + ptop + pbottom, mMaxHeight, heightMeasureSpec);

在此,hw是图像的尺寸,p*表示填充。

接下来:

private int resolveAdjustedSize(int desiredSize, int maxSize,
                               int measureSpec) {
    ...
    switch (specMode) {
        case MeasureSpec.UNSPECIFIED:
            /* Parent says we can be as big as we want. Just don't be larger
               than max size imposed on ourselves.
            */
            result = Math.min(desiredSize, maxSize);

如果您设置了layout_height="wrap_content",它将设置widthSize = w + pleft + pright,换句话说,最大宽度等于图像宽度。
这意味着,除非您设置了确切的大小,否则图像永远不会被放大。我认为这是一个错误,但祝你好运,让谷歌注意到并修复它。编辑:我自己提交了错误报告,他们说已经在未来的版本中修复了!

另一种解决方案

这是另一种子类解决方案,但您在理论上应该(我没有真正测试过!)能够在任何地方使用它ImageView。要使用它,请设置layout_width="match_parent"layout_height="wrap_content"。它比接受的解决方案更通用。例如,您可以根据高度适应或根据宽度适应。
import android.content.Context;
import android.util.AttributeSet;
import android.widget.ImageView;

// This works around the issue described here: https://dev59.com/EnA75IYBdhLWcg3w_umD#12675430
public class StretchyImageView extends ImageView
{

    public StretchyImageView(Context context)
    {
        super(context);
    }

    public StretchyImageView(Context context, AttributeSet attrs)
    {
        super(context, attrs);
    }

    public StretchyImageView(Context context, AttributeSet attrs, int defStyle)
    {
        super(context, attrs, defStyle);
    }

    @Override
    protected void onMeasure(int widthMeasureSpec, int heightMeasureSpec)
    {
        // Call super() so that resolveUri() is called.
        super.onMeasure(widthMeasureSpec, heightMeasureSpec);

        // If there's no drawable we can just use the result from super.
        if (getDrawable() == null)
            return;

        final int widthSpecMode = MeasureSpec.getMode(widthMeasureSpec);
        final int heightSpecMode = MeasureSpec.getMode(heightMeasureSpec);

        int w = getDrawable().getIntrinsicWidth();
        int h = getDrawable().getIntrinsicHeight();
        if (w <= 0)
            w = 1;
        if (h <= 0)
            h = 1;

        // Desired aspect ratio of the view's contents (not including padding)
        float desiredAspect = (float) w / (float) h;

        // We are allowed to change the view's width
        boolean resizeWidth = widthSpecMode != MeasureSpec.EXACTLY;

        // We are allowed to change the view's height
        boolean resizeHeight = heightSpecMode != MeasureSpec.EXACTLY;

        int pleft = getPaddingLeft();
        int pright = getPaddingRight();
        int ptop = getPaddingTop();
        int pbottom = getPaddingBottom();

        // Get the sizes that ImageView decided on.
        int widthSize = getMeasuredWidth();
        int heightSize = getMeasuredHeight();

        if (resizeWidth && !resizeHeight)
        {
            // Resize the width to the height, maintaining aspect ratio.
            int newWidth = (int) (desiredAspect * (heightSize - ptop - pbottom)) + pleft + pright;
            setMeasuredDimension(newWidth, heightSize);
        }
        else if (resizeHeight && !resizeWidth)
        {
            int newHeight = (int) ((widthSize - pleft - pright) / desiredAspect) + ptop + pbottom;
            setMeasuredDimension(widthSize, newHeight);
        }
    }
}
我提交了一个Bug报告(http://code.google.com/p/android/issues/detail?id=38056)。看着它被忽视了! - Timmmm
3
看起来我得收回之前的话了——他们说这个问题在未来的版本中已经修复了! - Timmmm
非常感谢你,Tim。这应该是最终的正确答案。我已经搜索了很长时间,没有什么比你的解决方案更好的了! - tainy
如果我在使用上述 StretchyImageView 时需要设置 maxHeight 怎么办?我没有找到任何解决方案。 - tainy

17

将adjustViewBounds设置为true并使用LinearLayout视图组对我非常有效。无需子类化或请求设备度量:

//NOTE: "this" is a subclass of LinearLayout
ImageView splashImageView = new ImageView(context);
splashImageView.setImageResource(R.drawable.splash);
splashImageView.setAdjustViewBounds(true);
addView(splashImageView);

1
...或者使用 ImageView XML 属性 - android:adjustViewBounds="true" - Anatolii Shuba
太好了!这很容易,而且它完美地拉伸了图像。为什么这个答案不正确呢?使用CustomView的答案对我没有起作用(一些奇怪的xml错误)。 - user3800924

14

我在某种程度上一直为这个问题苦苦挣扎,谢谢您,谢谢您,谢谢您.... :)

我只是想指出,你可以通过扩展View并重写onMeasure来从Bob Lee的方法中获得一个通用的解决方案。这样你就可以使用任何你想要的drawable,并且如果没有图像也不会出现问题:

    public class CardImageView extends View {
        public CardImageView(Context context, AttributeSet attrs, int defStyle) {
            super(context, attrs, defStyle);
        }

        public CardImageView(Context context, AttributeSet attrs) {
            super(context, attrs);
        }

        public CardImageView(Context context) {
            super(context);
        }

        @Override
        protected void onMeasure(int widthMeasureSpec, int heightMeasureSpec) {
            Drawable bg = getBackground();
            if (bg != null) {
                int width = MeasureSpec.getSize(widthMeasureSpec);
                int height = width * bg.getIntrinsicHeight() / bg.getIntrinsicWidth();
                setMeasuredDimension(width,height);
            }
            else {
                super.onMeasure(widthMeasureSpec, heightMeasureSpec);
            }
        }
    }

2
在解决这个问题的众多方案中,这是第一个完全可替换的解决方案,而其他方案总是有缺陷(例如无法在运行时更改图像而不需要重写代码)。谢谢! - MacD
这真是太棒了 - 我已经苦苦挣扎了一段时间,所有使用 XML 属性的明显解决方案都不起作用。有了这个扩展视图,我只需要用它替换我的 ImageView,一切都能按预期工作! - slott
这绝对是解决这个问题的最佳方案。 - erlando
这是一个很好的答案。你可以毫不担心地在xml文件中使用这个类,就像这样:<com.yourpackagename.CardImageView android:layout_width="fill_parent" android:layout_height="wrap_content" android:background="@drawable/your_photo" />。太棒了! - arniotaki

11

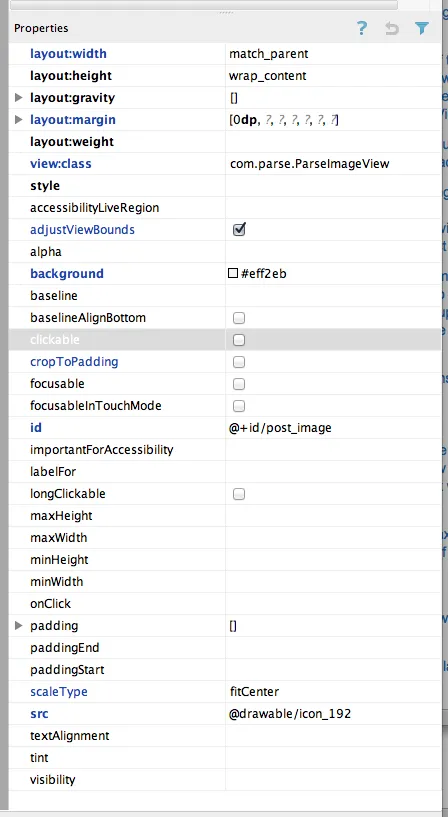
在某些情况下,这个神奇的公式可以很好地解决问题。

对于那些从其他平台转来的人来说,“适应尺寸和形状”选项在Android中处理得非常好,但很难找到。

通常,您需要以下组合:

  • 宽度匹配父容器,
  • 高度包裹内容,
  • adjustViewBounds打开(即 ON),
  • scale使用fitCenter,
  • cropToPadding关闭(即 OFF)

然后它就会自动且令人惊叹。

如果您是iOS开发者,在Android中,您可以轻松地在表视图(list view)中做到“完全动态的单元格高度”... 哦,我的意思是ListView。享受吧。

<com.parse.ParseImageView
    android:layout_width="match_parent"
    android:layout_height="wrap_content"
    android:id="@+id/post_image"
    android:src="@drawable/icon_192"
    android:layout_margin="0dp"
    android:cropToPadding="false"
    android:adjustViewBounds="true"
    android:scaleType="fitCenter"
    android:background="#eff2eb"/>

在这里输入图片描述


6

我仅使用这段XML代码就成功实现了这一点。可能情况是eclipse无法呈现高度以展示其扩展以适应;但是,当您在设备上运行时,它会正确呈现并提供所需的结果。(至少对我来说是这样)

<FrameLayout
     android:layout_width="match_parent"
     android:layout_height="wrap_content">

     <ImageView
          android:layout_width="match_parent"
          android:layout_height="wrap_content"
          android:adjustViewBounds="true"
          android:scaleType="centerCrop"
          android:src="@drawable/whatever" />
</FrameLayout>

抱歉,这个不起作用。它可以缩放宽度,但centerCrop不能保持纵横比。 - ricosrealm
1
在花费了许多时间与自定义类扩展ImageView(如许多答案和文章中所写)的斗争后,我遇到了一个异常,如“找不到以下类”。于是我删除了那段代码。突然间,我注意到我的ImageView的背景属性存在问题!将其更改为“src”,ImageView就变成了比例的。 - CoolMind

5

我在LinearLayout中使用以下值进行了操作:

Scale type: fitStart
Layout gravity: fill_horizontal
Layout height: wrap_content
Layout weight: 1
Layout width: fill_parent

你能给一个真实的例子吗?我应该把这些值放在我的xml文件中的哪里? - John Smith Optional

5

大家都在通过编程实现这个,所以我认为这个答案非常适合这里。这段代码在我的xml中有效。我还没有考虑比例,但如果有帮助的话,我仍然想分享这个答案。

android:adjustViewBounds="true"

干杯...

3

一个非常简单的解决方案是使用RelativeLayout提供的功能。

以下是使用Android标准Views实现的xml示例代码:

<?xml version="1.0" encoding="utf-8"?>
<ScrollView xmlns:android="http://schemas.android.com/apk/res/android"
    android:layout_width="match_parent"
    android:layout_height="match_parent"
    android:fillViewport="true">

    <RelativeLayout 
        android:layout_width="match_parent"
        android:layout_height="wrap_content"
        >
        <LinearLayout
            android:id="@+id/button_container"
            android:layout_width="match_parent"
            android:layout_height="wrap_content"
            android:orientation="vertical"
            android:layout_alignParentBottom="true"
            >
            <Button
                android:text="button"
                android:layout_width="wrap_content"
                android:layout_height="wrap_content"/>
            <Button
                android:text="button"
                android:layout_width="wrap_content"
                android:layout_height="wrap_content"/>
            <Button
                android:text="button"
                android:layout_width="wrap_content"
                android:layout_height="wrap_content"/>
        </LinearLayout>
        <ImageView 
            android:src="@drawable/cat"
            android:layout_width="match_parent"
            android:layout_height="match_parent"
            android:adjustViewBounds="true"
            android:scaleType="centerCrop"
            android:layout_above="@id/button_container"/>
    </RelativeLayout>
</ScrollView>

窍门在于将ImageView设置为填充屏幕,但它必须位于其他布局上面。这样你就可以实现你需要的一切。

网页内容由stack overflow 提供, 点击上面的
可以查看英文原文,
原文链接