如何在React Native中输入字段时将文本输入框设置在键盘上方

34

我正在使用React Native的TextInput组件。在此,如果用户单击textInput字段,则需要显示InputBox在键盘上方。

我尝试过以下方法,但我遇到了问题

1. 键盘避免视图(Keyboard avoiding view)

 a. Here it shows some empty space below the input box 
 b. Manually I need to scroll up the screen to see the input field which I was given in the text field
 c. Input box section is hiding while placing the mouse inside the input box 

2. react-native-Keyboard-aware-scroll-view

a.It shows some empty space below the input box
b.ScrollView is reset to the top of the page after I moving to the next input box

我在ScrollView组件中设置了Keyboard-aware-scroll-view。

请说明一下。

我的示例代码如下:

<SafeAreaView>
<KeyboardAvoidingView>
<ScrollView>        
        <Text>Name</Text>
            <AutoTags
            //required
             suggestions={this.state.suggestedName}
             handleAddition={this.handleAddition}
             handleDelete={this.handleDelete}
             multiline={true}
             placeholder="TYPE IN"
             blurOnSubmit={true}
             style= {styles.style}
             />
</ScrollView>   
</KeyboardAvoidingView>
</SafeAreaView>

[https://github.com/APSL/react-native-keyboard-aware-scroll-view]

尝试为KeyboardAvoidingView设置行为,并确保您的容器视图样式是flex。 - Omar Samman
我已经为KeyboardAvoidingView设置了behavior='padding'和style={{flex:1}}。 <KeyboardAvoidingView style={{flex:1}} behavior='padding'> <View> <Text>名称</Text> <View> <TextInput placeholder="输入内容"/> </View> </View> </KeyboardAvoidingView> - sejn
我需要在React Native中实现这种行为。当移动到文本输入框时,键盘会自动打开并在按下返回键后关闭。https://github.com/Just-/UIViewController-KeyboardAnimation - sejn
你可以尝试将<View>标签移除,只在<KeyboardAvoidingView>外面放置一个标签吗? - kenmistry
不确定为什么您撤销了我的编辑。如果您能在问题描述中放置代码,那肯定会有所帮助。 - kenmistry
@kenmistry 我已经添加了我的示例代码。它将不会显示在键盘上方的inputText框。我想要滚动以查看我正在文本框中输入哪个输入。Autotags具有和TextInput框相同的属性。 - sejn
17个回答

0

当我在处理我的个人项目时,我遇到了同样的问题,经过对KeyboardAvoidingView进行一些调整后,我解决了它。 我将我的解决方案发布到npm,请尝试并给我反馈意见! iOS上的演示

示例代码片段

import React from 'react';
import { StyleSheet, TextInput } from 'react-native';
import KeyboardStickyView from 'rn-keyboard-sticky-view';

const KeyboardInput = (props) => {
  const [value, setValue] = React.useState('');

  return (
    <KeyboardStickyView style={styles.keyboardView}>
      <TextInput
        value={value}
        onChangeText={setValue}
        onSubmitEditing={() => alert(value)}
        placeholder="Write something..."
        style={styles.input}
      />
    </KeyboardStickyView>
  );
}

const styles = StyleSheet.create({
  keyboardView: { ... },
  input: { ... }
});

export default KeyboardInput;


0

我基于@basbase的解决方案。

我的问题在于他的解决方案会使得TextInput跳起来,而不考虑我的整体视图。

这不是我想要的结果,所以我按照他的建议进行了一些小修改。

只需按照以下方式为父View添加样式:

 <View 
             style={{
              flex: 1,
              bottom:   keyboardOffset,
          }}>

这样就可以了!唯一的问题是,如果键盘打开并且您向下滚动,您将看到屏幕末尾的额外空白填充。


0
安装这个包 npm i react-native-keyboard-aware-scroll-view --save 然后像这样放置你的输入
`<KeyboardAwareScrollView>
  <View>
    <TextInput />
  </View>
</KeyboardAwareScrollView>`

0
在android下的app.json文件中添加"softwareKeyboardLayoutMode": "pan"
"android": {
      "softwareKeyboardLayoutMode": "pan",
      "adaptiveIcon": {
        "foregroundImage": "./assets/adaptive-icon.png",
        "backgroundColor": "#ffffff"
      }
    },

0
这对我有用 转到AndroidManifest.xml 将下面的行粘贴到activity标签内
android:windowSoftInputMode="stateAlwaysHidden|adjustPan"

-1

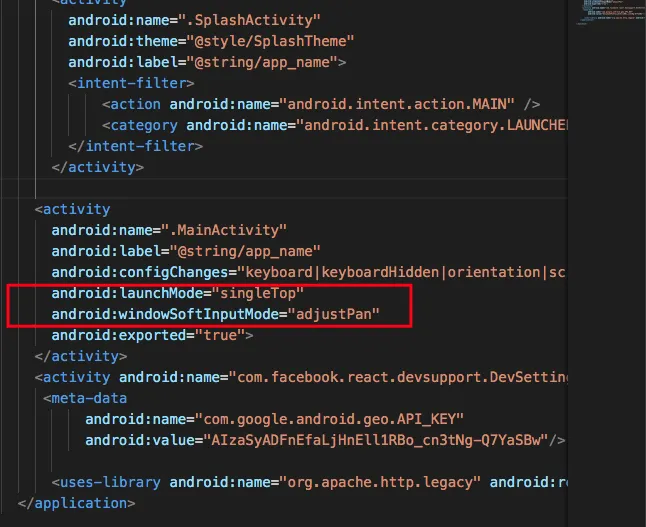
前往你的 Android>app>src>main>AndroidManifest.xml 文件,在其中添加以下两行:

android:launchMode="singleTop" android:windowSoftInputMode="adjustPan"

enter image description here


-1

最好和简单的方法是使用滚动视图,它会自动将内容向上移动,并且文本输入框不会被隐藏,可以参考下面的代码

  <ScrollView style={styles.container}>
  <View>
    <View style={styles.commonView}>
      <Image source={firstNameIcon} style={{width: 25, height: 25}}></Image>
      <Text style={styles.commonTxt}>First Name</Text>
    </View>

    <TextInput
      onFocus={() => onFocus('firstName')}
      placeholder="First Name"
      style={styles.txtInput}
      onChangeText={(text) => onChangeText(text, 'firstName')}
      value={firstNameValue}
    />
  </View>
  <View>
    <View style={styles.commonView}>
      <Image source={LastNameIcon} style={{width: 25, height: 25}}></Image>
      <Text style={styles.commonTxt}>Last Name</Text>
    </View>

    <TextInput
      onFocus={() => onFocus('lastName')}
      placeholder="Last Name"
      style={styles.txtInput}
      onChangeText={(text) => onChangeText(text, 'lastName')}
      value={lastNameValue}
    />
  </View>
  <View>
    <View style={styles.commonView}>
      <Image source={callIcon} style={{width: 25, height: 25}}></Image>
      <Text style={styles.commonTxt}>Number</Text>
    </View>

    <TextInput
      onFocus={() => onFocus('number')}
      placeholder="Number"
      style={styles.txtInput}
      onChangeText={(text) => onChangeText(text, 'number')}
      value={numberValue}
    />
  </View>
  <View>
    <View style={styles.commonView}>
      <Image source={emailIcon} style={{width: 25, height: 25}}></Image>
      <Text style={styles.commonTxt}>Email</Text>
    </View>

    <TextInput
      onFocus={() => onFocus('email')}
      placeholder="Email"
      style={styles.txtInput}
      onChangeText={(text) => onChangeText(text, 'email')}
      value={emailValue}
    />
  </View>

  <View style={styles.viewSavebtn}>
    <TouchableOpacity style={styles.btn}>
      <Text style={styles.saveTxt}>Save</Text>
    </TouchableOpacity>
  </View>
</ScrollView>

网页内容由stack overflow 提供, 点击上面的
可以查看英文原文,
原文链接