在半大小的父控制器中呈现模态视图控制器

58

我试图在其他视图控制器上呈现模态视图控制器,其大小为父视图控制器的一半。但它总是以全屏视图呈现。

我在故事板中创建了自由形式大小的视图控制器,具有固定的框架大小。320 X 250。

var storyboard = UIStoryboard(name: "Main", bundle: nil)
var pvc = storyboard.instantiateViewControllerWithIdentifier("CustomTableViewController") as ProductsTableViewController
self.presentViewController(pvc, animated: true, completion: nil)

我已经尝试设置frame.superview,但没有帮助。

图片示例

请给予建议。


你尝试过将演示样式设置为当前上下文吗? - boidkan
@boidkan 是的,我已经尝试过每一个。 - Anton
你有试过调整布局吗?比如将其改为常规、全部或是紧凑模式。 - boidkan
你是如何让视图与键盘一起工作的?就像在标题/位置字段中,您需要弹出键盘一样。 - esh
@BlackFlam3 这是我很久以前的问题,我一直没有检查它。但是在没有使用这个解决方案的情况下解决了我的问题。 - Anton
显示剩余2条评论
10个回答

97

你可以使用UIPresentationController来实现这个功能。

为此,您可以让呈现的ViewController实现UIViewControllerTransitioningDelegate并返回您的PresentationController以进行半尺寸的显示:

func presentationController(forPresented presented: UIViewController, presenting: UIViewController?, source: UIViewController) -> UIPresentationController? {
    return HalfSizePresentationController(presentedViewController: presented, presenting: presentingViewController)
}

当您进行演示时,将演示样式设置为 .Custom 并设置转换委托:

pvc.modalPresentationStyle = .custom
pvc.transitioningDelegate = self

演示控制器仅返回您呈现的视图控制器的框架:

class HalfSizePresentationController: UIPresentationController {
    override var frameOfPresentedViewInContainerView: CGRect {
        guard let bounds = containerView?.bounds else { return .zero }
        return CGRect(x: 0, y: bounds.height / 2, width: bounds.width, height: bounds.height / 2)
    }
}

以下是完整的可工作代码:

class ViewController: UIViewController, UIViewControllerTransitioningDelegate {

    @IBAction func tap(sender: AnyObject) {
        let storyboard = UIStoryboard(name: "Main", bundle: nil)
        let pvc = storyboard.instantiateViewController(withIdentifier: "CustomTableViewController") as! UITableViewController

        pvc.modalPresentationStyle = .custom
        pvc.transitioningDelegate = self
        pvc.view.backgroundColor = .red

        present(pvc, animated: true)
    }
    
    func presentationController(forPresented presented: UIViewController, presenting: UIViewController?, source: UIViewController) -> UIPresentationController? {
        return HalfSizePresentationController(presentedViewController: presented, presenting: presentingViewController)
    }
}

class HalfSizePresentationController: UIPresentationController {
    override var frameOfPresentedViewInContainerView: CGRect {
        guard let bounds = containerView?.bounds else { return .zero }
        return CGRect(x: 0, y: bounds.height / 2, width: bounds.width, height: bounds.height / 2)
    }
}


6
谢谢。它起作用了。现在当用户点击父视图控制器时,我需要解散我的第二个视图控制器。但是我无法在父视图控制器中获取轻拍手势。能否请您指导我解决这个问题? - BB_Dev
谢谢@Jannis。顺便问一下,我想在第二个视图控制器上放置一个圆形按钮,使按钮的高度50%位于透明视图上,另外50%位于红色部分(以您的示例为例)。 您有什么建议? - Stan92
在iOS9中无法工作:fatal error: unexpectedly found nil while unwrapping an Optional value 在代码行 return HalfSizePresentationController(presentedViewController: presented, presentingViewController: presentingViewController!) 中。 - TomSawyer
3
我根据 此帖子 中的解决方案,编辑了答案以修复 iOS 9 错误。 - phatmann
1
重命名 func presentationController(forPresented presented: UIViewController, presenting: UIViewController?, source: UIViewController) -> UIPresentationController? 为: - Rachit Mishra
显示剩余5条评论

61

如果您想将视图控制器呈现为半模态视图,可以将一些UIViewControllerTransitioningDelegate的委托方法推入其中一个ViewController中。

假设我们有 ViewControllerA 呈现半模态的 ViewControllerB

只需在ViewControllerA中使用自定义的 modalPresentationStyle 呈现ViewControllerB即可。

func gotoVCB(_ sender: UIButton) {
    let vc = ViewControllerB()
    vc.modalPresentationStyle = .custom
    present(vc, animated: true, completion: nil)
}

并且在ViewControllerB中:

import UIKit

final class ViewControllerB: UIViewController {

lazy var backdropView: UIView = {
    let bdView = UIView(frame: self.view.bounds)
    bdView.backgroundColor = UIColor.black.withAlphaComponent(0.5)
    return bdView
}()

let menuView = UIView()
let menuHeight = UIScreen.main.bounds.height / 2
var isPresenting = false

init() {
    super.init(nibName: nil, bundle: nil)
    modalPresentationStyle = .custom
    transitioningDelegate = self
}

required init?(coder aDecoder: NSCoder) {
    fatalError("init(coder:) has not been implemented")
}

override func viewDidLoad() {
    super.viewDidLoad()
    
    view.backgroundColor = .clear
    view.addSubview(backdropView)
    view.addSubview(menuView)
    
    menuView.backgroundColor = .red
    menuView.translatesAutoresizingMaskIntoConstraints = false
    menuView.heightAnchor.constraint(equalToConstant: menuHeight).isActive = true
    menuView.bottomAnchor.constraint(equalTo: view.bottomAnchor).isActive = true
    menuView.leadingAnchor.constraint(equalTo: view.leadingAnchor).isActive = true
    menuView.trailingAnchor.constraint(equalTo: view.trailingAnchor).isActive = true
    
    let tapGesture = UITapGestureRecognizer(target: self, action: #selector(ViewControllerB.handleTap(_:)))
    backdropView.addGestureRecognizer(tapGesture)
}

@objc func handleTap(_ sender: UITapGestureRecognizer) {
    dismiss(animated: true, completion: nil)
}
}

extension ViewControllerB: UIViewControllerTransitioningDelegate, UIViewControllerAnimatedTransitioning {
func animationController(forPresented presented: UIViewController, presenting: UIViewController, source: UIViewController) -> UIViewControllerAnimatedTransitioning? {
    return self
}

func animationController(forDismissed dismissed: UIViewController) -> UIViewControllerAnimatedTransitioning? {
    return self
}

func transitionDuration(using transitionContext: UIViewControllerContextTransitioning?) -> TimeInterval {
    return 1
}

func animateTransition(using transitionContext: UIViewControllerContextTransitioning) {
    let containerView = transitionContext.containerView
    let toViewController = transitionContext.viewController(forKey: UITransitionContextViewControllerKey.to)
    guard let toVC = toViewController else { return }
    isPresenting = !isPresenting
    
    if isPresenting == true {
        containerView.addSubview(toVC.view)
        
        menuView.frame.origin.y += menuHeight
        backdropView.alpha = 0
        
        UIView.animate(withDuration: 0.4, delay: 0, options: [.curveEaseOut], animations: {
            self.menuView.frame.origin.y -= self.menuHeight
            self.backdropView.alpha = 1
        }, completion: { (finished) in
            transitionContext.completeTransition(true)
        })
    } else {
        UIView.animate(withDuration: 0.4, delay: 0, options: [.curveEaseOut], animations: {
            self.menuView.frame.origin.y += self.menuHeight
            self.backdropView.alpha = 0
        }, completion: { (finished) in
            transitionContext.completeTransition(true)
        })
    }
}
}

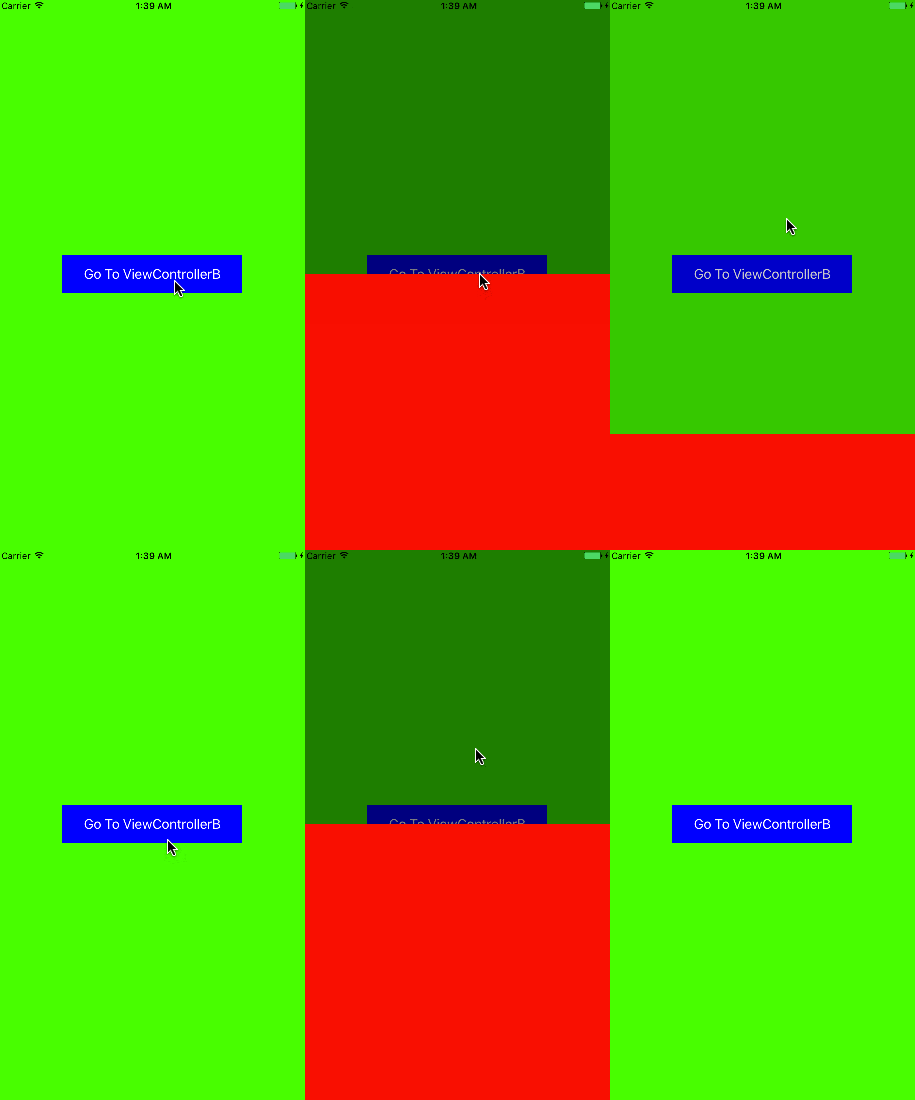
结果:

enter image description here

所有代码都已发布在我的Github上。


1
谢谢!这是最好的实现方式! - Włodzimierz Woźniak
1
这个程序百分之百可行,但在iOS 13上,演示和解散转换远不如您的gif流畅,它们都非常突然。但除此之外,它是完美的! - Lance Samaria
1
我遇到了这个错误:“init(coder:)未被实现”。 - OhhhThatVarun
1
这绝对是我遇到的最干净的方法。所有操作都是通过编程完成的。它可以以任何方式进行完全自定义。非常感谢您花费的时间和精力,并与我们分享。 - Jiraheta

41

如果有人像我一样想用 Swift 4 实现这个,这里提供一些参考。

class MyViewController : UIViewController {
    ...
    @IBAction func dictionaryButtonTouchUp(_ sender: UIButton) {
        let modalViewController = ...
        modalViewController.transitioningDelegate = self
        modalViewController.modalPresentationStyle = .custom

        self.present(modalViewController, animated: true, completion: nil)
    }
}

extension MyViewController : UIViewControllerTransitioningDelegate {
    func presentationController(forPresented presented: UIViewController, presenting: UIViewController?, source: UIViewController) -> UIPresentationController? {
        return HalfSizePresentationController(presentedViewController: presented, presenting: presenting)
    }
}

HalfSizePresentationController类由以下组成:

class HalfSizePresentationController : UIPresentationController {
    override var frameOfPresentedViewInContainerView: CGRect {
        get {
            guard let theView = containerView else {
                return CGRect.zero
            }

            return CGRect(x: 0, y: theView.bounds.height/2, width: theView.bounds.width, height: theView.bounds.height/2)
        }
    }
}

干杯!


3
在你的例子中,@/francois-nadeau是如何将背景视图的三分之一变为灰色/半透明的? - user2924482

10

Jannis很好地捕捉了总体策略。在iOS 9.x中,使用Swift 3对我没有起作用。在呈现VC上,启动呈现的VC的操作与上面介绍的类似,只是有一些非常小的更改如下:

let storyboard = UIStoryboard(name: "Main", bundle: nil)
let pvc = storyboard.instantiateViewController(withIdentifier: "SomeScreen") as SomeViewController

pvc.modalPresentationStyle = .custom
pvc.transitioningDelegate = self

present(pvc, animated: true, completion: nil)

要在同一呈现VC上实现UIViewControllerTransitioningDelegate,语法与SO答案中https://dev59.com/A5rga4cB1Zd3GeqPrsM-#39513247中的突出显示不同。这是对我来说最棘手的部分。以下是协议实现:

func presentationController(forPresented presented: UIViewController, presenting: UIViewController?, source: UIViewController) -> UIPresentationController? {
    return HalfSizePresentationController(presentedViewController:presented, presenting: presenting)
}

对于UIPresentationController类,我必须覆盖变量frameOfPresentedViewInContainerView,而不是方法,如下所示:

class HalfSizePresentationController: UIPresentationController {
    override var frameOfPresentedViewInContainerView: CGRect {
        return CGRect(x: 0, y: 0, width: containerView!.bounds.width, height: containerView!.bounds.height/2)
    }
}

有些问题是关于如何在演示后关闭视图。您可以像处理其他 VC 一样,在呈现的 VC 上实现所有常规逻辑。我在 SomeViewController 中实现了一个操作,当用户在呈现的 VC 外部点击时关闭视图。


2
我认为HalfSizeController的y坐标应该从半屏幕开始,代码如下: return CGRect(x: 0, y: (containerView!.bounds.height/2), width: containerView!.bounds.width, height: containerView!.bounds.height/2 - Farras Doko

6

详情

  • Xcode 12.2 (12B45b)
  • Swift 5.3

解决方案1:默认转换

思路:

隐藏ChildViewControllerroot view,并添加新视图作为root view

主要逻辑:

class ChildViewController: UIViewController { 
    override func viewDidLoad() {
        super.viewDidLoad()
        view.backgroundColor = .clear

        let contentView = UIView()
        contentView.backgroundColor = .lightGray
        view.addSubview(contentView)
        //...
    }
}

解决方案1. 全样本

import UIKit

// MARK: ParentViewController

class ParentViewController: UIViewController {

    override func viewDidLoad() {
        super.viewDidLoad()
        let button = UIButton(frame: CGRect(x: 50, y: 50, width: 200, height: 60))
        button.setTitle("Present VC", for: .normal)
        button.setTitleColor(.blue, for: .normal)
        button.addTarget(self, action: #selector(touchedUpInside), for: .touchUpInside)
        view.addSubview(button)
    }

    @objc func touchedUpInside(source: UIButton) {
        let viewController = ChildViewController()
        present(viewController, animated: true, completion: nil)
    }
}

// MARK: ChildViewController

class ChildViewController: UIViewController {
    override func viewDidLoad() {
        super.viewDidLoad()
        view.backgroundColor = .clear

        let contentView = UIView()
        contentView.backgroundColor = .lightGray
        view.addSubview(contentView)

        contentView.translatesAutoresizingMaskIntoConstraints = false
        contentView.heightAnchor.constraint(equalTo: view.heightAnchor, multiplier: 0.5).isActive = true
        contentView.leftAnchor.constraint(equalTo: view.safeAreaLayoutGuide.leftAnchor).isActive = true
        contentView.rightAnchor.constraint(equalTo: view.safeAreaLayoutGuide.rightAnchor).isActive = true
        contentView.bottomAnchor.constraint(equalTo: view.safeAreaLayoutGuide.bottomAnchor).isActive = true
    }
}

解决方案 2. 自定义转场

思路:

改变ChildViewController的根视图大小。

主要逻辑:

ModalPresentationController(模态呈现控制器)

protocol ModalPresentationControllerDelegate: class {
    func updateFrameOfPresentedViewInContainerView(frame: CGRect) -> CGRect
}

class ModalPresentationController: UIPresentationController {
    private weak var modalPresentationDelegate: ModalPresentationControllerDelegate!

    convenience
    init(delegate: ModalPresentationControllerDelegate,
         presentedViewController: UIViewController,
         presenting presentingViewController: UIViewController?) {
        self.init(presentedViewController: presentedViewController,
                  presenting: presentingViewController)
        self.modalPresentationDelegate = delegate
    }

    override var frameOfPresentedViewInContainerView: CGRect {
        get { modalPresentationDelegate.updateFrameOfPresentedViewInContainerView(frame: super.frameOfPresentedViewInContainerView) }
    }
}

更新根视图大小。
class ChildViewController: UIViewController {
    init() {
        //...
        transitioningDelegate = self
        modalPresentationStyle = .custom
    }
}

extension ChildViewController: UIViewControllerTransitioningDelegate {
    func presentationController(forPresented presented: UIViewController,
                                presenting: UIViewController?,
                                source: UIViewController) -> UIPresentationController? {
        ModalPresentationController(delegate: self, presentedViewController: presented, presenting: presenting)
    }
}

extension ChildViewController: ModalPresentationControllerDelegate {
    func updateFrameOfPresentedViewInContainerView(frame: CGRect) -> CGRect {
        CGRect(x: 0, y: frame.height/2, width: frame.width, height: frame.height/2)
    }
}
解决方案 2. 完整示例

不要忘记在此处粘贴上方定义的ModalPresentationController

import UIKit

// MARK: ParentViewController

class ParentViewController: UIViewController {

    override func viewDidLoad() {
        super.viewDidLoad()
        let button = UIButton(frame: CGRect(x: 50, y: 50, width: 200, height: 60))
        button.setTitle("Present VC", for: .normal)
        button.setTitleColor(.blue, for: .normal)
        button.addTarget(self, action: #selector(touchedUpInside), for: .touchUpInside)
        view.addSubview(button)
    }

    @objc func touchedUpInside(source: UIButton) {
        let viewController = ChildViewController()
        present(viewController, animated: true, completion: nil)
    }
}

// MARK: ChildViewController

class ChildViewController: UIViewController {
    init() {
        super.init(nibName: nil, bundle: nil)
        transitioningDelegate = self
        modalPresentationStyle = .custom
        view.backgroundColor = .lightGray
    }

    required init?(coder: NSCoder) { super.init(coder: coder) }
}

extension ChildViewController: UIViewControllerTransitioningDelegate {
    func presentationController(forPresented presented: UIViewController,
                                presenting: UIViewController?,
                                source: UIViewController) -> UIPresentationController? {
        ModalPresentationController(delegate: self, presentedViewController: presented, presenting: presenting)
    }
}

extension ChildViewController: ModalPresentationControllerDelegate {
    func updateFrameOfPresentedViewInContainerView(frame: CGRect) -> CGRect {
        CGRect(x: 0, y: frame.height/2, width: frame.width, height: frame.height/2)
    }
}
1
第二个例子非常聪明。它比通常的UIPresentationController子类化要复杂一些,通常情况下,人们会在那里设置/调整呈现VC的大小,而你使用一个委托来让呈现的VC设置自己的大小。因此,您已经将其变成了更灵活的通用解决方案,这使得新手难以理解,但它非常深思熟虑。 - clearlight
我鼓励任何新手查看各种UIPresentationViewController子类化示例,以了解通常如何处理基本/最小的内容,然后再尝试理解这个示例,这需要对所有涉及的内容有相当扎实的掌握。 - clearlight

3

1
这应该是被接受的答案; - mehdok
1
没错。顺便说一下:从iOS 16开始,您可以创建自定义的停靠大小(例如不仅限于.medium().large())。注意:自定义停靠确实会自动适应软键盘(例如当kb出现时会垂直移动呈现的VC),就像UISheetController手册页面所说的那样。对于iOS 15,可以使用UISheetController子类使用私有方法和_detent属性来实现自定义停靠。如果需要自定义停靠,则在iOS 15中最好子类化UIPresentationController子类并在frameOfPresentedViewInContainerView属性中设置大小。 - clearlight

1

这里是 Swift 4.0,一些类名已更改,frameOfPresentedViewInContainerView 的获取方法也有所变化。

步骤1:设置代理

class ViewController: UIViewController, UIViewControllerTransitioningDelegate 

步骤二:设置代理方法。
func presentationController(forPresented presented: UIViewController, presenting: UIViewController?, source: UIViewController) -> UIPresentationController? {
         return SetSizePresentationController(presentedViewController: presented, presenting: presenting)
}

第三步:在这里,您可以创建自己的类以设置大小(CGRect)。
class SetSizePresentationController : UIPresentationController {
    override var frameOfPresentedViewInContainerView: CGRect {
        get {
             return CGRect(x: 0, y: (containerView?.bounds.height ?? 0)/2, width: containerView?.bounds.width ?? 0, height: (containerView?.bounds.height ?? 0)/2)
        }
    }
}

第四步:这里有两行重要内容 transitioningdelegateUIModalPresentationStyle.custom

let storyboard = UIStoryboard(name: "User", bundle: nil)
let vc = storyboard.instantiateViewController(withIdentifier: "LicenceViewController") as! LicenceViewController
vc.modalPresentationStyle = UIModalPresentationStyle.custom
vc.transitioningDelegate = self
present(vc, animated: true)

全屏是哪个类?半屏是哪个类? - Satyam

0

我使用以下逻辑来呈现半屏幕 ViewController

 let storyboard = UIStoryboard(name: "Main", bundle: nil)
    let expVC = storyboard.instantiateViewController(withIdentifier: "AddExperinceVC") as! AddExperinceVC
    expVC.modalPresentationStyle = UIModalPresentationStyle.overCurrentContext

    self.present(expVC, animated: true, completion: nil)

0

补充Jannis的答案:

如果你的弹出视图是一个UIViewController,在加载/设置时添加了一个表格,你需要确保创建的表格框架与实际视图的所需宽度匹配。

例如:

let tableFrame: CGRect = CGRectMake(0, 0, chosenWidth, CGFloat(numOfRows) * rowHeight)

其中chosenWidth是您在自定义类中设置的宽度(在上面的例子中为containerView.bounds.width

您不需要对单元格本身进行任何强制操作,因为表格容器(至少在理论上)应该将单元格强制调整为正确的宽度。


0
通常情况下,您可以使用viewDidLayoutSubviews中的systemLayoutSizeFitting来调整框架大小以达到最小要求。这样可以保留Apple提供的视觉效果和物理效果,而使用自定义演示文稿则会失去这些效果。
请参见此答案上的示例代码。

网页内容由stack overflow 提供, 点击上面的
可以查看英文原文,
原文链接