如何在Node.js中将二进制缓冲区保存为PNG文件?

3
我有一个包含位图信息的二进制nodejs缓冲区对象。如何从缓冲区创建图像并将其保存到文件中?
编辑:
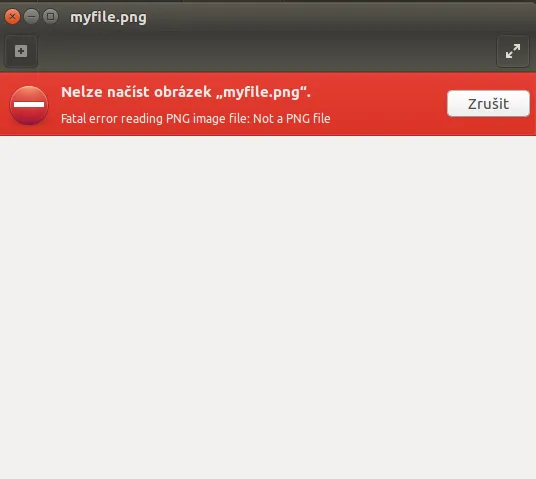
我尝试使用文件系统包,就像@herchu所说的那样,但如果我这样做:
let robot = require("robotjs")
let fs = require('fs')

let size = 200
let img = robot.screen.capture(0, 0, size, size)


let path = 'myfile.png'
let buffer = img.image

fs.open(path, 'w', function (err, fd) {
  if (err) {
    // Something wrong creating the file
  }

  fs.write(fd, buffer, 0, buffer.length, null, function (err) {
    // Something wrong writing contents!
  })
})

我得到

enter image description here

5个回答

7

虽然@herchu和@Jake提供的解决方案是可行的,但它们非常缓慢(根据我的经验需要10-15秒)。


Jimp支持将原始像素缓冲区转换为PNG,并且可以快得多(在子秒级别)。

const img = robot.screen.capture(0, 0, width, height).image;
new Jimp({data: img, width, height}, (err, image) => {
    image.write(fileName);
});

2
我遇到了这个错误:找不到匹配的构造函数重载。请查看文档以了解如何调用Jimp构造函数。 - HRK44
这就像快了100000e10倍。 - Alan Aasmaa
在Ubuntu 18.04上,这对我来说效果不佳。 起初,生成的图像是透明的。我注意到alpha通道始终为0,所以我将其更新为255,只是发现颜色不正确。 由于某种原因,robotjs创建的缓冲区使用的是bgra而不是rgba。 使用以下代码解决了我的问题,并且仍然比此处提供的其他建议解决方案快得多: let fixedImg = new Uint8Array(img.length); for (let i=0; i < img.length; i+=4){ fixedImg[i] = img[i+2]; // r fixedImg[i+1] = img[i+1]; // g fixedImg[i+2] = img[i+0]; // b fixedImg[i+3] = 255; // a } - Dor Cohen

3

补充一下@herchu所接受的答案,这个代码示例可以更快地处理/转换原始字节(对于我来说,全屏幕<1s)。希望对某些人有所帮助。

var jimg = new Jimp(width, height);
for (var x=0; x<width; x++) {
    for (var y=0; y<height; y++) {
        var index = (y * rimg.byteWidth) + (x * rimg.bytesPerPixel);
        var r = rimg.image[index];
        var g = rimg.image[index+1];
        var b = rimg.image[index+2];
        var num = (r*256) + (g*256*256) + (b*256*256*256) + 255;
        jimg.setPixelColor(num, x, y);
    }
}

3

注意:我正在根据您最后的编辑修改我的答案

如果您正在使用Robotjs,请检查其位图对象是否包含用于原始像素数据的缓冲区,而不是PNG或任何其他文件格式的内容,只有相邻的像素(在您的情况下恰好为200 x 200个元素)。

我没有在Robotjs库中找到编写其他格式内容的函数(也许我不知道),因此在这个答案中我使用了另一个库Jimp进行图像处理。

let robot = require("robotjs")
let fs = require('fs')
let Jimp = require('jimp')

let size = 200
let rimg = robot.screen.capture(0, 0, size, size)
let path = 'myfile.png'

// Create a new blank image, same size as Robotjs' one
let jimg = new Jimp(size, size);
for (var x=0; x<size; x++) {
        for (var y=0; y<size; y++) {
                // hex is a string, rrggbb format
                var hex = rimg.colorAt(x, y);
                // Jimp expects an Int, with RGBA data,
                // so add FF as 'full opaque' to RGB color
                var num = parseInt(hex+"ff", 16)
                // Set pixel manually
                jimg.setPixelColor(num, x, y);
        }
    }
jimg.write(path)

请注意,转换是通过手动迭代所有像素完成的;在 JS 中这很慢。此外,每个库如何处理其像素格式存在一些细节,因此需要在循环中进行一些操作——从嵌入式注释中应该能够清楚地看出来。

我发现了一个很棒的库。我制作了一个简单的颜色机器人,然后决定做一些更智能的事情,所以我在nodejs中设置了模板匹配。我可以拍摄屏幕截图,但库返回一个缓冲区。https://robotjs.io/docs/syntax#screencapturex-y-width-height。我担心无法使用文件系统。https://github.com/octalmage/robotjs/issues/222 - Michal
我编辑了我的问题。如果您了解C或其他更难的编程语言,我会非常感激您的帮助,因为我已经花了几个小时来解决这个问题了。 :/ - Michal
我已经编辑了这个问题。代码现在基于你的代码,使用了robotjs,并产生了一个工作的PNG文件。(原始问题中没有明确说明你的缓冲区不是PNG文件...而是一个原始的robotjs缓冲区) - herchu
我接受了这个答案,因为你解释得很详细。但是当图片大小达到600x600及以上时,它变得太慢了。我将使用shelljs并将截图生成到文件中。然后我可能会使用express服务器向客户端提供服务,或者只是使用socket.io进行传输。 - Michal
我在下面添加了一个备用的代码示例,用于处理像素,运行速度更快(对于大多数实际用途来说应该足够快)。感谢@herchu一开始指导我正确方向。 :) - Jake

1
四倍快!如果使用这个脚本,全屏1920x1080的加载时间为约280毫秒和550千字节。当我将每个字节的2个线程与额头进行比较时,我发现了这种模式。
const robotjs = require('robotjs');
const Jimp = require('jimp');
const app = require('express').Router();

app.get('/screenCapture', (req, res)=>{
  let image = robotjs.screen.capture();
  for(let i=0; i < image.image.length; i++){
      if(i%4 == 0){
          [image.image[i], image.image[i+2]] = [image.image[i+2], image.image[i]];
      }
  }

  var jimg = new Jimp(image.width, image.height);
  jimg.bitmap.data = image.image;
  jimg.getBuffer(Jimp.MIME_PNG, (err, result)=>{
      res.set('Content-Type', Jimp.MIME_PNG);
      res.send(result);
  });
});

如果在jimp.getBuffer之前添加此代码,则全屏显示大约需要210毫秒和320Kb。
  jimg.rgba(true);
  jimg.filterType(1); 
  jimg.deflateLevel(5);
  jimg.deflateStrategy(1);

0

我建议你看看sharp,因为它的性能指标比jimp更优秀。

robotjs屏幕捕获的问题实际上非常高效,但是它使用的是BGRA颜色模型而不是RGBA。因此,您需要进行额外的颜色旋转。

此外,由于我们从桌面截取屏幕截图,我无法想象我们需要透明度的情况。因此,我建议忽略它。

const [left, top, width, height] = [0, 0, 100, 100]
const channels = 3
const {image, width: cWidth, height: cHeight, bytesPerPixel, byteWidth} = robot.screen.capture(left, right, width, height)
const uint8array = new Uint8Array(cWidth*cHeight*channels);
for(let h=0; h<cHeight; h+=1) {
  for(let w=0; w<cWidth; w+=1) {
    let offset = (h*cWidth + w)*channels
    let offset2 = byteWidth*h + w*bytesPerPixel
    uint8array[offset] = image.readUInt8(offset2 + 2)
    uint8array[offset + 1] = image.readUInt8(offset2 + 1)
    uint8array[offset + 2] = image.readUInt8(offset2 + 0)
  }
}
await sharp(Buffer.from(uint8array), {
  raw: {
    width: cWidth,
    height: cHeight,
    channels,
  }
}).toFile('capture.png')

我在这里使用了中间数组,但实际上你可以直接交换屏幕截图的结果。


网页内容由stack overflow 提供, 点击上面的
可以查看英文原文,
原文链接