长的Android TextView将其他视图推出屏幕

5

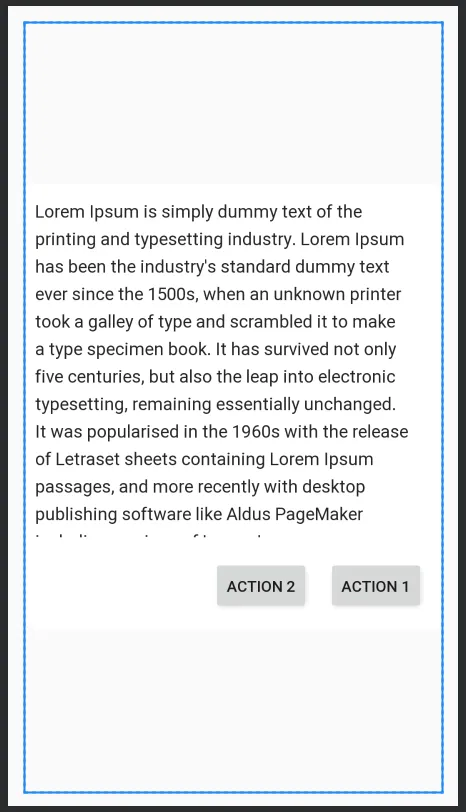
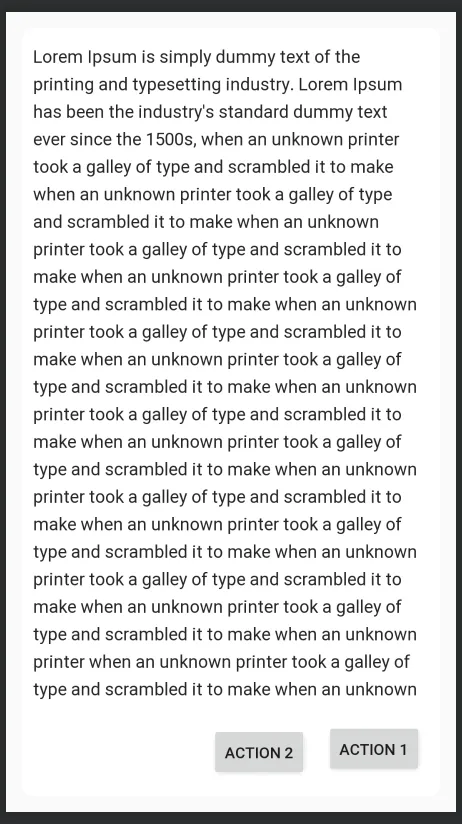
我有两个并排的TextView。TextView1的文本长度不固定,而TextView2则始终为“+#”。但是当TextView1变得很长时,它会将TextView2推出屏幕外。有什么解决方法吗?这是我的布局代码:

    <RelativeLayout
        android:layout_width="match_parent"
        android:layout_height="wrap_content"
        android:orientation="horizontal">

        <TextView
            android:id="@+id/TextView1"
            android:layout_width="wrap_content"
            android:layout_height="wrap_content"
            android:singleLine="true"
            android:ellipsize="end"
            android:textSize="13sp"/>

        <TextView
            android:id="@+id/TextView2"
            android:layout_width="wrap_content"
            android:layout_height="wrap_content"
            android:singleLine="true"
            android:textSize="13sp"/>

    </RelativeLayout>

你打算将父视图设置为RelativeLayout还是LinearLayout?你正在指定android:orientation =“horizontal”,而方向仅适用于LinearLayout。另外,如果您可以澄清期望的行为,那将有所帮助。 - Michael Krause
4个回答

26

实际上这是我尝试解决了一段时间的问题。不幸的是,其他人建议使用LinearLayout中的layout_weight的方法并不能真正解决问题; 但是,我已经为您找到了一个解决方案!

<RelativeLayout
    android:layout_width="match_parent"
    android:layout_height="wrap_content"
    android:gravity="left">

    <TextView
        android:id="@+id/TextView1"
        android:layout_width="wrap_content"
        android:layout_height="wrap_content"
        android:layout_toLeftOf="@id/TextView2"
        android:singleLine="true"
        android:ellipsize="end"
        android:textSize="13sp"/>

    <TextView
        android:id="@+id/TextView2"
        android:layout_width="wrap_content"
        android:layout_height="wrap_content"
        android:layout_alignParentRight="true"
        android:singleLine="true"
        android:textSize="13sp"/>
</RelativeLayout>

通过上述代码块,我们使用RelativeLayout来使第一个TextView与第二个TextView左对齐。 我们还将第二个TextView与父ViewGroup的右侧对齐。 最后,我们在父ViewGroup中添加android:gravity="left"以将所有TextView都左对齐。

这样做将导致两个TextView并排放置 - 不受第一个TextView长度的影响。 如果您希望第一个TextView具有多行文本,请删除android:ellipsize="end"标记。

希望这符合您的期望!


1
最好的答案!我找了两个小时 :) - TrueCurry
3
@Justin你的评论与问题无关。是的,layout_weightlinear_layout中可以工作;然而使用layout_weight来实现发帖者要求的内容是行不通的。 - Evan Bashir
这个代码可以运行,但是它把所有东西都固定在了父RelativeLayout的最右边,而我需要它在左边...有什么帮助吗? - Lampione
我认为很清楚:即使RelativeLayout具有gravity="left"属性,两个内部布局也会被锚定到父级的右侧。我尝试翻转属性,但没有任何变化。 - Lampione
@Matteo,请提交一个新问题,因为我没有看到你尝试过什么,所以无法正确评估情况。 - Evan Bashir
显示剩余4条评论

0
使用LinearLayout和子视图上的weight属性。
<LinearLayout
  android:orientation="horizontal"
  android:layout_width="fill_parent"
  android:layout_height="fill_parent"
  xmlns:android="http://schemas.android.com/apk/res/android">

        <TextView
            android:id="@+id/TextView1"
            android:layout_width="wrap_content"
            android:layout_height="wrap_content"
            android:singleLine="true"
            android:ellipsize="end"
            android:textSize="13sp"
            android:layout_weight="1"/>

        <TextView
            android:id="@+id/TextView2"
            android:layout_width="wrap_content"
            android:layout_height="wrap_content"
            android:singleLine="true"
            android:textSize="13sp"
            android:layout_weight="0"/>

    </LinearLayout>

0
将您的TextView权重设置为1,并将其宽度/高度设置为“0dp”。
<LinearLayout
    android:layout_height="wrap_content"
    android:layout_width="match_parent">

    <TextView
        android:layout_height="wrap_content"
        android:layout_weight="1"
        android:layout_width="0dp"
        android:text="@string/random_string" />

    <com.google.android.material.button.MaterialButton
        android:layout_width="wrap_content"
        android:layout_height="wrap_content"/>

    <com.google.android.material.button.MaterialButton
        android:layout_width="wrap_content"
        android:layout_height="wrap_content"/>
</LinearLayout>

0

这个问题可以使用android.support.constraint.ConstraintLayout来解决。

这里有一些截图,让你可以看到它如何处理小文本和长文本。

Example 1: Small text

Example 2: Very long text

这里是XML:

<?xml version="1.0" encoding="utf-8"?>
<android.support.constraint.ConstraintLayout
    xmlns:android="http://schemas.android.com/apk/res/android"
    xmlns:app="http://schemas.android.com/apk/res-auto"
    android:layout_width="match_parent"
    android:layout_height="match_parent"
    android:layout_margin="15dp">

    <ScrollView
        android:id="@+id/scrollView"
        android:background="@drawable/white_rounded_rectangle"
        android:layout_width="match_parent"
        android:layout_height="wrap_content"
        app:layout_constraintBottom_toBottomOf="parent"
        app:layout_constraintEnd_toEndOf="parent"
        app:layout_constraintStart_toStartOf="parent"
        app:layout_constraintTop_toTopOf="parent"
        android:scrollbars="none">

        <TextView
            android:id="@+id/messageTv"
            android:layout_width="match_parent"
            android:layout_height="wrap_content"
            android:fontFamily="sans-serif"
            android:lineSpacingExtra="6sp"
            android:paddingTop="15dp"
            android:paddingLeft="10dp"
            android:paddingRight="10dp"
            android:paddingBottom="70dp"
            android:text="Lorem Ipsum is simply dummy text of the printing and typesetting industry. Lorem Ipsum has been the industry's standard dummy text ever PageMaker including versions of Lorem Ipsum."
            android:textColor="#252525"
            android:textIsSelectable="true"
            android:textSize="@dimen/text_size16"
            />
    </ScrollView>


    <android.support.constraint.ConstraintLayout
        android:id="@+id/bottomLayout"
        android:layout_width="match_parent"
        android:layout_height="84dp"
        android:background="@drawable/white_rounded_rectangle"
        app:layout_constraintBottom_toBottomOf="@+id/scrollView"
        app:layout_constraintEnd_toEndOf="@+id/scrollView"
        app:layout_constraintStart_toStartOf="@+id/scrollView">

        <android.support.v7.widget.AppCompatButton
            android:id="@+id/btnAction1"
            android:layout_width="wrap_content"
            android:layout_height="wrap_content"
            android:layout_marginEnd="16dp"
            android:layout_marginBottom="19dp"
            android:layout_weight="1"
            android:text="Action 1"
            app:layout_constraintBottom_toBottomOf="parent"
            app:layout_constraintEnd_toEndOf="parent" />

        <android.support.v7.widget.AppCompatButton
            android:id="@+id/btnAction2"
            android:layout_width="wrap_content"
            android:layout_height="wrap_content"
            android:layout_marginEnd="17dp"
            android:layout_marginBottom="16dp"
            android:text="Action 2"
            app:layout_constraintBottom_toBottomOf="parent"
            app:layout_constraintEnd_toStartOf="@+id/btnAction1" />
    </android.support.constraint.ConstraintLayout>

</android.support.constraint.ConstraintLayout>

网页内容由stack overflow 提供, 点击上面的
可以查看英文原文,
原文链接