UWP合成——将不透明度掩码应用于ListView的顶部30像素

7
如何将效果应用于ListView,使顶部的30像素从完全透明渐变为完全不透明?想法是随着向下滚动,顶部的项目逐渐消失。
我正在构建一个UWP应用程序,设计要求ListView的顶部30像素从不透明度0开始过渡到不透明度1。从概念上讲,我想象一个Opacity Mask应用于SpriteVisual的顶部部分,但我无法弄清楚如何实现这一点。
我正在尝试使用Windows 10周年版,Composition和Win2D。
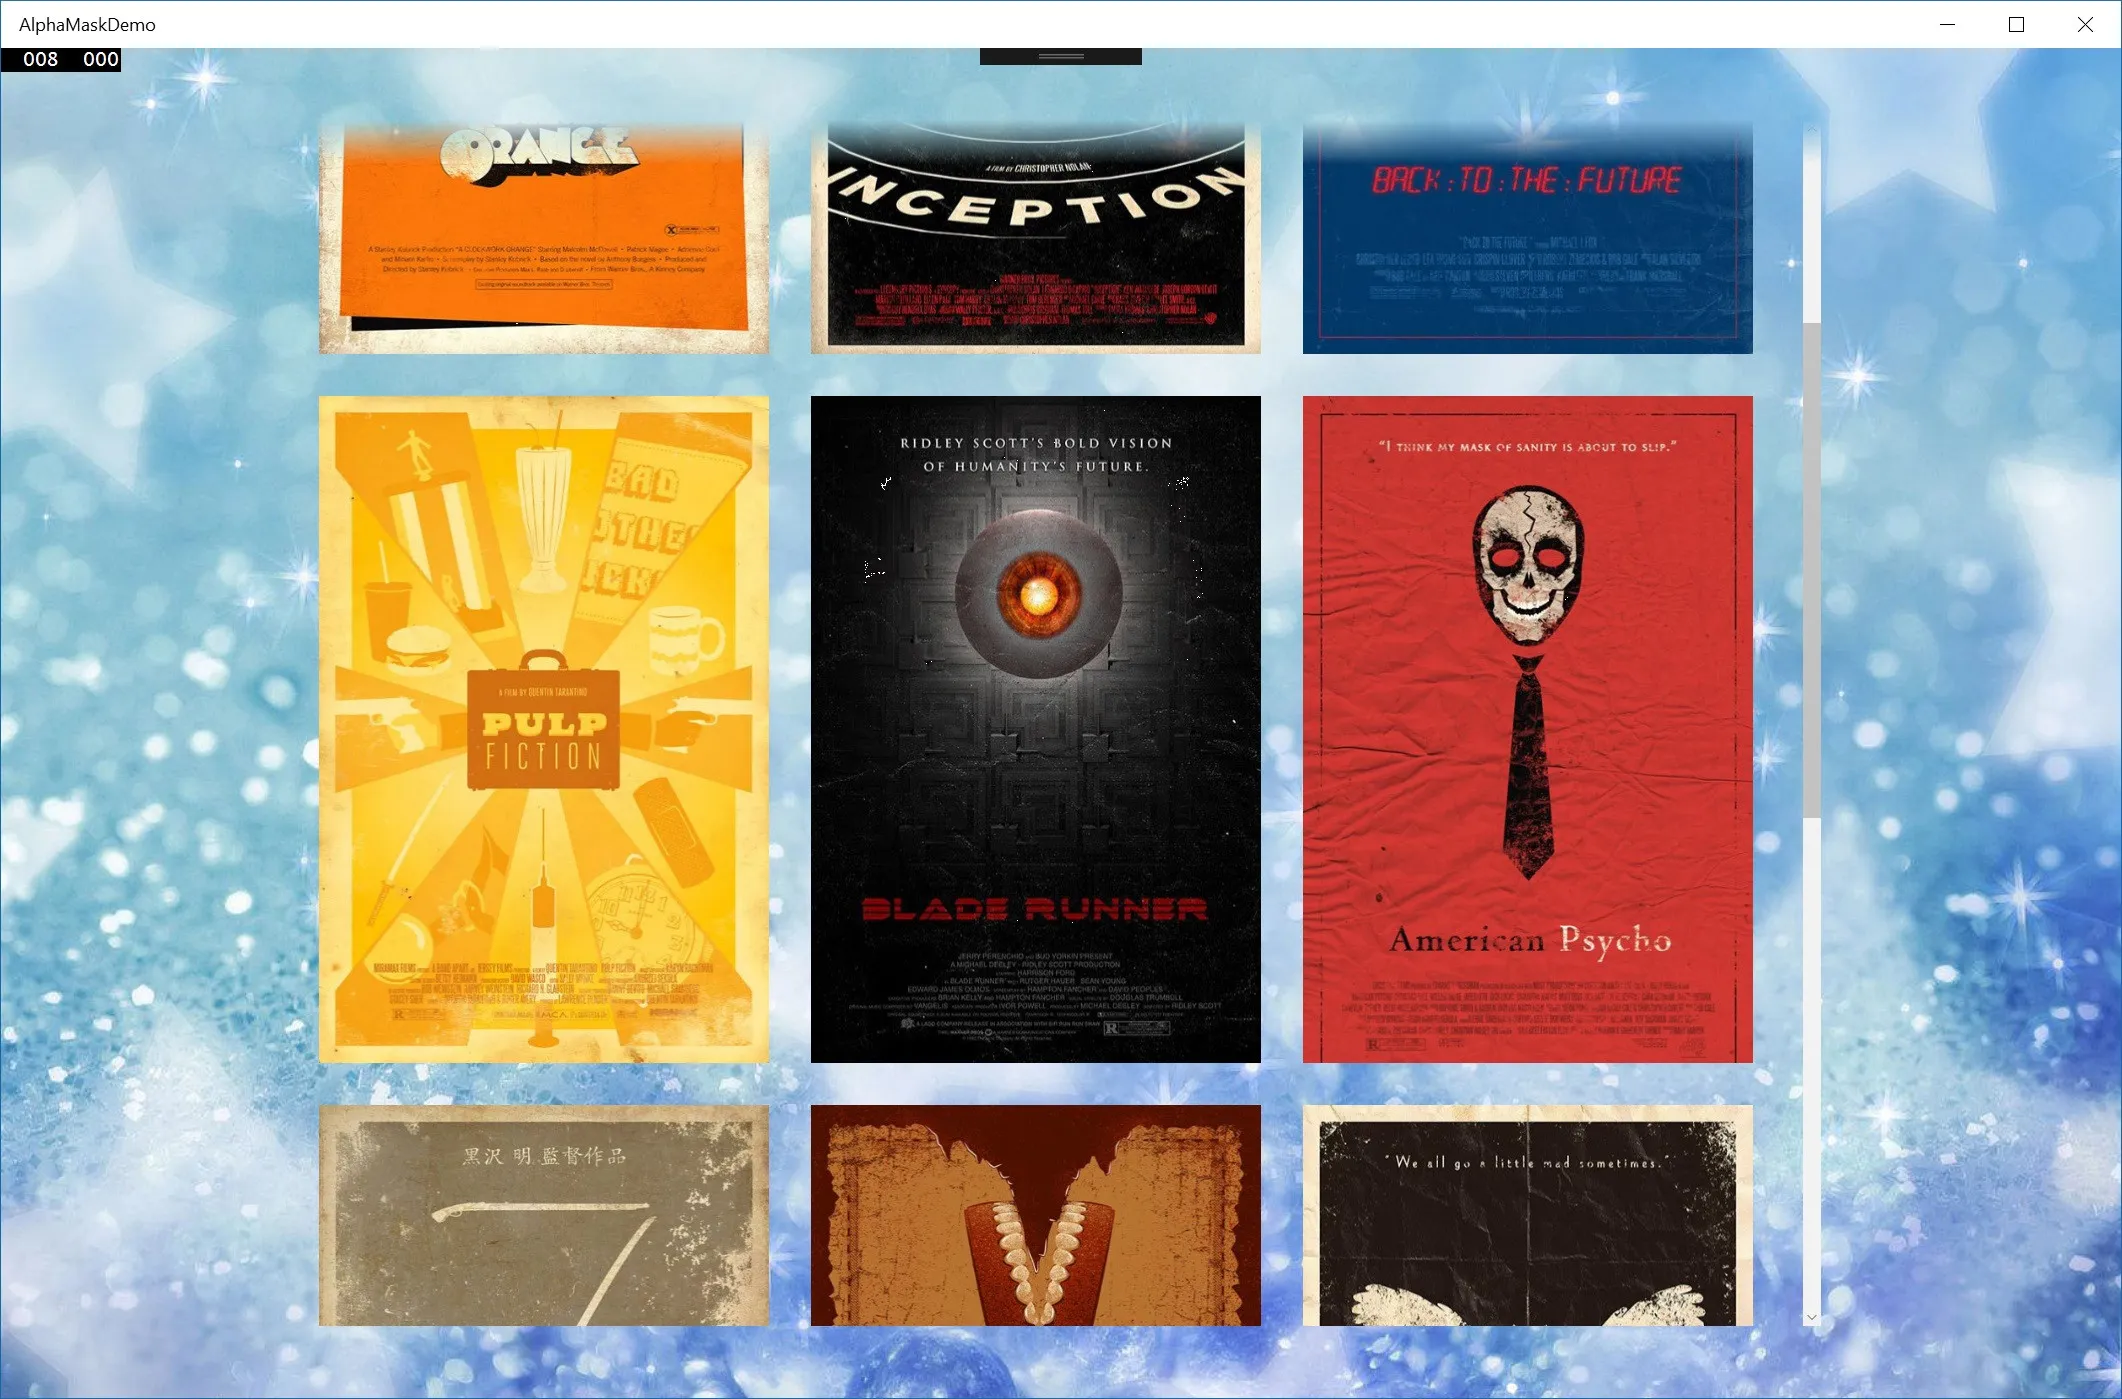
编辑:图片可以说明问题:

Example of the fade

如果您查看这张图片,底部左侧和右侧有两个内容元素。虽然背景看起来是黑色的,但实际上是一个渐变。如果您检查这两个元素的顶部,它们朝向顶部更加透明,从而显示出背景。这就是我想要实现的效果。
编辑2: 为了展示我所寻求的效果的结果,这里是一个GIF,如果我使用重叠的位图,则会显示出效果: Scrolling Images 页眉背景图片为: header background 下面的30像素具有alpha渐变,并出现在网格视图之上,给人一种网格视图项逐渐消失并滑动到背景下方的假象。
XAML布局如下:
<Page
x:Class="App14.MainPage"
xmlns="http://schemas.microsoft.com/winfx/2006/xaml/presentation"
xmlns:x="http://schemas.microsoft.com/winfx/2006/xaml"
xmlns:local="using:App14"
xmlns:d="http://schemas.microsoft.com/expression/blend/2008"
xmlns:mc="http://schemas.openxmlformats.org/markup-compatibility/2006"
mc:Ignorable="d">
<Grid>
    <Grid.RowDefinitions>
        <RowDefinition Height="150" />
        <RowDefinition Height="*" />
    </Grid.RowDefinitions>

    <Image Source="/Assets/background.png"
           Grid.Row="0"
           Grid.RowSpan="2"
           VerticalAlignment="Top"
           Stretch="None" />

    <GridView Grid.Row="1"
              Margin="96,-30,96,96">
        <GridView.Resources>
            <Style TargetType="Image">
                <Setter Property="Height" Value="400" />
                <Setter Property="Width" Value="300" />
                <Setter Property="Margin" Value="30" />
            </Style>
        </GridView.Resources>
        <Image Source="Assets/1.jpg" />
        <Image Source="Assets/2.jpg" />
        <Image Source="Assets/3.jpg" />
        <Image Source="Assets/4.jpg" />
        <Image Source="Assets/5.jpg" />
        <Image Source="Assets/6.jpg" />
        <Image Source="Assets/7.jpg" />
        <Image Source="Assets/8.jpg" />
        <Image Source="Assets/9.jpg" />
        <Image Source="Assets/10.jpg" />
        <Image Source="Assets/11.jpg" />
        <Image Source="Assets/12.jpg" />
    </GridView>

    <!-- Header above content -->

    <Image Grid.Row="0" Source="/Assets/header_background.png"
           Stretch="None" />

    <TextBlock x:Name="Title"
               Grid.Row="0"
               FontSize="48"
               Text="This Is A Title"
               HorizontalAlignment="Center"
               VerticalAlignment="Center"
               Foreground="White" />


</Grid>


你有没有考虑过如果第一个项目半透明,它应该是什么样子? - Markus Hütter
这并不是问题的重点 - 我正在实现一个存在于许多不同平台上的设计,所以它的外观并不重要。我想设计师认为效果类似于列表中的顶部项目“滑动到”另一个元素下面,该元素的下边界从透明变为完全不透明。事实上,如果理论上层元素是静态的,那么我会完全按照这种方式来做,但是背景图像经常发生变化,因此我不想不断地裁剪图像,而是想利用合成。 - DarenMay
1
唉,这指的是 UWP 缺少的 WPF OpacityMask 功能 - 这就是我希望通过合成实现的目标。 - DarenMay
3个回答

4

在Windows UI Dev Labs的问题列表上得到了@sohcatt的帮助后,我构建了一个可行的解决方案。

enter image description here

以下是XAML代码:

    <Grid x:Name="LayoutRoot">

    <Image x:Name="BackgroundImage"
           ImageOpened="ImageBrush_OnImageOpened"
           Source="../Assets/blue-star-background-wallpaper-3.jpg"
           Stretch="UniformToFill" />

    <GridView x:Name="Posters" Margin="200,48">
        <GridView.Resources>
            <Style TargetType="ListViewItem" />
            <Style TargetType="Image">
                <Setter Property="Stretch" Value="UniformToFill" />
                <Setter Property="Width" Value="300" />
                <Setter Property="Margin" Value="12" />
            </Style>
        </GridView.Resources>
        <GridViewItem>
            <Image Source="Assets/Posters/1.jpg" />
        </GridViewItem>
        <GridViewItem>
            <Image Source="Assets/Posters/2.jpg" />
        </GridViewItem>
        <GridViewItem>
            <Image Source="Assets/Posters/3.jpg" />
        </GridViewItem>
        <GridViewItem>
            <Image Source="Assets/Posters/4.jpg" />
        </GridViewItem>
        <GridViewItem>
            <Image Source="Assets/Posters/5.jpg" />
        </GridViewItem>
        <GridViewItem>
            <Image Source="Assets/Posters/6.jpg" />
        </GridViewItem>
        <GridViewItem>
            <Image Source="Assets/Posters/7.jpg" />
        </GridViewItem>
        <GridViewItem>
            <Image Source="Assets/Posters/8.jpg" />
        </GridViewItem>
        <GridViewItem>
            <Image Source="Assets/Posters/9.jpg" />
        </GridViewItem>
        <GridViewItem>
            <Image Source="Assets/Posters/10.jpg" />
        </GridViewItem>
        <GridViewItem>
            <Image Source="Assets/Posters/11.jpg" />
        </GridViewItem>
        <GridViewItem>
            <Image Source="Assets/Posters/12.jpg" />
        </GridViewItem>
    </GridView>
</Grid>

以下是代码:

        private bool _imageLoaded;

    // this is an initial way of handling resize 
    // I will investigate expressions
    private async void OnSizeChanged(object sender, SizeChangedEventArgs args)
    {
        if (!_imageLoaded)
        {
            return;
        }
        await RenderOverlayAsync();
    }

    private async void ImageBrush_OnImageOpened(object sender, RoutedEventArgs e)
    {
        _imageLoaded = true;
        await RenderOverlayAsync();
    }

    // this method must be called after the background image is opened, otherwise
    // the render target bitmap is empty
    private async Task RenderOverlayAsync()
    {
        // setup composition
        // (in line here for readability - will be member variables moving forwards)
        var compositor = ElementCompositionPreview.GetElementVisual(this).Compositor;
        var canvasDevice = new CanvasDevice();
        var compositionDevice = CanvasComposition.CreateCompositionGraphicsDevice(compositor, canvasDevice);

        // determine what region of the background we need to "cut out" for the overlay
        GeneralTransform gt = Posters.TransformToVisual(LayoutRoot);
        Point elementPosition = gt.TransformPoint(new Point(0, 0));

        // our overlay height is as wide as our poster control and is 30 px high
        var overlayHeight = 30;
        var areaToRender = new Rect(elementPosition.X, elementPosition.Y, Posters.ActualWidth, overlayHeight);

        // Capture the image from our background.
        //
        // Note: this is just the <Image/> element, not the Grid. If we took the <Grid/>, 
        // we would also have all of the child elements, such as the <GridView/> rendered as well -
        // which defeats the purpose!
        // 
        // Note 2: this method must be called after the background image is opened, otherwise
        // the render target bitmap is empty
        var bitmap = new RenderTargetBitmap();
        await bitmap.RenderAsync(BackgroundImage);
        var pixels = await bitmap.GetPixelsAsync();

        // we need the display DPI so we know how to handle the bitmap correctly when we render it
        var dpi = DisplayInformation.GetForCurrentView().LogicalDpi;

        // load the pixels from RenderTargetBitmap onto a CompositionDrawingSurface
        CompositionDrawingSurface uiElementBitmapSurface;
        using (
            // this is the entire background image
            // Note we are using the display DPI here.
            var canvasBitmap = CanvasBitmap.CreateFromBytes(
                canvasDevice, pixels.ToArray(),
                bitmap.PixelWidth,
                bitmap.PixelHeight,
                DirectXPixelFormat.B8G8R8A8UIntNormalized,
                dpi)
        )
        {
            // we create a surface we can draw on in memory.
            // note we are using the desired size of our overlay
            uiElementBitmapSurface =
                compositionDevice.CreateDrawingSurface(
                    new Size(areaToRender.Width, areaToRender.Height),
                    DirectXPixelFormat.B8G8R8A8UIntNormalized, DirectXAlphaMode.Premultiplied);
            using (var session = CanvasComposition.CreateDrawingSession(uiElementBitmapSurface))
            {
                // here we draw just the part of the background image we wish to use to overlay
                session.DrawImage(canvasBitmap, 0, 0, areaToRender);
            }
        }

        // assign CompositionDrawingSurface to the CompositionSurfacebrush with which I want to paint the relevant SpriteVisual
        var backgroundImageBrush = _compositor.CreateSurfaceBrush(uiElementBitmapSurface);

        // load in our opacity mask image.
        // this is created in a graphic tool such as paint.net
        var opacityMaskSurface = await SurfaceLoader.LoadFromUri(new Uri("ms-appx:///Assets/OpacityMask.Png"));

        // create surfacebrush with ICompositionSurface that contains the background image to be masked
        backgroundImageBrush.Stretch = CompositionStretch.UniformToFill;

        // create surfacebrush with ICompositionSurface that contains the gradient opacity mask asset
        CompositionSurfaceBrush opacityBrush = _compositor.CreateSurfaceBrush(opacityMaskSurface);
        opacityBrush.Stretch = CompositionStretch.UniformToFill;

        // create maskbrush
        CompositionMaskBrush maskbrush = _compositor.CreateMaskBrush();
        maskbrush.Mask = opacityBrush; // surfacebrush with gradient opacity mask asset
        maskbrush.Source = backgroundImageBrush; // surfacebrush with background image that is to be masked

        // create spritevisual of the approproate size, offset, etc.
        SpriteVisual maskSprite = _compositor.CreateSpriteVisual();
        maskSprite.Size = new Vector2((float)Posters.ActualWidth, overlayHeight);
        maskSprite.Brush = maskbrush; // paint it with the maskbrush

        // set the sprite visual as a child of the XAML element it needs to be drawn on top of
        ElementCompositionPreview.SetElementChildVisual(Posters, maskSprite);
    }

0
    <Grid Height="30"
          VerticalAlignment="Top">
        <Grid.Background>
            <LinearGradientBrush EndPoint="0.5,1"
                                 StartPoint="0.5,0">
                <GradientStop Color="White"
                              Offset="0" />
                <GradientStop Color="Transparent"
                              Offset="1" />
            </LinearGradientBrush>
        </Grid.Background>
    </Grid>

上面的代码创建了一个从完全白色到完全透明的30像素渐变。尝试将其放在您的列表视图上,看看效果如何。

很不幸,我不想“褪色到白色”。 - DarenMay
我知道白色只是一个例子,你应该选择与你的页面/列表视图背景相匹配的颜色,这样它看起来就会渐变消失。 - Junpei Kun
就像我之前尝试解释的那样 - 背景不是一种一致的纯色 - 它是一个变化的图片。 - DarenMay

0
正如我之前所解释的 - 背景不是一致的纯色 - 它是一个会变化的图像。
我认为我们应该知道的一件事是,默认情况下 ListView 控件的背景是透明的。因此,如果 ListView 的父控件设置了一个背景图片,为了实现您想要的布局,我们需要为 ListView 设置另一个背景,并且同时这个背景不能填满整个 ListView
因此,这里有一个方法:
<Grid>
    <Grid.Background>
        <ImageBrush ImageSource="Assets/background.png" />
    </Grid.Background>
    <Grid Margin="0,100">
        <Grid.RowDefinitions>
            <RowDefinition Height="30" />
            <RowDefinition Height="*" />
        </Grid.RowDefinitions>
        <Grid Grid.Row="0">
            <Grid.Background>
                <LinearGradientBrush EndPoint="0.5,1"
                             StartPoint="0.5,0">
                    <GradientStop Color="Transparent"
                          Offset="0" />
                    <GradientStop Color="Wheat"
                          Offset="1" />
                </LinearGradientBrush>
            </Grid.Background>
        </Grid>
        <Grid Grid.Row="1" Background="Wheat" />
        <ListView ItemsSource="{x:Bind listCollection}" Grid.RowSpan="2">
            <ListView.ItemTemplate>
                <DataTemplate>
                    <TextBlock Text="{Binding testText}" FontSize="20" />
                </DataTemplate>
            </ListView.ItemTemplate>
        </ListView>
    </Grid>
</Grid>

从这段代码中可以看出,我将一张图片设置为rootGrid的背景,并在内部放置了另一个Grid以实现您所需的布局。在这个Grid中,当然ListView应该占据所有的空间,但我们可以将这个Grid分成两部分,一部分是用于LinearGradientBrush,另一部分是用于ListView的背景。以下是此布局的渲染图像: enter image description here

如果您想将另一张图片设置为ListView的背景,我认为我们只能获取该图片的平均颜色,并将Offset = 1GradientStop绑定到该颜色。

更新

对于ListView的前景,我认为您是正确的,我们需要覆盖一个遮罩。以下是一种方法:

<Grid>
    <Grid.Background>
        <ImageBrush ImageSource="Assets/background.png" />
    </Grid.Background>
    <Grid Margin="0,100">
        <Grid.RowDefinitions>
            <RowDefinition Height="30" />
            <RowDefinition Height="*" />
        </Grid.RowDefinitions>
        <Grid Grid.Row="0">
            <Grid.Background>
                <LinearGradientBrush EndPoint="0.5,1"
                             StartPoint="0.5,0">
                    <GradientStop Color="Transparent"
                          Offset="0" />
                    <GradientStop Color="Wheat"
                          Offset="1" />
                </LinearGradientBrush>
            </Grid.Background>
        </Grid>
        <Grid Grid.Row="1" Background="Wheat" />
        <ListView ItemsSource="{x:Bind listCollection}" Grid.RowSpan="2">
            <ListView.ItemTemplate>
                <DataTemplate>
                    <TextBlock Text="{Binding testText}" FontSize="20" />
                </DataTemplate>
            </ListView.ItemTemplate>
        </ListView>
        <Grid Grid.Row="0">
            <Grid.Background>
                <LinearGradientBrush EndPoint="0.5,1"
                             StartPoint="0.5,0">
                    <GradientStop Color="Transparent"
                          Offset="0" />
                    <GradientStop Color="Wheat"
                          Offset="1" />
                </LinearGradientBrush>
            </Grid.Background>
        </Grid>
    </Grid>
</Grid>

这里有一个问题,ListView 的滚动条默认是可见的,当在其上使用遮罩时,滚动条也会被覆盖。为了实现更好的布局,最好将 ScrollViewer.VerticalScrollBarVisibility="Hidden" 设置到 ListView 上。


格雷斯 - 这是一个近似的效果。问题在于: - DarenMay
Grace - 这是一个近似的效果 - 谢谢。不幸的是,还存在一些问题。前景颜色保持完全不透明,因此仍然显示在背景之上。列表的主体仍需要显示背景。每个项目都是电影海报,水平排列,并留有边距以显示背景。唯一可以动态实现该效果的方法是将某种形式的 alpha 蒙版应用于合成输出的顶部,但我无法弄清楚如何做到这一点。 - DarenMay
我尝试使用组合构建Sprite视觉效果 - 创建背景并应用复合效果,利用蒙版,但是我无法达到我想要的结果。 - DarenMay
@DarenMay,我更新了我的答案。它可以工作,但是我实际上不理解你所说的使用组合构建精灵视觉。也许你可以为我指点迷津,提供其他解决这个问题的方法。 - Grace Feng
UI组合:https://blogs.windows.com/buildingapps/2015/12/08/awaken-your-creativity-with-the-new-windows-ui-composition/ - DarenMay
看一下前景焦点效果示例,你就可以看到应用于列表视图的效果。 - DarenMay

网页内容由stack overflow 提供, 点击上面的
可以查看英文原文,
原文链接