在 iOS7 及以前的版本中,我们可以像下图所示一样将表格视图放在警告框中。
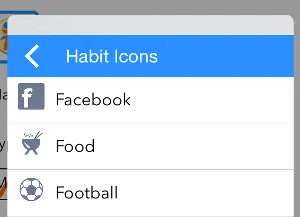
但在 iOS8 中,UITableview 已经不能工作了。我可以将其放入表格视图中,但是表格视图无法滚动,并且无法检测到任何单元格的点击事件。
那么,如何实现这种类型的 AlertController?
如何在iOS8中将UITableview添加到UIAlertController中?
3
- Sunil Parmar
2
多个 UIAlertActions 不会产生您想要的效果,对吗? - erdekhayser
你还需要答案吗? - Syed Ali Salman
2个回答
8
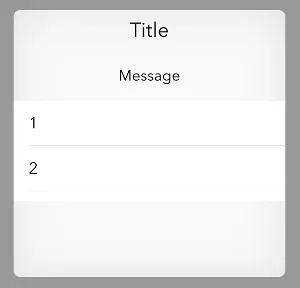
感谢StackOverFlow的用户,我能够完成这个任务...下面是我的代码...
 UIViewController *controller = [[UIViewController alloc]init];
UITableView *alertTableView;
if (array.count < 4) {
    CGRect rect = CGRectMake(0, 0, 272, 100);
    [controller setPreferredContentSize:rect.size];
    alertTableView  = [[UITableView alloc]initWithFrame:CGRectMake(0, 0, 272, 100)];
}
else if (array.count < 6){
    CGRect rect = CGRectMake(0, 0, 272, 150);
    [controller setPreferredContentSize:rect.size];
    alertTableView  = [[UITableView alloc]initWithFrame:CGRectMake(0, 0, 272, 150)];
}
else if (array.count < 8){
    CGRect rect = CGRectMake(0, 0, 272, 200);
    [controller setPreferredContentSize:rect.size];
    alertTableView  = [[UITableView alloc]initWithFrame:CGRectMake(0, 0, 272, 200)];
}
else{
    CGRect rect = CGRectMake(0, 0, 272, 250);
    [controller setPreferredContentSize:rect.size];
    alertTableView  = [[UITableView alloc]initWithFrame:CGRectMake(0, 0, 272, 250)];
}

alertTableView.delegate = self;
alertTableView.dataSource = self;
alertTableView.tableFooterView = [[UIView alloc]initWithFrame:CGRectZero];
[alertTableView setSeparatorStyle:UITableViewCellSeparatorStyleSingleLine];
[alertTableView setTag:kAlertTableViewTag];
[controller.view addSubview:alertTableView];
[controller.view bringSubviewToFront:alertTableView];
[controller.view setUserInteractionEnabled:YES];
[alertTableView setUserInteractionEnabled:YES];
[alertTableView setAllowsSelection:YES];
UIAlertController *alertController = [UIAlertController alertControllerWithTitle:@"Title" message:@"Message" preferredStyle:UIAlertControllerStyleAlert];
[alertController setValue:controller forKey:@"contentViewController"];
UIAlertAction *cancelAction = [UIAlertAction actionWithTitle:@"Cancel" style:UIAlertActionStyleDestructive handler:^(UIAlertAction *action) {

}];
[alertController addAction:cancelAction];
[self presentViewController:alertController animated:YES completion:nil];
- Syed Ali Salman
3
2这应该标记为正确答案。谢谢分享! - SleepsOnNewspapers
请检查您的
dataSoruce。 - Syed Ali Salman非常感谢,你今天帮我节省了很多时间 :D - bulubuloa
-2
请尝试使用自定义视图和动画来运行以下代码
最后从您的视图控制器中按照以下代码调用此视图
Viewcontroller.m
Test.h
#import <UIKit/UIKit.h>

@interface Test : UIView <UITableViewDataSource,UITableViewDelegate>
{
    UITableView *table;
}

- (id)initWithFrame:(CGRect)frame Array:(NSArray *)ArrayValue;
- (void)showInView:(UIView *)aView animated:(BOOL)animated;
- (void)fadeOut;

@end
Test.m
- (id)initWithFrame:(CGRect)frame Array:(NSArray *)ArrayValue
{
    if (self = [super initWithFrame:frame])
    {
        aryType = ArrayValue;
        table = [[UITableView alloc] initWithFrame:CGRectMake(15, 0, 320, 380) style:UITableViewStylePlain];
        table.dataSource = self;
        table.delegate = self;
        [table setSeparatorInset:UIEdgeInsetsZero];
        table.showsVerticalScrollIndicator = YES;
        [self addSubview:table];
    }
    return self;
}

- (NSInteger)tableView:(UITableView *)tableView numberOfRowsInSection:(NSInteger)section
{
    return aryType.count;
}

- (UITableViewCell *)tableView:(UITableView *)tableView cellForRowAtIndexPath:(NSIndexPath *)indexPath
{
    static NSString *CellIdentifier = @"cell";
    UITableViewCell *cell = [tableView dequeueReusableCellWithIdentifier:CellIdentifier];
    if (cell == nil)
    {
        cell = [[UITableViewCell alloc] initWithStyle:UITableViewCellStyleDefault reuseIdentifier:CellIdentifier];
        cell.selectionStyle = UITableViewCellSelectionStyleGray;
    }
    cell.textLabel.text = [aryType objectAtIndex:(indexPath.row)];
    cell.textLabel.font = [UIFont fontWithName:@"Avenir Next" size:16];
    return cell;
}

- (void)tableView:(UITableView *)tableView didSelectRowAtIndexPath:(NSIndexPath *)indexPath
{
    [tableView deselectRowAtIndexPath:indexPath animated:YES];
    NSLog(@"select");
}

- (void)fadeIn
{
    self.transform = CGAffineTransformMakeScale(1.3, 1.3);
    self.alpha = 0;
    [UIView animateWithDuration:.35 animations:^{
        self.alpha = 1;
        self.transform = CGAffineTransformMakeScale(1, 1);
    }];
}

- (void)fadeOut
{
    [UIView animateWithDuration:.35 animations:^{
        self.transform = CGAffineTransformMakeScale(1.3, 1.3);
        self.alpha = 0.0;
    } completion:^(BOOL finished) {
        if (finished) {
            [self removeFromSuperview];
        }
    }];
}

- (void)showInView:(UIView *)aView animated:(BOOL)animated
{
    [aView addSubview:self];
    if (animated)
    {
        [self fadeIn];
    }
}
最后从您的视图控制器中按照以下代码调用此视图
Viewcontroller.m
- (void)viewDidLoad
{
[super viewDidLoad];
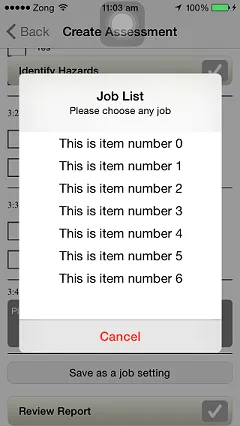
NSArray *aryType = [[NSArray alloc] initWithObjects:@"1",@"2",@"3",@"4",@"5",@"6",@"7",@"8",@"9",@"10", nil];
[self showPopUpWithTitle:@"Title" arrOptions:aryType xy:CGPointMake(16, 150) size:CGSizeMake(287, 134)];
}
- (void)showPopUpWithTitle:(NSString *)popupTitle arrOptions:(NSArray *)arrOptions xy:(CGPoint)point size:(CGSize)size
{
testView = [[Test alloc] initWithFrame:CGRectMake(15, point.y, size.width, 200.0) Array:arrOptions];
[testView showInView:self.view animated:YES];
}
- Shah Nilay
网页内容由stack overflow 提供, 点击上面的可以查看英文原文,
原文链接
原文链接
- 相关问题
- 8 我该如何定制iOS8中UIAlertController中的UIAlertAction?
- 3 在Swift中将图像添加到UIAlertController
- 6 如何在iOS8中在UIAlertController中添加UIDatePicker?
- 3 iOS8 UISearchController覆盖UITableView
- 6 如何在Swift iOS中使用UIAlertController显示UITableview?
- 3 如何在iOS 7中将UITableView添加到UIAlertView中
- 3 访问UIAlertController的文本字段 - Swift iOS8
- 6 在iOS8中,从弹出窗口中呈现一个UIAlertController
- 6 如何在obj-c/ios/xcode中将工具栏添加到UITableView的底部
- 108 如何在Swift中将TextField添加到UIAlertController