四舍五入
首先,在缩放之前确保您对大小进行四舍五入。 在这种情况下,drawInRect:可能会模糊图像。 要四舍五入为最接近的整数值:
size.width = truncf(size.width);
size.height = truncf(size.height);
对于某些任务,您可能希望向下取整(floorf)或向上取整(ceilf)。
CILanczosScaleTransform不可用
那么,请忽略我之前关于CILanczosScaleTransform的推荐。虽然在iOS 5.0中提供了部分Core Image功能,但是Lanczos缩放却没有。如果它变得可用,请使用它。对于在Mac OS上工作的人,它是可用的,请使用它。
vImage Scaling
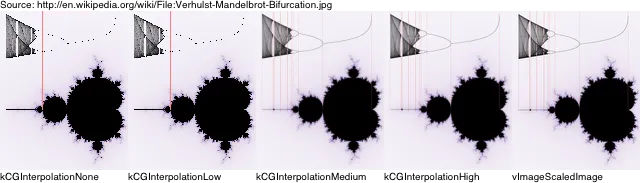
但是,在vImage中有一种高质量的缩放算法。以下图片展示了使用vImageScaledImage方法与不同上下文插值选项进行比较的结果。还要注意这些选项在不同的缩放级别下表现不同。
在这张图表上,它保留了最多的线条细节:
在这张照片上,比较左下角的叶子:
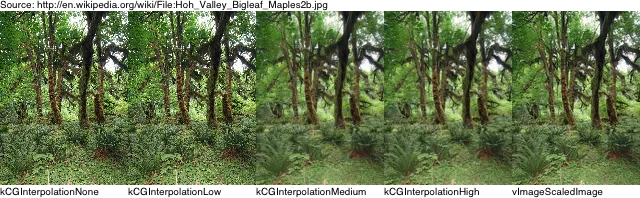
在这张照片上,比较右下角的纹理:

不要在像素艺术上使用它;它会创建奇怪的缩放伪影:
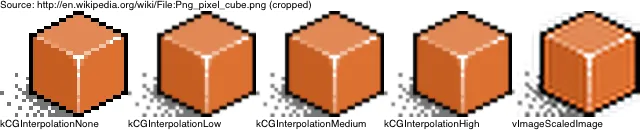
虽然在一些图像上它具有有趣的四舍五入效果:

性能
毫不奇怪,kCGImageInterpolationHigh是最慢的标准图像插值选项。在此实现中,vImageScaledImage的速度更慢。将分形图像缩小到其原始大小的一半时,它需要UIImageInterpolationHigh时间的110%。将其缩小到四分之一时,它需要时间的340%。
如果您在模拟器中运行它,则可能会有所不同;在那里,它比kCGImageInterpolationHigh快得多。也许vImage多核优化在桌面上给了它一个相对优势。
代码
- (UIImage*) vImageScaledImage:(UIImage*) sourceImage withSize:(CGSize) destSize;
{
UIImage *destImage = nil;
if (sourceImage)
{
CGImageRef sourceRef = [sourceImage CGImage];
NSUInteger sourceWidth = CGImageGetWidth(sourceRef);
NSUInteger sourceHeight = CGImageGetHeight(sourceRef);
CGColorSpaceRef colorSpace = CGColorSpaceCreateDeviceRGB();
unsigned char *sourceData = (unsigned char*) calloc(sourceHeight * sourceWidth * 4, sizeof(unsigned char));
NSUInteger bytesPerPixel = 4;
NSUInteger sourceBytesPerRow = bytesPerPixel * sourceWidth;
NSUInteger bitsPerComponent = 8;
CGContextRef context = CGBitmapContextCreate(sourceData, sourceWidth, sourceHeight,
bitsPerComponent, sourceBytesPerRow, colorSpace,
kCGImageAlphaPremultipliedFirst | kCGBitmapByteOrder32Big);
CGContextDrawImage(context, CGRectMake(0, 0, sourceWidth, sourceHeight), sourceRef);
CGContextRelease(context);
NSUInteger destWidth = (NSUInteger) destSize.width;
NSUInteger destHeight = (NSUInteger) destSize.height;
NSUInteger destBytesPerRow = bytesPerPixel * destWidth;
unsigned char *destData = (unsigned char*) calloc(destHeight * destWidth * 4, sizeof(unsigned char));
vImage_Buffer src = {
.data = sourceData,
.height = sourceHeight,
.width = sourceWidth,
.rowBytes = sourceBytesPerRow
};
vImage_Buffer dest = {
.data = destData,
.height = destHeight,
.width = destWidth,
.rowBytes = destBytesPerRow
};
vImage_Error err = vImageScale_ARGB8888 (
&src,
&dest,
NULL,
kvImageHighQualityResampling
);
free(sourceData);
CGContextRef destContext = CGBitmapContextCreate(destData, destWidth, destHeight,
bitsPerComponent, destBytesPerRow, colorSpace,
kCGImageAlphaPremultipliedFirst | kCGBitmapByteOrder32Big);
CGImageRef destRef = CGBitmapContextCreateImage(destContext);
destImage = [UIImage imageWithCGImage:destRef];
CGImageRelease(destRef);
CGColorSpaceRelease(colorSpace);
CGContextRelease(destContext);
free(destData);
if (err != kvImageNoError)
{
NSString *errorReason = [NSString stringWithFormat:@"vImageScale returned error code %d", err];
NSDictionary *errorInfo = [NSDictionary dictionaryWithObjectsAndKeys:
sourceImage, @"sourceImage",
[NSValue valueWithCGSize:destSize], @"destSize",
nil];
NSException *exception = [NSException exceptionWithName:@"HighQualityImageScalingFailureException" reason:errorReason userInfo:errorInfo];
@throw exception;
}
}
return destImage;
}