2个回答
50
你应该查看ImageIO.framework中的CGImageSource方法,但它只在iOS 4.0及以上版本可用。
快速示例:
快速示例:
-(UIImage*)resizeImageToMaxSize:(CGFloat)max path:(NSString*)path
{
    CGImageSourceRef imageSource = CGImageSourceCreateWithURL((CFURLRef)[NSURL fileURLWithPath:path], NULL);
    if (!imageSource)
        return nil;

    CFDictionaryRef options = (CFDictionaryRef)[NSDictionary dictionaryWithObjectsAndKeys:
        (id)kCFBooleanTrue, (id)kCGImageSourceCreateThumbnailWithTransform,
        (id)kCFBooleanTrue, (id)kCGImageSourceCreateThumbnailFromImageIfAbsent,
        (id)@(max),
        (id)kCGImageSourceThumbnailMaxPixelSize,
        nil];
    CGImageRef imgRef = CGImageSourceCreateThumbnailAtIndex(imageSource, 0, options);

    UIImage* scaled = [UIImage imageWithCGImage:imgRef];

    CGImageRelease(imgRef);
    CFRelease(imageSource);

    return scaled;
}
- Nyx0uf
4
3
根据这个会话 iOS Memory Deep Dive,我们最好使用
或者
ImageIO 来缩小图片。
使用 UIImage 缩小图像的缺点:
- 会将原始图像解压缩到内存中
- 内部坐标空间转换成本高昂
使用 ImageIO
ImageIO 可以读取图像大小和元数据信息,而不会污染内存。
ImageIO 只消耗缩放后的图像成本来调整图像大小。
关于内存中的图像
- 内存使用与图像的尺寸相关,而不是文件大小。
UIGraphicsBeginImageContextWithOptions始终使用SRGB渲染格式,每个像素使用 4 个字节。- 一个图像有
加载 -> 解码 -> 渲染三个阶段。 UIImage对于调整大小和缩放来说成本很高。
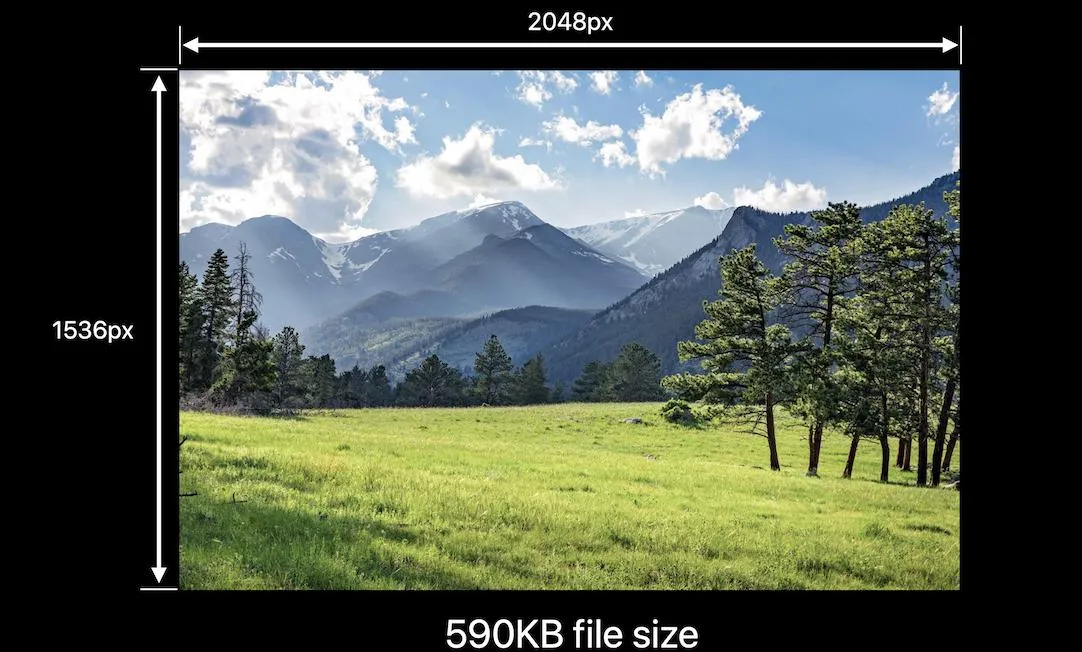
对于以下图像,如果您使用 UIGraphicsBeginImageContextWithOptions,我们只需要 590KB 来加载图像,而在解码时需要
2048 像素 x 1536 像素 x 4 字节每个像素 = 10MB。
而 UIGraphicsImageRenderer,在 iOS 10 中引入,将自动选择最佳的图形格式,在 iOS12 中会使用 SRGB。这意味着,如果您不需要 SRGB,则可以通过将 UIGraphicsBeginImageContextWithOptions 替换为 UIGraphicsImageRenderer 来节省 75% 的内存。
这是我关于 iOS 图像内存 的文章。
func resize(url: NSURL, maxPixelSize: Int) -> CGImage? {
    let imgSource = CGImageSourceCreateWithURL(url, nil)
    guard let imageSource = imgSource else {
        return nil
    }

    var scaledImage: CGImage?
    let options: [NSString: Any] = [
            // The maximum width and height in pixels of a thumbnail.
            kCGImageSourceThumbnailMaxPixelSize: maxPixelSize,
            kCGImageSourceCreateThumbnailFromImageAlways: true,
            // Should include kCGImageSourceCreateThumbnailWithTransform: true in the options dictionary. Otherwise, the image result will appear rotated when an image is taken from camera in the portrait orientation.
            kCGImageSourceCreateThumbnailWithTransform: true
    ]
    scaledImage = CGImageSourceCreateThumbnailAtIndex(imageSource, 0, options as CFDictionary)

    return scaledImage
}


let filePath = Bundle.main.path(forResource:"large_leaves_70mp", ofType: "jpg")

let url = NSURL(fileURLWithPath: filePath ?? "")

let image = resize(url: url, maxPixelSize: 600)
或者
// Downsampling large images for display at smaller size
func downsample(imageAt imageURL: URL, to pointSize: CGSize, scale: CGFloat) -> UIImage {
    let imageSourceOptions = [kCGImageSourceShouldCache: false] as CFDictionary
    let imageSource = CGImageSourceCreateWithURL(imageURL as CFURL, imageSourceOptions)!
    let maxDimensionInPixels = max(pointSize.width, pointSize.height) * scale
    let downsampleOptions =
        [kCGImageSourceCreateThumbnailFromImageAlways: true,
        kCGImageSourceShouldCacheImmediately: true,
        // Should include kCGImageSourceCreateThumbnailWithTransform: true in the options dictionary. Otherwise, the image result will appear rotated when an image is taken from camera in the portrait orientation.
        kCGImageSourceCreateThumbnailWithTransform: true,
        kCGImageSourceThumbnailMaxPixelSize: maxDimensionInPixels] as CFDictionary
    let downsampledImage =
        CGImageSourceCreateThumbnailAtIndex(imageSource, 0, downsampleOptions)!
    return UIImage(cgImage: downsampledImage)
}
- RY_ Zheng
网页内容由stack overflow 提供, 点击上面的可以查看英文原文,
原文链接
原文链接
kCGImageSourceThumbnailMaxPixelSize值,即“缩略图的最大宽度和高度(以像素为单位)”。Nyx0uf将此max值作为参数传递给该方法。而@(...)只是将其打包成NSNumber,这就是所谓的“语法糖”,用于将此CGFloat转换为NSNumber。(您不能只插入原始数字类型到字典中,而必须将它们包装在NSNumber对象中。) - Rob