React Native: 屏幕方向改变时应用不同的样式

53

我正在开发一个 React Native 应用,希望能够在 iOS 和 Android 上部署本地应用程序(如果可能的话,也在 Windows 上部署)。

问题是我们希望布局可以根据不同的屏幕尺寸和方向进行不同的排版。

我编写了一些函数来返回样式对象,并在每个组件渲染函数中调用它们,因此我能够在应用程序启动时应用不同的样式。但是,如果初始化后方向(或屏幕大小)发生更改,它们就不会重新计算或重新应用。

我已经添加了侦听器到顶级元素上,以便在方向更改时更新其状态(并强制对整个应用程序进行重新渲染),但是子组件不会重新渲染(因为实际上它们没有被更改)。

所以,我的问题是:如何使样式可以根据屏幕尺寸和方向完全不同,就像使用CSS媒体查询一样(在运行时呈现)?

我已经尝试了react-native-responsive模块,但没有成功。

谢谢!


请尝试此链接:https://dev59.com/o7voa4cB1Zd3GeqP87bI#64559463 - shammi
16个回答

0

关于使用纯组件的情况需要注意。@mridul-tripathi的答案是正确的,但如果使用了纯组件,则仅仅让父级/顶层组件响应方向变化可能是不够的。您还需要在方向变化时单独更新纯组件。


0
你需要使用 useWindowDimensions 这个钩子。当尺寸改变时,这个钩子会重新渲染组件并应用样式,但是 Dimensions 对象无法重新渲染组件和更改样式,它只在第一次渲染时起作用。
import { useWindowDimensions } from 'react-native';

然后解构它

const { height, width } = useWindowDimensions();

最后你可以这样做

import React from "react";
import { View, StyleSheet, useWindowDimensions } from "react-native";

const App = () => {
  const { height, width } = useWindowDimensions();
  const isPortrait = height > width;

  return (
    <View style={isPortrait ? styles.portrait : styles.landscape}>
      {/* something */}
    </View>
  );
};

const styles = StyleSheet.create({
  portrait: {},
  landscape: {},
});

export default App;

你也可以使用 scale 属性

const { scale } = useWindowDimensions();

阅读这份文档 https://reactnative.dev/docs/usewindowdimensions

虽然 useWindowDimensions 语法方便,但目前在 iOS 上存在一些问题,当旋转屏幕时:https://github.com/facebook/react-native/issues/35800 和 https://github.com/facebook/react-native/issues/29290。 - Constantin

0

我正在使用 styled-components,这是我在方向更改时重新呈现 UI 的方法。

import React, { useState } from 'react';
import { View } from 'react-native';
import { ThemeProvider } from 'styled-components';
import appTheme from 'constants/appTheme';

const App = () => {
  // Re-Layout on orientation change
  const [theme, setTheme] = useState(appTheme.getTheme());
  const onLayout = () => {
    setTheme(appTheme.getTheme());
  }

  return (
    <ThemeProvider theme={theme}>
      <View onLayout={onLayout}/>
      {/* Components */}
    </ThemeProvider>
  );
}

export default App;

即使您不使用styled-components,也可以创建一个状态并在onLayout上更新它以重新渲染UI。

0

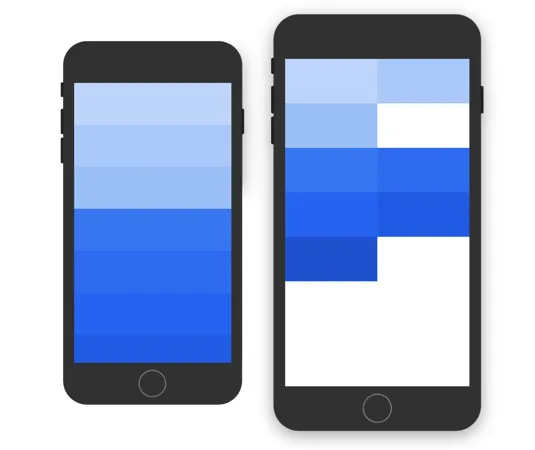
我迄今为止最成功的库是:https://github.com/axilis/react-native-responsive-layout 它可以做到你所要求的,而且还有更多功能。简单的组件实现,几乎没有像一些复杂答案中那样的逻辑。我的项目使用手机、平板电脑和RNW通过网络 - 实现非常完美。此外,在调整浏览器大小时,它真正响应,并不仅限于初始渲染 - 完美地处理手机方向变化。

示例代码(将任何组件作为块的子元素):

<Grid>
  <Section> {/* Light blue */}
    <Block xsSize="1/1" smSize="1/2" />
    <Block xsSize="1/1" smSize="1/2" />
    <Block xsSize="1/1" smSize="1/2" /> 
  </Section>
  <Section> {/* Dark blue */}
    <Block size="1/1" smSize="1/2" />
    <Block size="1/1" smSize="1/2" />
    <Block size="1/1" smSize="1/2" />
    <Block size="1/1" smSize="1/2" />
    <Block size="1/1" smSize="1/2" />
  </Section>
</Grid>

翻译成中文为:

enter image description here


0

我为我的 expo SDK36 项目编写了一个 HoC 解决方案,它支持方向更改并基于 ScreenOrientation.Orientation 值传递 props.orientation

import React, { Component } from 'react';
import { ScreenOrientation } from 'expo';

export default function withOrientation(Component) {
  class DetectOrientation extends React.Component {
    constructor(props) {
      super(props);
      this.state = {
        orientation: '',
      };
      this.listener = this.listener.bind(this);
    }

    UNSAFE_componentWillMount() {
      this.subscription = ScreenOrientation.addOrientationChangeListener(this.listener);
    }

    componentWillUnmount() {
      ScreenOrientation.removeOrientationChangeListener(this.subscription);
    }

    listener(changeEvent) {
      const { orientationInfo } = changeEvent;
      this.setState({
        orientation: orientationInfo.orientation.split('_')[0],
      });
    }

    async componentDidMount() {
      await this.detectOrientation();
    }

    async detectOrientation() {
      const { orientation } = await ScreenOrientation.getOrientationAsync();
      this.setState({
        orientation: orientation.split('_')[0],
      });
    }

    render() {
      return (
        <Component
          {...this.props}
          {...this.state}
          onLayout={this.detectOrientation}
        />
      );
    }
  }
  return (props) => <DetectOrientation {...props} />;
}

0
为了实现更高效的集成,我将以下内容用作每个react-navigation屏幕的超类:
export default class BaseScreen extends Component {
  constructor(props) {
    super(props)

    const { height, width } = Dimensions.get('screen')

    // use this to avoid setState errors on unmount
    this._isMounted = false

    this.state = {
      screen: {
        orientation: width < height,
        height: height,
        width: width
      }
    }
  }

  componentDidMount() {
    this._isMounted = true
    Dimensions.addEventListener('change', () => this.updateScreen())
  }

  componentWillUnmount() {
    this._isMounted = false
    Dimensions.removeEventListener('change', () => this.updateScreen())
  }

  updateScreen = () => {
    const { height, width } = Dimensions.get('screen')

    if (this._isMounted) {
      this.setState({
        screen: {
          orientation: width < height,
          width: width, height: height
        }
      })
    }
  }

将任何根组件设置为从该组件扩展,然后从继承的根组件向您的叶子/哑组件传递屏幕状态。

此外,为了避免增加性能开销,请更改样式对象,而不是添加更多组件到混合中:

const TextObject = ({ title }) => (
  <View style={[styles.main, screen.orientation ? styles.column : styles.row]}>
    <Text style={[styles.text, screen.width > 600 ? {fontSize: 14} : null ]}>{title}</Text>
  </View>
)

const styles = StyleSheet.create({
  column: {
    flexDirection: 'column'
  },
  row: {
    flexDirection: 'row'
  },
  main: {
    justifyContent: 'flex-start'
  },
  text: {
    fontSize: 10
  }
}

我希望这能帮助到未来的任何人,你会发现它在开销方面非常优化。

网页内容由stack overflow 提供, 点击上面的
可以查看英文原文,
原文链接