我正在开发Android应用程序。我想在屏幕底部横向放置4个按钮。其中2个按钮上有图像。按钮的边框颜色应为黑色,边框应尽可能细。当我单击按钮时,我希望按钮的背景色更改为蓝色,而不更改边框的颜色,并保持该颜色一段时间。如何在Android中实现这种情况?
如何在Android中点击按钮时更改按钮的颜色?
90
- Android_programmer_camera
2
可能是[如何在按钮点击时更改矢量可绘制路径的颜色]的重复问题(https://dev59.com/x1sV5IYBdhLWcg3w6ych)我已将其标记为重复,您可以在此处检查我的答案:https://stackoverflow.com/a/55205149/3763032 - mochadwi
请添加android:background="?android:attr/selectableItemBackground"。如果可以的话,请在下方投票支持我的回答,谢谢。 - Ashraf Amin
16个回答
136
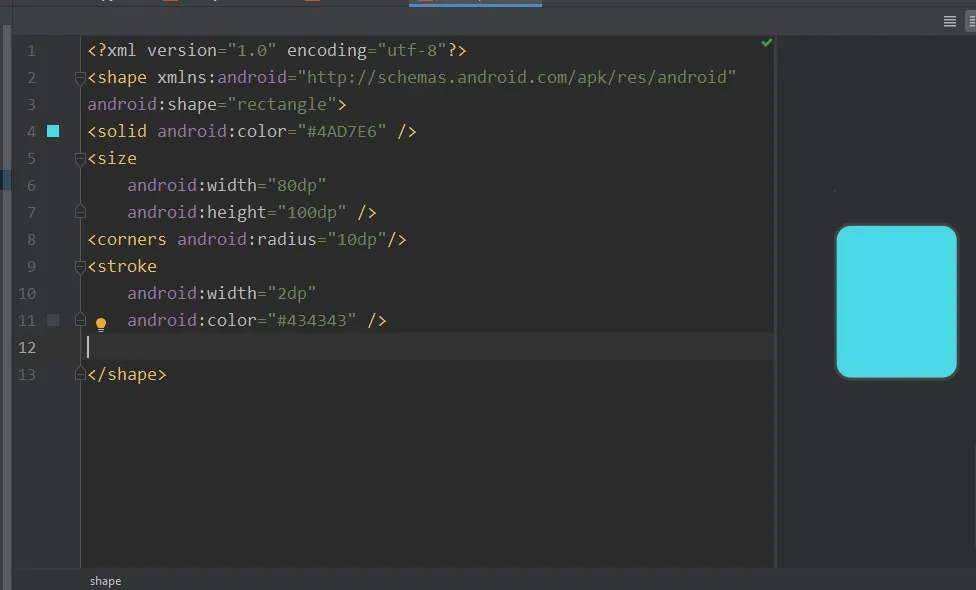
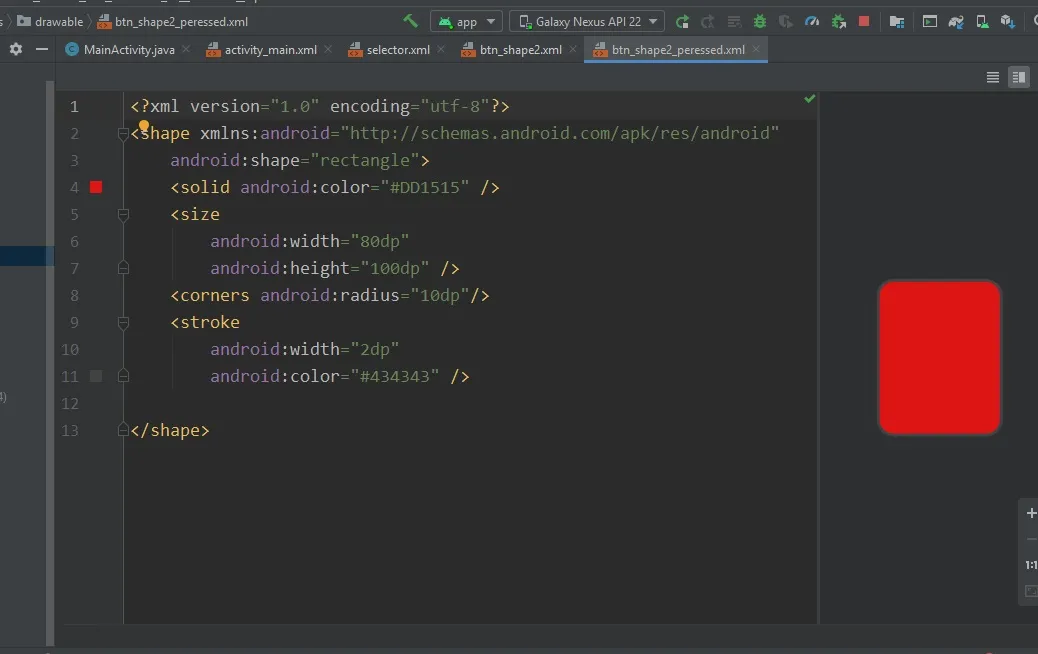
一种方法是在drawable目录下创建一个名为whatever.xml的XML文件,内容如下:
<?xml version="1.0" encoding="utf-8"?>
  <selector xmlns:android="http://schemas.android.com/apk/res/android">
    <item
        android:state_focused="true"
        android:state_pressed="true"
        android:drawable="@drawable/bgalt" />

    <item
        android:state_focused="false"
        android:state_pressed="true"
        android:drawable="@drawable/bgalt" />

    <item android:drawable="@drawable/bgnorm" />
</selector>
bgalt和bgnorm是在drawable中的PNG图像。
如果您在活动中以编程方式创建按钮,您可以使用以下代码设置背景:
final Button b = new Button (MyClass.this);
b.setBackgroundDrawable(getResources().getDrawable(R.drawable.whatever));
如果您使用XML设置按钮的样式,您可以这样做:
<Button
  android:id="@+id/mybutton"
  android:background="@drawable/watever" />
最后,这里有一个指向教程的链接。
- methode
8
16如果您想避免使用图片,您也可以在XML文件中使用颜色定义来替换这些可绘制对象。 - haseman
7@jshin47 经历了大量的试错过程。现在我已经写了两本关于Android开发的书籍 :-) - haseman
1如果只有颜色而没有图像呢? - Kala J
@KalaJ,你找到解决方案了吗? - Prafulla Kumar Sahu
请注意填充颜色时不要更改 android:drawable 为 android:color,只需使用 "@color/xxx" 替代 "@drawable/xxx" 即可。 - Mayeul sgc
显示剩余3条评论
79
将此代码保存在drawable文件夹中,文件名为"bg_button.xml",并在您的xml文件中将"@drawable/bg_button"作为按钮的背景调用:
<?xml version="1.0" encoding="UTF-8"?>
<selector xmlns:android="http://schemas.android.com/apk/res/android">
    <item android:state_pressed="true" >
        <shape>
            <solid
                android:color="#004F81" />
            <stroke
                android:width="1dp"
                android:color="#222222" />
            <corners
                android:radius="7dp" />
            <padding
                android:left="10dp"
                android:top="10dp"
                android:right="10dp"
                android:bottom="10dp" />
        </shape>
    </item>
    <item>
        <shape>
            <gradient
                android:startColor="#89cbee"
                android:endColor="#004F81"
                android:angle="270" />
            <stroke
                android:width="1dp"
                android:color="#4aa5d4" />
            <corners
                android:radius="7dp" />
            <padding
                android:left="10dp"
                android:top="10dp"
                android:right="10dp"
                android:bottom="10dp" />
        </shape>
    </item>
</selector>
- Fakhar
3
2谢谢,使用样式可以减小应用程序的大小。不使用drawable是个好主意。 - Rahul Mandaliya
另一方面,基于XML矢量的可绘制图形通常比图像性能差,特别是在旧设备上。不要过早优化,但也要记住这一点。 - Przemyslaw Jablonski
请添加android:background="?android:attr/selectableItemBackground"。如果您喜欢我的回答,请在下面投票,谢谢。 - Ashraf Amin
11
试一试
    final Button button = (Button) findViewById(R.id.button_id);
    button.setOnTouchListener(new View.OnTouchListener() {

        @Override
        public boolean onTouch(View view, MotionEvent event) {
            if(event.getAction() == MotionEvent.ACTION_UP) {
                button.setBackgroundColor(Color.RED);
            } else if(event.getAction() == MotionEvent.ACTION_DOWN) {
                button.setBackgroundColor(Color.BLUE);
            }
            return false;
        }

    });
- Waxren
1
它无法改回原来的颜色。 - CN_Cabbage
10
可以参考这个:
boolean check = false;
Button backward_img;
Button backward_img1;
backward_img = (Button) findViewById(R.id.bars_footer_backward);
backward_img1 = (Button) findViewById(R.id.bars_footer_backward1);
backward_img.setOnClickListener(new OnClickListener() {

    @Override
    public void onClick(View arg0) {
        check = true;
        backward_img.setBackgroundColor(Color.BLUE);
    }
});

if (check == true) {
    backward_img1.setBackgroundColor(Color.RED);
    backward_img.setBackgroundColor(Color.BLUE);
}
- Sankar Ganesh PMP
2
2这将永久设置背景,也就是说,如果用户点击返回按钮,背景将变为红色。 - methode
@方法:好的,请参考新答案,我已经更正了旧答案。 - Sankar Ganesh PMP
8
<?xml version="1.0" encoding="utf-8"?>
<selector xmlns:android="http://schemas.android.com/apk/res/android">
    <!-- default -->
    <item
        android:state_pressed="false"
        android:state_focused="false">
        <shape
            android:innerRadiusRatio="1"
            android:shape="rectangle" >
            <solid android:color="#00a3e2" />

            <padding
                android:bottom="10dp"
                android:left="10dp"
                android:right="10dp"
                android:top="10dp" />

        </shape>
    </item>

    <!-- button focused -->
    <item
        android:state_pressed="false"
        android:state_focused="true">
        <shape
            android:innerRadiusRatio="1"
            android:shape="rectangle" >
            <solid android:color="#5a97f5" />

            <padding
                android:bottom="5dp"
                android:left="10dp"
                android:right="10dp"
                android:top="5dp" />
        </shape></item>

    <!-- button pressed -->
    <item
        android:state_pressed="true"
        android:state_focused="false">
        <shape
            android:innerRadiusRatio="1"
            android:shape="rectangle" >
            <solid android:color="#478df9"/>
            <padding
                android:bottom="10dp"
                android:left="10dp"
                android:right="10dp"
                android:top="10dp" />
        </shape></item>
</selector>
- mirazimi
6
1-制作一个按钮形状:右键单击drawable,新建drawable资源文件。将根元素更改为shape并创建您的形状。
2-现在复制您的形状并更改名称和填充颜色。 点击此处查看图片描述
3-右键单击drawable,新建drawable资源文件,将根元素设置为selector, 进入文件并设置“state_pressed”状态。
<selector xmlns:android="http://schemas.android.com/apk/res/android">

<item android:state_pressed="true"android:drawable="@drawable/YourShape1"/>
<item android:state_pressed="false" android:drawable="@drawable/YourShape2"/>

</selector>
4-最后,转到XML布局并设置您的按钮背景“your selector”
(对不起我的英语不好)
- Mj.talebi
6
如果你想在按钮被按下时更改其背景图片或颜色,请将以下代码复制并粘贴到项目中指定的位置。
      <!-- Create new xml file like mybtn_layout.xml file in drawable -->
<?xml version="1.0" encoding="utf-8"?>
<selector xmlns:android="http://schemas.android.com/apk/res/android">
<item android:state_pressed="true" android:drawable="@drawable/pressed" /> <!--pressed -->
<item android:drawable="@drawable/normal" /> <!-- Normal -->
</selector>
  <!-- Now this file should be in a drawable folder and use this
  single line code in    button code to get all the properties of this xml file -->

    <Button
      android:id="@+id/street_btn"
      android:layout_width="wrap_content"
      android:background="@drawable/layout_a" > <!-- your required code -->
    </Button>
- Pir Fahim Shah
4
请尝试以下操作......
首先创建一个名为button_pressed.xml的xml文件,其内容如下:
<?xml version="1.0" encoding="utf-8"?>
<selector
  xmlns:android="http://schemas.android.com/apk/res/android">
    <item android:state_focused="true"
          android:state_pressed="false"
          android:drawable="@drawable/icon_1" />
    <item android:state_focused="true"
          android:state_pressed="true"
          android:drawable="@drawable/icon_1_press" />
    <item android:state_focused="false"
          android:state_pressed="true"
            android:drawable="@drawable/icon_1_press" />
    <item android:drawable="@drawable/icon_1" />
</selector>
现在在您的按钮上尝试这个。
int imgID = getResources().getIdentifier("button_pressed", "drawable", getApplication().getPackageName());
button.setImageResource(imgID);
- James
3
您可以尝试使用这段代码来解决您的问题。
<?xml version="1.0" encoding="utf-8"?>
<selector xmlns:android="http://schemas.android.com/apk/res/android">
  <item android:state_pressed="true"
   android:drawable="@drawable/login_selected" /> <!-- pressed -->
  <item android:state_focused="true"
   android:drawable="@drawable/login_mouse_over" /> <!-- focused -->
  <item android:drawable="@drawable/login" /> <!-- default -->
</selector>
在drawable文件夹中编写此代码,创建一个新的资源并将其命名为您想要的名称,然后在按钮中写入此可绘制项的名称,就像我们在Android中引用图像SRC一样。
- Mudassir Khan
1
1您好,@lmo先生,我已经在问题中给出了一些解释。 - Mudassir Khan
1
我正在使用以下代码(带有涟漪效果):
<ripple xmlns:android="http://schemas.android.com/apk/res/android" android:color="@color/color_gray">
<item android:id="@android:id/mask">
    <color android:color="@color/color_gray" />
</item></ripple>
- user3524157
网页内容由stack overflow 提供, 点击上面的可以查看英文原文,
原文链接
原文链接