用PHP裁剪PNG图像,去除空白透明。

6
我目前正在尝试使用GD函数处理图片和PHP。现在我想修改PNG图片的大小。以下是我想调整大小的PNG示例: enter image description here 
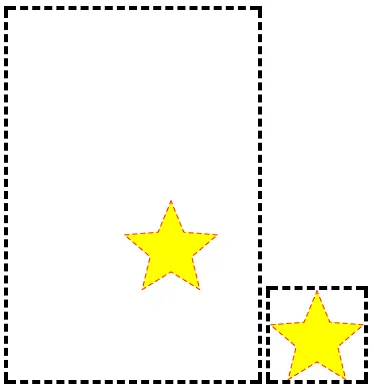
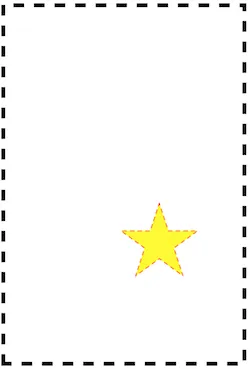
虚线表示PNG的边框,背景为透明,在一个大空间中只有一个丢失的星星。我想裁剪这个星星,获得一个简单的星星正方形(即使新的背景变成空白,也没有关系)。
我应该如何高效地做到这样?我考虑循环检查图片的每个像素..试图找到图像所在的位置,最终基于最小x/最大X和最小y/最大y值进行裁剪,但如果我开始处理数百张图片,这将非常耗时。
编辑:
<?php

$file = "./crop.png";

$ext = pathinfo($file, PATHINFO_EXTENSION);

$image;

switch ($ext){
case 'png':
    $image = imagecreatefrompng($file);
    break;

case 'jpeg':
case 'jpg':
    $image = imagecreatefromjpeg($file);
    break;

case 'gif':
    $image = imagecreatefromgif($file);
    break;
}

$cropped = imagecropauto($image, IMG_CROP_DEFAULT);

    if ($cropped !== false) { // in case a new image resource was returned
        echo "=> Cropping needed\n";
        imagedestroy($image);    // we destroy the original image
        $image = $cropped;       // and assign the cropped image to $im
    }

    imagepng($image, "./cropped.png");
    imagedestroy($image);

你自己尝试过了吗?我认为目前这个问题太宽泛了。 - Jonnix
是的。检查图片的每个像素,从(最小X,最小Y)裁剪到(最大X,最大Y),添加一点边距。这对于一张图片完美地工作,但我想将此脚本应用于数百张图片的数组。不确定服务器是否会欣赏这种循环脚本,我对PHP还很陌生,如果有更有效的方法来完成这项工作,我很感兴趣! - saperlipopette
如果您已经编写了代码并且关心效率问题,那么您可能需要访问 https://codereview.stackexchange.com。 - Jonnix
2
下面是我的答案。对于 PHP 5 >= 5.5.0, PHP 7,已经有一个内置的 [tag:php-gd] 函数可以完成这个任务。 - Christos Lytras
2个回答

7
如果你阅读并遵循php和php-gd文档,你会发现一个名为imagecropauto的函数,它可以精确地裁剪图片的alpha通道。这正是你想要的功能。
裁剪带有alpha通道的PNG图片。
$im = imagecreatefrompng("./star-with-alpha.png");
$cropped = imagecropauto($im, IMG_CROP_DEFAULT);

if ($cropped !== false) { // in case a new image resource was returned
    imagedestroy($im);    // we destroy the original image
    $im = $cropped;       // and assign the cropped image to $im
}

imagepng($im, "./star-with-alpha-crop.png");
imagedestroy($im);

您可以使用以下代码将其直接尝试到PHP页面中:
<body>

<img src="star-with-alpha.png">

<?php 

$im = imagecreatefrompng("./star-with-alpha.png");
$cropped = imagecropauto($im, IMG_CROP_DEFAULT);

if ($cropped !== false) { // in case a new image resource was returned
    imagedestroy($im);    // we destroy the original image
    $im = $cropped;       // and assign the cropped image to $im
}

imagepng($im, "./star-with-alpha-crop.png");
imagedestroy($im);

?>

<img src="star-with-alpha-crop.png">

</body>

结果

http://zikro.gr/dbg/php/crop-png/

裁剪图片演示


1
你好,你的解决方案在我的 Mac 上运行得非常好,但是我刚刚在服务器上部署了我的脚本(debian)。我的 Mac 和服务器上都是完全相同的 PHP 版本(5.6.30)。当在我的电脑上运行脚本时,它可以正常裁剪,但是当我在服务器上运行时,它却没有任何裁剪,并且背景不是空白的,而是全部变成黑色。有什么想法吗?为什么相同的代码在我的 Mac 上可以工作,但在远程服务器上却不能?提前感谢。 - saperlipopette
@saperlipopette 创建一个 PHP 信息文件并检查 PHP 是否编译了 GD2。如果没有,请尝试运行 apt-get install php5-gd 并重新启动 Web 服务器。 - Christos Lytras
1
我使用了错误报告,但没有发现问题,并且函数存在。即使我重新安装GD,apt-get也告诉我这是最新版本。 - saperlipopette
1
问题不在代码上,而是在系统/PHP/GD上。我建议您在此处或超级用户上创建一个新问题,并获得一些帮助来使GD与Debian系统配合工作。 - Christos Lytras
2
不错的替代方案。是的,我应该想到了,你可以使用ImageMagick来实现相同的功能。 - Christos Lytras
显示剩余12条评论

1

[这是针对Ubuntu 12的] imagecropauto 的唯一问题在于它仅适用于Mac和Windows。 由于今天大多数服务器使用Ubuntu/Debian - 这个函数没有用处。 相反,可以使用Imagick()来实现此功能。 这是我编写的一个示例代码,可以完美地实现这一点:

    //Add background transmparent
    $background = 'none';
    $image = new Imagick($path);
    $image->trimImage(0);
   
    //add transparent border
    //border add start
    /** Set border format **/
    $borderWidth = 20;
    $borderColor = 'none';
    $borderPadding = 10;


    $imageWidth = $image->getImageWidth() + ( 2 * ( $borderWidth + 
    $borderPadding ) );
    $imageHeight = $image->getImageHeight() + ( 2 * ( $borderWidth + 
    $borderPadding ) );

创建带有边框的最终图像的 Imagick 对象。
    $imageWithBorder = new Imagick();
    // Set image canvas
    $imageWithBorder->newImage( $imageWidth, $imageHeight, new ImagickPixel( 
    'none' ));
    // Create ImagickDraw object to draw border
    $border = new ImagickDraw();
    // Set fill color to transparent
    $border->setFillColor( 'none' );
    // Set border format
    $border->setStrokeColor( new ImagickPixel( $borderColor ) );
    $border->setStrokeWidth( $borderWidth );
    $border->setStrokeAntialias( false );

绘制边框。
    $border->rectangle(
        $borderWidth / 2 - 1,
        $borderWidth / 2 - 1,
        $imageWidth - ( ($borderWidth / 2) ),
        $imageHeight - ( ($borderWidth / 2) )
    );
    // Apply drawed border to final image
    $imageWithBorder->drawImage( $border );
    $imageWithBorder->setImageFormat('png');

保存图片

    // Put source image to final image
    $imageWithBorder->compositeImage(
            $image, Imagick::COMPOSITE_DEFAULT,
            $borderWidth + $borderPadding,
            $borderWidth + $borderPadding
    );
    
    $imageWithBorder->writeImage($path);

重新调整并适应原始图像的高度和宽度。
    $imageWithBorder->scaleImage(FINAL_WIDTH, FINAL_HEIGHT, true);
    $imageWithBorder->setImageBackgroundColor($background);
    $w = $imageWithBorder->getImageWidth();
    $h = $imageWithBorder->getImageHeight();
    $imageWithBorder->extentImage(FINAL_WIDTH, FINAL_HEIGHT, ($w  - 
    FINAL_WIDTH) / 2, ($h - FINAL_HEIGHT)/ 2);
    $imageWithBorder->writeImage($path);

希望有所帮助。祝好!

这仍然给我一个黑色背景。 - MrEduar
我不会因为错误信息而投下反对票,但是imagecropauto在Linux上运行得非常好。 - Brogan

网页内容由stack overflow 提供, 点击上面的
可以查看英文原文,
原文链接