如何在Google Colab上安装NVIDIA Apex

19

我所做的就是按照官方 GitHub 网站上的指示进行操作。

!git clone https://github.com/NVIDIA/apex
!cd apex
!pip install -v --no-cache-dir ./

它给了我一个错误:

ERROR: Directory './' is not installable. Neither 'setup.py' nor 'pyproject.toml' found.
Exception information:
Traceback (most recent call last):
  File "/usr/local/lib/python3.6/dist-packages/pip/_internal/cli/base_command.py", line 178, in main
    status = self.run(options, args)
  File "/usr/local/lib/python3.6/dist-packages/pip/_internal/commands/install.py", line 326, in run
    self.name, wheel_cache
  File "/usr/local/lib/python3.6/dist-packages/pip/_internal/cli/base_command.py", line 268, in populate_requirement_set
    wheel_cache=wheel_cache
  File "/usr/local/lib/python3.6/dist-packages/pip/_internal/req/constructors.py", line 248, in install_req_from_line
    "nor 'pyproject.toml' found." % name
pip._internal.exceptions.InstallationError: Directory './' is not installable. Neither 'setup.py' nor 'pyproject.toml' found.
8个回答

18

在添加了CUDA_HOME环境变量后,这对我起了作用:

%%writefile setup.sh

export CUDA_HOME=/usr/local/cuda-10.1
git clone https://github.com/NVIDIA/apex
pip install -v --no-cache-dir --global-option="--cpp_ext" --global-option="--cuda_ext" ./apex
!sh setup.sh

通常需要多长时间? - Nabin
我需要8分钟。 - Alex Bravo
3
截至2021年6月21日,在Colab上这将无法运行。PyTorch的默认版本现在是1.9+cuda102。最新版(6/21/21)的Apex在cuda102选项下构建失败。在构建Apex之前,需要降级PyTorch以使用cuda101。 - Noel DSouza
仍然存在@NoelDSouza提到的相同问题。 - Ind

17

我想只是添加一个评论,但是我的声望不够...

这对我来说有效,但实际上不需要 cd。此外,我需要这里建议的两个全局选项:https://github.com/NVIDIA/apex/issues/86

%%writefile setup.sh

git clone https://github.com/NVIDIA/apex
pip install -v --no-cache-dir --global-option="--cpp_ext" --global-option="--cuda_ext" ./apex

然后

!sh setup.sh

由于某些原因,另一个选项可行而这个不行,所以我不确定他们是否在Apex、GColab等方面进行了更改...只需尝试两种方法,看看哪个适用于您 :D - Marc Torrellas Socastro
这个脚本在Colab中下载了Apex。 - Vineet

10

更新

首先,按照以下步骤创建一个文件,例如setup.sh

用于带有CUDA和C++扩展的Apex:

%%writefile setup.sh

git clone https://github.com/NVIDIA/apex
cd apex
pip install -v --disable-pip-version-check --no-cache-dir --global-option="--cpp_ext" --global-option="--cuda_ext" ./

然后,安装它

!sh setup.sh

仅适用于Python构建


%%writefile setup.sh

git clone https://github.com/NVIDIA/apex
cd apex
pip install -v --disable-pip-version-check --no-cache-dir ./

Python-only编译不包含使用apex.optimizers.FusedAdamapex.normalization.FusedLayerNorm等所需的特定Fused kernels。

请查看apex快速入门


对我来说非常有效!谢谢 - neel
需要多长时间? - Nabin
@Nabin 在 Colab 上没花太多时间。 - kHarshit
我在一台普通的GPU机器上安装,花了很长时间,至少30分钟。 - Vamsi Sistla

6
在Colab中,使用cd命令之前,请使用“%”而不是“!”。
!git clone https://github.com/NVIDIA/apex
%cd apex
!pip install -v --no-cache-dir ./

上述代码将正常工作。


2

我尝试了几个选项,但我喜欢这个网站上的方法(链接),它与fast_bert和torch非常兼容,并且效果很好:

try:
  import apex
except Exception:
  ! git clone https://github.com/NVIDIA/apex.git
  % cd apex
  !pip install --no-cache-dir --global-option="--cpp_ext" --global-option="--cuda_ext" .
  %cd ..

1

1
以下是我在2022年11月使用的方法。 apex.optimizers.FusedAdamapex.normalization.FusedLayerNorm等需要CUDA和C++扩展(参见这里)。因此,仅安装Python版本是不够的。要构建apex,必须确保PyTorchapex的CUDA版本匹配,详细说明请参见这里
查询Ubuntu Colab运行的版本:
!lsb_release -a

No LSB modules are available.
Distributor ID: Ubuntu
Description:    Ubuntu 18.04.6 LTS
Release:    18.04
Codename:   bionic

要获取当前的CUDA版本,请运行以下命令:
!nvcc --version

nvcc: NVIDIA (R) Cuda compiler driver
Copyright (c) 2005-2021 NVIDIA Corporation
Built on Sun_Feb_14_21:12:58_PST_2021
Cuda compilation tools, release 11.2, V11.2.152
Build cuda_11.2.r11.2/compiler.29618528_0 

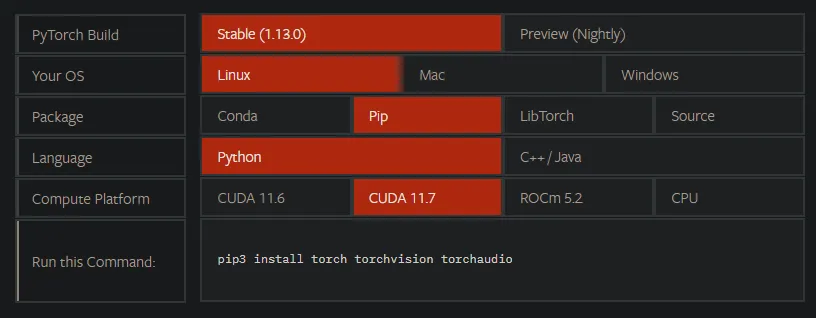
在这里查找最新的PyTorch构建和计算平台链接。 输入图像描述

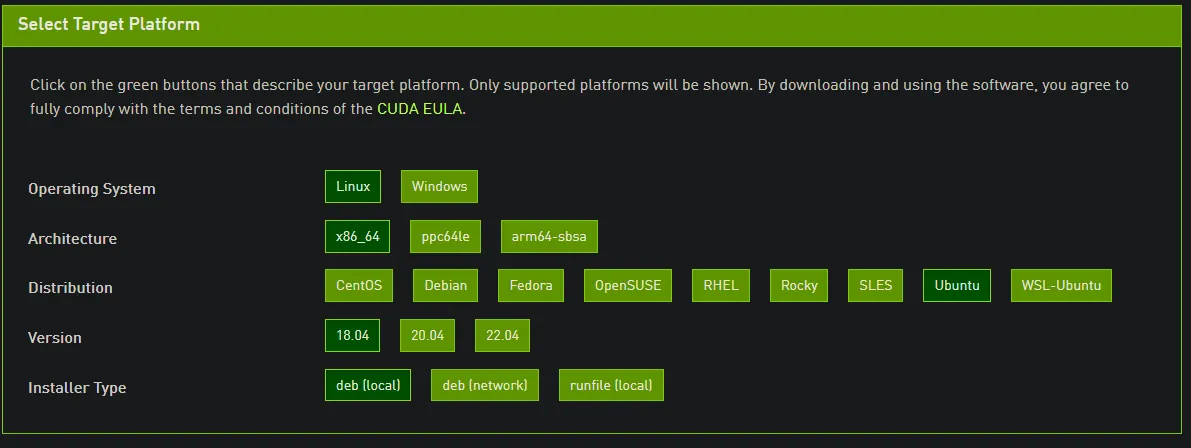
接下来,转到cuda工具包存档并配置与PyTorch的cuda版本和您的操作系统版本相匹配的版本。 输入图像描述

复制安装说明:

wget https://developer.download.nvidia.com/compute/cuda/repos/ubuntu1804/x86_64/cuda-ubuntu1804.pin
sudo mv cuda-ubuntu1804.pin /etc/apt/preferences.d/cuda-repository-pin-600
wget https://developer.download.nvidia.com/compute/cuda/11.7.0/local_installers/cuda-repo-ubuntu1804-11-7-local_11.7.0-515.43.04-1_amd64.deb
sudo dpkg -i cuda-repo-ubuntu1804-11-7-local_11.7.0-515.43.04-1_amd64.deb
sudo cp /var/cuda-repo-ubuntu1804-11-7-local/cuda-*-keyring.gpg /usr/share/keyrings/
sudo apt-get update
sudo apt-get -y install cuda

删除Sudo并将最后一行改为包含你的cuda版本,例如!apt-get -y install cuda-11-7(如果在 shell 直接运行则不需要感叹号):

!wget https://developer.download.nvidia.com/compute/cuda/repos/ubuntu1804/x86_64/cuda-ubuntu1804.pin
!mv cuda-ubuntu1804.pin /etc/apt/preferences.d/cuda-repository-pin-600
!wget https://developer.download.nvidia.com/compute/cuda/11.7.0/local_installers/cuda-repo-ubuntu1804-11-7-local_11.7.0-515.43.04-1_amd64.deb
!dpkg -i cuda-repo-ubuntu1804-11-7-local_11.7.0-515.43.04-1_amd64.deb
!cp /var/cuda-repo-ubuntu1804-11-7-local/cuda-*-keyring.gpg /usr/share/keyrings/
!apt-get update
!apt-get -y install cuda-11-7

您的CUDA版本将会被更新:
!nvcc --version

nvcc: NVIDIA (R) Cuda compiler driver
Copyright (c) 2005-2022 NVIDIA Corporation
Built on Wed_Jun__8_16:49:14_PDT_2022
Cuda compilation tools, release 11.7, V11.7.99
Build cuda_11.7.r11.7/compiler.31442593_0

接下来,在Google Colab中更新过时的Pytorch版本。
!pip install torch -U

构建顶点。根据您可能需要的全局选项,可能会减少全局选项的数量。
!git clone https://github.com/NVIDIA/apex.git && cd apex && pip install -v --no-cache-dir --global-option="--cpp_ext" --global-option="--cuda_ext" --global-option="--fast_multihead_attn" . && cd .. && rm -rf apex

...
Successfully installed apex-0.1

您现在可以根据需要导入Apex:
from apex import optimizers, normalization
...

0

我使用Paperspace,这对我有效:

!pip install git+https://github.com/NVIDIA/apex

网页内容由stack overflow 提供, 点击上面的
可以查看英文原文,
原文链接