Spring在运行时选择bean实现

79

我正在使用注解的Spring Beans,需要在运行时选择不同的实现。

@Service
public class MyService {
   public void test(){...}
}

例如对于Windows平台,我需要 MyServiceWin 扩展 MyService,对于Linux平台,我需要 MyServiceLnx 扩展 MyService
目前我只知道一个可怕的解决方案:
@Service
public class MyService {

    private MyService impl;

   @PostInit
   public void init(){
        if(windows) impl=new MyServiceWin();
        else impl=new MyServiceLnx();
   }

   public void test(){
        impl.test();
   }
}

请注意,我只使用注释而不是XML配置。


如果您的所有类名都不同,那么在使用
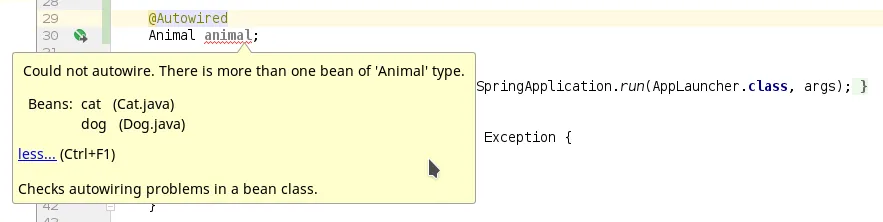
@Qualifier时有什么问题吗? - JamesENL
5
如果我没记错的话,Qualifer在运行时不会被评估。 - Tobia
没错。你可能应该看一下工厂模式。请参考下面的答案了解详情。 - JamesENL
8个回答

117

1. 实现一个自定义的Condition

public class LinuxCondition implements Condition {
  @Override
  public boolean matches(ConditionContext context, AnnotatedTypeMetadata metadata) {
    return context.getEnvironment().getProperty("os.name").contains("Linux");  }
}

对于Windows同样适用。

2. 在您的Configuration类中使用@Conditional

@Configuration
public class MyConfiguration {
   @Bean
   @Conditional(LinuxCondition.class)
   public MyService getMyLinuxService() {
      return new LinuxService();
   }

   @Bean
   @Conditional(WindowsCondition.class)
   public MyService getMyWindowsService() {
      return new WindowsService();
   }
}

3. 像往常一样使用 @Autowired

@Service
public class SomeOtherServiceUsingMyService {

    @Autowired    
    private MyService impl;

    // ... 
}

我尝试了@Profile解决方案,对我很有效。我认为这也可以是一个不错的解决方案,但使用@Profile时我不需要配置器。 - Tobia
1
@grep 你说得对。我已经修复了方法名称。请注意,您是基于类型MyService使用Conditional进行自动装配,因此bean定义的方法名称不会优先考虑,并且具有不同方法名称的单个配置应该可以工作。 - nobeh
如果两个条件都满足,你的自动装配会发生什么? - Derek
1
如果我想在“matches”内部使用某些变量怎么办? - J. Doe
有没有一种解决方案,不需要使用“new”,因此您不必指定所有构造函数参数,而是使用依赖注入,例如通过Lombok - lilalinux

31

让我们创建漂亮的配置。

假设我们有一个动物接口,我们又有两种实现。我们想要这样写:

@Autowired
Animal animal;

但我们应该返回哪个实现?

enter image description here

那么解决方案是什么?解决问题有许多方法。我将写下如何同时使用 @Qualifier 和自定义条件。

所以首先让我们创建我们的自定义注解:

@Retention(RetentionPolicy.RUNTIME)
@Target({ElementType.METHOD, ElementType.FIELD, ElementType.TYPE})
public @interface AnimalType {
    String value() default "";
}

和配置:

@Configuration
@EnableAutoConfiguration
@ComponentScan
public class AnimalFactoryConfig {

    @Bean(name = "AnimalBean")
    @AnimalType("Dog")
    @Conditional(AnimalCondition.class)
    public Animal getDog() {
        return new Dog();
    }

    @Bean(name = "AnimalBean")
    @AnimalType("Cat")
    @Conditional(AnimalCondition.class)
    public Animal getCat() {
        return new Cat();
    }

}

注意:我们的bean名称是AnimalBean为什么我们需要这个bean?因为当我们注入Animal接口时,只需编写@Qualifier("AnimalBean")

另外,我们创建了自定义注释来将值传递给我们的自定义条件

现在我们的条件看起来像这样(想象一下,“Dog”名称来自配置文件或JVM参数等)

   public class AnimalCondition implements Condition {

    @Override
    public boolean matches(ConditionContext conditionContext, AnnotatedTypeMetadata annotatedTypeMetadata) {
        if (annotatedTypeMetadata.isAnnotated(AnimalType.class.getCanonicalName())){
           return annotatedTypeMetadata.getAnnotationAttributes(AnimalType.class.getCanonicalName())
                   .entrySet().stream().anyMatch(f -> f.getValue().equals("Dog"));
        }
        return false;
    }
}

最后是注入:

@Qualifier("AnimalBean")
@Autowired
Animal animal;

2
我认为Qualifier不应该与Autowired混用。 - GabrielBB
为什么你认为它们不应该混合使用? - alex

30
你可以将bean注入移到配置中,例如:

您可以将bean注入到配置中,如下所示:

@Configuration
public class AppConfig {

    @Bean
    public MyService getMyService() {
        if(windows) return new MyServiceWin();
        else return new MyServiceLnx();
    }
}

或者,您可以使用配置文件 windowslinux,然后使用 @Profile 注释来注释您的服务实现,例如 @Profile("linux")@Profile("windows"),并为您的应用程序提供其中之一的配置文件。


我可以通过 web.xml 设置 Spring 配置文件的配置文件,但是否可以使用一些代码在 ContextListerner 中更改它?这样我就可以按照要求在运行时更改配置文件。 - Tobia
自从 Spring 4(?) 版本以来,你就可以使用 @Conditional 注解。@Profile 可以正常工作,但更适合的是Conditional - demaniak
@demaniak 如果我正确阅读了有关条件语句的文档,那么它似乎是在启动时而不是运行时被评估的? - Charles Wood
@CharlesWood - 是的,你说得对。但是,通过添加“@RefreshScope”和Actuator starter,可以在运行时重新加载。当然,您必须仔细考虑其对正在运行的系统的影响! - demaniak
为什么这还会被称为AppConfig?从技术上讲,这不就像是工厂模式吗? - alex

18
将所有实现类使用@Qualifier注释自动装配到工厂中,并从工厂返回所需的服务类。
public class MyService {
    private void doStuff();
}

我的Windows服务:

@Service("myWindowsService")
public class MyWindowsService implements MyService {

    @Override
    private void doStuff() {
        //Windows specific stuff happens here.
    }
}

我的 Mac 服务:

@Service("myMacService")
public class MyMacService implements MyService {

    @Override
    private void doStuff() {
        //Mac specific stuff happens here
    }
}

我的工厂:

@Component
public class MyFactory {
    @Autowired
    @Qualifier("myWindowsService")
    private MyService windowsService;

    @Autowired
    @Qualifier("myMacService")
    private MyService macService;

    public MyService getService(String serviceNeeded){
        //This logic is ugly
        if(serviceNeeded == "Windows"){
            return windowsService;
        } else {
            return macService;
        }
    }
}
如果您想要更加巧妙,您可以使用枚举来存储实现类类型,然后使用枚举值来选择您想要返回的实现。
public enum ServiceStore {
    MAC("myMacService", MyMacService.class),
    WINDOWS("myWindowsService", MyWindowsService.class);

    private String serviceName;
    private Class<?> clazz;

    private static final Map<Class<?>, ServiceStore> mapOfClassTypes = new HashMap<Class<?>, ServiceStore>();

    static {
        //This little bit of black magic, basically sets up your 
        //static map and allows you to get an enum value based on a classtype
        ServiceStore[] namesArray = ServiceStore.values();
        for(ServiceStore name : namesArray){
            mapOfClassTypes.put(name.getClassType, name);
        }
    }

    private ServiceStore(String serviceName, Class<?> clazz){
        this.serviceName = serviceName;
        this.clazz = clazz;
    }

    public String getServiceBeanName() {
        return serviceName;
    }

    public static <T> ServiceStore getOrdinalFromValue(Class<?> clazz) {
        return mapOfClassTypes.get(clazz);
    }
}

然后您的工厂可以接入应用程序上下文,并将实例拉入自己的映射中。当您添加新的服务类时,只需将另一个条目添加到枚举中,这就是您需要做的全部。

 public class ServiceFactory implements ApplicationContextAware {

     private final Map<String, MyService> myServices = new Hashmap<String, MyService>();

     public MyService getInstance(Class<?> clazz) {
         return myServices.get(ServiceStore.getOrdinalFromValue(clazz).getServiceName());
     }

      public void setApplicationContext(ApplicationContext applicationContext) throws BeansException {
          myServices.putAll(applicationContext.getBeansofType(MyService.class));
      }
 }

现在你只需将所需的类类型传递给工厂,它将为您提供所需的实例。这非常有帮助,特别是如果您想使服务通用化。


2
委托模式的应用理论上是很好的。但在实践中,它会增加扩展MyService的开销 - 每个添加的方法都必须由MyFactory(顺便说一下,它不是工厂而是代理)来实现。当MyService只有一个或两个方法时还好,但随着MyService的增长,这变得很繁琐。 - Kirill Gamazkov

9
只需将带有@Service注解的类设为有条件的: 就这些。不需要其他显式的@Bean方法。
public enum Implementation {
    FOO, BAR
}

@Configuration
public class FooCondition implements Condition {
    @Override
    public boolean matches(ConditionContext context, AnnotatedTypeMetadata metadata) {
        Implementation implementation = Implementation.valueOf(context.getEnvironment().getProperty("implementation"));
        return Implementation.FOO == implementation;
    }
}

@Configuration
public class BarCondition implements Condition {
    @Override
    public boolean matches(ConditionContext context, AnnotatedTypeMetadata metadata) {
        Implementation implementation = Implementation.valueOf(context.getEnvironment().getProperty("implementation"));
        return Implementation.BAR == implementation;
    }
}

这里发生了魔法。 条件恰好位于实现类所在的位置。

@Conditional(FooCondition.class)
@Service
class MyServiceFooImpl implements MyService {
    // ...
}

@Conditional(BarCondition.class)
@Service
class MyServiceBarImpl implements MyService {
    // ...
}

您可以像往常一样使用依赖注入,例如通过 Lombok@RequiredArgsConstructor@Autowired

@Service
@RequiredArgsConstructor
public class MyApp {
    private final MyService myService;
    // ...
}

将以下内容添加到您的 application.yml 文件中:
implementation: FOO

只有使用了FooCondition 注解的实现会被实例化。不会出现虚假实例化。


如何为这些编写集成测试? 如果我有一个针对Foo的集成测试,如何设置implementation属性=foo。同样适用于当implementation属性=bar的情况。 - SGB
可能与其他依赖于应用程序属性的测试相同。 - lilalinux

8

在这个问题上,我想多说几句。请注意,不必像其他答案所示实现那么多的Java类。可以使用@ConditionalOnProperty来解决。例如:

@Service
@ConditionalOnProperty(
  value="property.my.service", 
  havingValue = "foo", 
  matchIfMissing = true)
class MyServiceFooImpl implements MyService {
    // ...
}

@ConditionalOnProperty(
  value="property.my.service", 
  havingValue = "bar")
class MyServiceBarImpl implements MyService {
    // ...
}

把这段代码放到你的application.yml文件中:
property.my.service: foo

1
这是利用Spring框架的最干净的解决方案。 请注意,value不是一个字符串数组,并且该属性可以被名为PROPERTY_MY_SERVICE的环境变量覆盖。 - ipopa
1
我认为这种方法看起来最清晰,并且在Spring博客中有记录:选择性注入的4个解决方案 - Charlie Reitzel

2

MyService.java:

public interface MyService {
  String message();
}

MyServiceConfig.java:

@Configuration
public class MyServiceConfig {

  @Value("${service-type}")
  MyServiceTypes myServiceType;

  @Bean
  public MyService getMyService() {
    if (myServiceType == MyServiceTypes.One) {
      return new MyServiceImp1();
    } else {
      return new MyServiceImp2();
    }
  }
}

application.properties:

service-type=one

MyServiceTypes.java

public enum MyServiceTypes {
  One,
  Two
}

可以在任何Bean/Component/Service等中使用,例如:

    @Autowired
    MyService myService;
    ...
    String message = myService.message()


getMyService() 配置方法需要使用 @Primary,以防止出现太多可供选择的实现。 - ᴠɪɴᴄᴇɴᴛ

0

使用AOP(AspectJ)的解决方案

@AutowiredCustom
public SpeedLimitService speedLimitService;

方面:

import org.aspectj.lang.annotation.Aspect;
import org.springframework.beans.BeansException;
import org.springframework.context.ApplicationContext;
import org.springframework.context.ApplicationContextAware;
import org.springframework.stereotype.Component;
import performance.context.CountryHolder;

import java.lang.reflect.Field;

/**
 */
@Aspect
@Component
public aspect AutowiredCustomFieldAspect implements ApplicationContextAware {

    private static ApplicationContext applicationContext;

    pointcut annotatedField(): get(@performance.annotation.AutowiredCustom * *);

    before(Object object): annotatedField() && target(object) {
        try {
            String fieldName = thisJoinPoint.getSignature().getName();
            Field field = object.getClass().getDeclaredField(fieldName);
            field.setAccessible(true);

            String className = field.getType().getSimpleName() + CountryHolder.getCountry().name();

            Object bean = applicationContext.getAutowireCapableBeanFactory().getBean(className);

            field.set(object, bean);
        } catch (Exception e) {
            e.printStackTrace();
        }
    }

    @Override
    public void setApplicationContext(ApplicationContext applicationContext) throws BeansException {
        this.applicationContext = applicationContext;
    }

}

豆类:

@Service("SpeedLimitServiceCH")
public class SpeedLimitServiceCH implements SpeedLimitService {

    @Override
    public int getHighwaySpeedLimit() {
        return 120;
    }
}

@Service("SpeedLimitServiceDE")
public class SpeedLimitServiceDE implements SpeedLimitService {

    @Override
    public int getHighwaySpeedLimit() {
        return 200;
    }
}

pom.xml 配置

...
                 <plugin>
                    <groupId>org.codehaus.mojo</groupId>
                    <artifactId>aspectj-maven-plugin</artifactId>
                    <version>${aspectj-maven-plugin.version}</version>
                    <configuration>
                        <complianceLevel>${java.version}</complianceLevel>
                        <source>${maven.compiler.source}</source>
                        <target>${maven.compiler.target}</target>
                        <showWeaveInfo>true</showWeaveInfo>
                        <verbose>true</verbose>
                        <Xlint>ignore</Xlint>
                        <encoding>${project.build.sourceEncoding}</encoding>
                    </configuration>
                    <executions>
                        <execution>
                            <goals>
                                <!-- use this goal to weave all your main classes -->
                                <goal>compile</goal>
                                <!-- use this goal to weave all your test classes -->
                                <goal>test-compile</goal>
                            </goals>
                        </execution>
                    </executions>
                </plugin>
    
            </plugins>
        </build>
    </project>

Reference:
https://viktorreinok.medium.com/dependency-injection-pattern-for-cleaner-business-logic-in-your-java-spring-application-f4ace0a3cba7


网页内容由stack overflow 提供, 点击上面的
可以查看英文原文,
原文链接