Android API 21工具栏填充

204

如何通过Android SDK API 21(支持库)去除新工具栏中的额外填充?
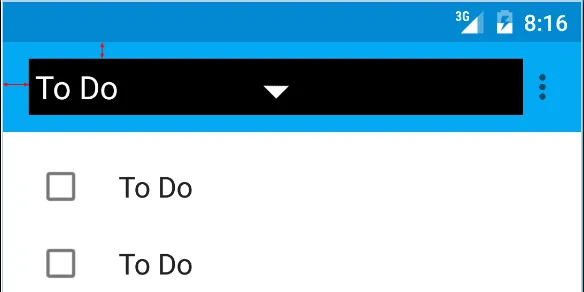
我指的是这张图片上的红箭头: enter image description here

以下是我正在使用的代码:

<android.support.v7.widget.Toolbar
        android:id="@+id/toolbar"
        android:layout_height="wrap_content"
        android:layout_width="match_parent"
        android:background="?attr/colorPrimary"
        android:padding="0dp"
        android:layout_margin="0dp">

        <RelativeLayout
            android:id="@+id/action_bar_layout"
            android:layout_width="match_parent"
            android:layout_height="match_parent"
            android:layout_margin="0dp"
            android:padding="0dp"
            android:background="#000000">

            <Spinner
                android:layout_width="wrap_content"
                android:layout_height="wrap_content"/>

        </RelativeLayout>
</Toolbar>

如您所见,我已将所有相关的填充设置为0,但是Spinner周围仍然有填充。我做错了什么,或者我需要做什么来消除额外的填充?

编辑 有人质疑我为什么要这样做。

根据Material Design规范,旋转器应距左侧72dp desc

我需要消除Google放置在那里的填充以正确放置我的spinner:desc

编辑2

根据Chris Bane的下面的答案,我将contentInsetStart设置为0。对于支持库,您需要使用app命名空间:

<android.support.v4.widget.DrawerLayout
    xmlns:android="http://schemas.android.com/apk/res/android"
    xmlns:app="http://schemas.android.com/apk/res-auto"
    android:layout_width="match_parent"
    android:layout_height="match_parent">

     <android.support.v7.widget.Toolbar
        android:id="@+id/toolbar"
        android:layout_height="wrap_content"
        android:layout_width="match_parent"
        android:minHeight="@dimen/action_bar_height"
        android:background="?attr/colorPrimary"
        android:contentInsetStart="0dp"
        android:contentInsetLeft="0dp"
        app:contentInsetLeft="0dp"
        app:contentInsetStart="0dp"
        app:theme="@style/ThemeOverlay.AppCompat.Dark.ActionBar"
        app:popupTheme="@style/ThemeOverlay.AppCompat.Light">

</android.support.v4.widget.DrawerLayout>

4
你也成功地移除了顶部/底部填充了吗?我尝试过,即使将所有的“contentInsetX”属性设置为0dp,仍然没有效果。 - patrickjason91
在Toolbar内部,是否可以将ImageView与Toolbar顶部对齐(图像具有w,h:wrap_content)?我尝试了所有方法,但无法实现。我的目标是拥有类似于书签丝带图像的东西,从Toolbar顶部“悬挂”,但总会有一些填充物,我无法消除它。 - Ewoks
10个回答

295

左缩进是由于工具栏的 contentInsetStart 导致的,默认情况下为16dp。

将其更改为72dp以与关键线对齐。

支持库v24.0.0的更新:

为了匹配Material Design规范,还有一个额外的属性contentInsetStartWithNavigation,默认情况下为16dp。如果你也有一个导航图标,请更改此属性。


1
contentInsetStart 用于从提供的任何工具栏 UI(例如导航图标)中进行插入。 - Chris Banes
@ChrisBanes 在Toolbar内部,是否有可能将imageView与Toolbar顶部对齐(图像具有w,h:wrap_content)?我已经尝试了所有方法,但无法实现..我的目标是拥有类似于书签缎带图像“悬挂”在Toolbar顶部的东西,但总会存在一些无法消除的填充。 - Ewoks
@ChrisBanes 当使用SearchView(默认与头像对齐)并将其与此解决方案结合使用时,标题会对齐,但SearchView会变得不对齐。有什么想法吗?我在这里创建了一个问题:http://stackoverflow.com/q/38998161/2153926 - GSala
2
contentInsetStartWithNavigation设置为0对我来说很管用,使用support-v4:25.0.1。 - Quentin G.
不要忘记设置 android:padding="0dp" - 4emodan
显示剩余5条评论

149

上面的答案是正确的,但仍有一件事可能会出问题(至少对我来说确实出了问题)

我使用了以下代码,在旧设备上无法正常工作 -

android:contentInsetStart="0dp"
android:contentInsetLeft="0dp"
app:contentInsetLeft="0dp"
app:contentInsetStart="0dp"

这里的诀窍就是只需使用以下内容 -

app:contentInsetLeft="0dp"
app:contentInsetStart="0dp"

并且摆脱 -

android:contentInsetStart="0dp"
android:contentInsetLeft="0dp"

现在它应该可以在所有设备上正常工作。


这可能是默认行为。谢谢 =) - Luciano Rodríguez
2
CollapsingToolBarLayout无法正常工作,请帮帮我。 - aslamhossin
添加 android:padding="0dp" 帮助了我。 - AITAALI_ABDERRAHMANE
1
除了上述4个之外,如果还不够的话,app:contentInsetStartWithNavigation 可能有助于解决问题。 - computingfreak

12

只需在工具栏中添加以下两行代码,就可以轻松去除左侧的空白边距,因为默认为16dp。

android:contentInsetStart="0dp"
app:contentInsetStart="0dp"

9

如果有其他人偶然来到这里...你也可以设置 padding,例如:

Toolbar toolbar = (Toolbar) findViewById(R.id.toolbar);

int padding = 200 // padding left and right

toolbar.setPadding(padding, toolbar.getPaddingTop(), padding, toolbar.getPaddingBottom());

或者 contentInset
toolbar.setContentInsetsAbsolute(toolbar.getContentInsetLeft(), 200);

你需要将填充转换为dp,并考虑显示密度。 - Someone Somewhere

4
在Toolbar的xml中使用 android:padding="0dp",并且在代码中使用mToolbar.setContentInsetsAbsolute(0, 0)的组合对我起了作用。

3
这是我所做的,它在每个Android版本上都可以完美运行。
工具栏 XML 文件:
<android.support.v7.widget.Toolbar
    xmlns:android="http://schemas.android.com/apk/res/android"
    xmlns:app="http://schemas.android.com/apk/res-auto"
    android:id="@+id/toolbar"
    android:layout_width="match_parent"
    android:layout_height="56dp"
    android:background="@color/primary_color"
    app:theme="@style/ThemeOverlay.AppCompat"
    app:popupTheme="@style/ThemeOverlay.AppCompat.Light">

    <TextView
        android:id="@+id/toolbar_title"
        android:layout_width="match_parent"
        android:layout_height="match_parent"
        android:layout_marginLeft="16dp" <!-- Add margin -->
        android:layout_marginStart="16dp"
        android:gravity="left|center"
        android:text="Toolbar Title" <!-- Your title text -->
        android:textColor="@color/white" <!-- Matches default title styles -->
        android:textSize="20sp"
        android:fontFamily="sans-serif-medium"/>

</android.support.v7.widget.Toolbar>

MyActivity.java (隐藏默认工具栏标题)

getSupportActionBar().setDisplayShowTitleEnabled(false); // Hide default toolbar title

显示关键线的结果

enter image description here


3

将您的工具栏设置为:

<android.support.v7.widget.Toolbar xmlns:android="http://schemas.android.com/apk/res/android"
xmlns:app="http://schemas.android.com/apk/res-auto"
android:id="@+id/menuToolbar"
android:layout_width="match_parent"
android:layout_height="wrap_content"
android:layout_margin="0dp"
android:background="@color/white"
android:contentInsetLeft="10dp"
android:contentInsetRight="10dp"
android:contentInsetStart="10dp"
android:minHeight="?attr/actionBarSize"
android:padding="0dp"
app:contentInsetLeft="10dp"
app:contentInsetRight="10dp"
app:contentInsetStart="10dp"></android.support.v7.widget.Toolbar>

您需要添加

contentInset

属性以添加间距

更多信息请访问此链接 - Android技巧


2

更新 AndroidX 工具栏:

<!-- TOOLBAR -->
<androidx.appcompat.widget.Toolbar
    android:id="@+id/toolbar"
    android:layout_width="match_parent"
    android:layout_height="wrap_content"
    app:contentInsetStart="0dp">

    <TextView
        style="@style/TextAppearance.AppCompat.Widget.ActionBar.Title"
        android:id="@+id/toolbar_title"
        android:layout_width="wrap_content"
        android:layout_height="wrap_content"
        android:text="@string/create_account_title"
        android:textColor="@color/color_dark_grey"/>

</androidx.appcompat.widget.Toolbar>

0

好的,如果你需要72dp,那么你可以在xml文件中添加差值的填充来实现。这样你就可以保留Android默认的Inset/Padding,他们希望我们使用。

所以:72-16=56

因此:添加56dp的填充,使自己的缩进/边距总共达到72dp。

或者你可以直接更改Dimen.xml文件中的值。这就是我现在正在做的事情。它会改变所有东西,整个布局,包括工具栏,当以新的适当的Android方式实现时。

Dimen Resource File

我添加的链接显示Dimen值为2dp,因为我已经更改了它,但默认设置为16dp。只是提供信息...


-2
((Toolbar)actionBar.getCustomView().getParent()).setContentInsetsAbsolute(0,0);

网页内容由stack overflow 提供, 点击上面的
可以查看英文原文,
原文链接