我有一个简单的打印语句:
print('hello friends')
我希望在终端中以蓝色输出。请问我该如何用Python3实现?
我有一个简单的打印语句:
print('hello friends')
我希望在终端中以蓝色输出。请问我该如何用Python3实现?
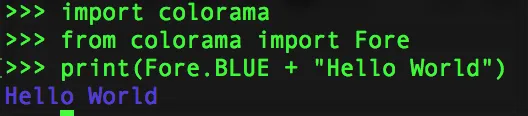
使用colorama非常简单,只需执行以下操作:
import colorama
from colorama import Fore, Style
print(Fore.BLUE + "Hello World")
以下是 Python3 REPL 中的运行结果:
要重置颜色设置,请调用此函数:
print(Style.RESET_ALL)
print(f"{Fore.BLUE}Hello World{Style.RESET_ALL}")
这是我使用Python 3脚本中用于标记特定输出的类。您可以导入这个类并像这样使用:
from colorprint import ColorPrint as _
_.print_fail('出现错误,退出程序')
import sys

# Colored printing functions for strings that use universal ANSI escape sequences.
# fail: bold red, pass: bold green, warn: bold yellow,
# info: bold blue, bold: bold white

class ColorPrint:

    @staticmethod
    def print_fail(message, end = '\n'):
        sys.stderr.write('\x1b[1;31m' + message.strip() + '\x1b[0m' + end)

    @staticmethod
    def print_pass(message, end = '\n'):
        sys.stdout.write('\x1b[1;32m' + message.strip() + '\x1b[0m' + end)

    @staticmethod
    def print_warn(message, end = '\n'):
        sys.stderr.write('\x1b[1;33m' + message.strip() + '\x1b[0m' + end)

    @staticmethod
    def print_info(message, end = '\n'):
        sys.stdout.write('\x1b[1;34m' + message.strip() + '\x1b[0m' + end)

    @staticmethod
    def print_bold(message, end = '\n'):
        sys.stdout.write('\x1b[1;37m' + message.strip() + '\x1b[0m' + end)
将这些类放入与您的< strong>test.py文件相邻的< strong>Color.py 文件中,然后运行< strong> test.py 。 我在Ubuntu服务器16.04和Linux Mint 18.2上测试了这些类。除了GColor(< strong> RGB )之外,所有类都工作得非常好,它可以在Linux Mint终端等图形终端中使用。 此外,您可以像这样使用这些类:
print(Formatting.Italic + ANSI_Compatible.Color(12) + "This is a " + Formatting.Bold + "test" + Formatting.Reset_Bold +  "!" + ANSI_Compatible.END + Formatting.Reset)
print(Color.B_DarkGray + Color.F_LightBlue + "This is a " + Formatting.Bold + "test" + Formatting.Reset_Bold +  "!" + Base.END)
结果:

注意: 它不能在Windows上工作!
文件 Color.py :
class Base:
    # Foreground:
    HEADER = '\033[95m'
    OKBLUE = '\033[94m'
    OKGREEN = '\033[92m'
    WARNING = '\033[93m'
    FAIL = '\033[91m'
    # Formatting
    BOLD = '\033[1m'
    UNDERLINE = '\033[4m'
    # End colored text
    END = '\033[0m'
    NC ='\x1b[0m' # No Color

class ANSI_Compatible:
    END = '\x1b[0m'
    # If Foreground is False that means color effect on Background
    def Color(ColorNo, Foreground=True): # 0 - 255
        FB_G = 38 # Effect on foreground
        if Foreground != True:
            FB_G = 48 # Effect on background
        return '\x1b[' + str(FB_G) + ';5;' + str(ColorNo) + 'm'

class Formatting:
    Bold = "\x1b[1m"
    Dim = "\x1b[2m"
    Italic = "\x1b[3m"
    Underlined = "\x1b[4m"
    Blink = "\x1b[5m"
    Reverse = "\x1b[7m"
    Hidden = "\x1b[8m"
    # Reset part
    Reset = "\x1b[0m"
    Reset_Bold = "\x1b[21m"
    Reset_Dim = "\x1b[22m"
    Reset_Italic = "\x1b[23m"
    Reset_Underlined = "\x1b[24"
    Reset_Blink = "\x1b[25m"
    Reset_Reverse = "\x1b[27m"
    Reset_Hidden = "\x1b[28m"

class GColor: # Gnome supported
    END = "\x1b[0m"
    # If Foreground is False that means color effect on Background
    def RGB(R, G, B, Foreground=True): # R: 0-255  ,  G: 0-255  ,  B: 0-255
        FB_G = 38 # Effect on foreground
        if Foreground != True:
            FB_G = 48 # Effect on background
        return "\x1b[" + str(FB_G) + ";2;" + str(R) + ";" + str(G) + ";" + str(B) + "m"

class Color:
    # Foreground
    F_Default = "\x1b[39m"
    F_Black = "\x1b[30m"
    F_Red = "\x1b[31m"
    F_Green = "\x1b[32m"
    F_Yellow = "\x1b[33m"
    F_Blue = "\x1b[34m"
    F_Magenta = "\x1b[35m"
    F_Cyan = "\x1b[36m"
    F_LightGray = "\x1b[37m"
    F_DarkGray = "\x1b[90m"
    F_LightRed = "\x1b[91m"
    F_LightGreen = "\x1b[92m"
    F_LightYellow = "\x1b[93m"
    F_LightBlue = "\x1b[94m"
    F_LightMagenta = "\x1b[95m"
    F_LightCyan = "\x1b[96m"
    F_White = "\x1b[97m"
    # Background
    B_Default = "\x1b[49m"
    B_Black = "\x1b[40m"
    B_Red = "\x1b[41m"
    B_Green = "\x1b[42m"
    B_Yellow = "\x1b[43m"
    B_Blue = "\x1b[44m"
    B_Magenta = "\x1b[45m"
    B_Cyan = "\x1b[46m"
    B_LightGray = "\x1b[47m"
    B_DarkGray = "\x1b[100m"
    B_LightRed = "\x1b[101m"
    B_LightGreen = "\x1b[102m"
    B_LightYellow = "\x1b[103m"
    B_LightBlue = "\x1b[104m"
    B_LightMagenta = "\x1b[105m"
    B_LightCyan = "\x1b[106m"
    B_White = "\x1b[107m"
同时,
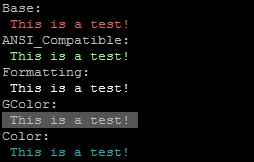
文件 test.py:
from Color import *

if __name__ == '__main__':
    print("Base:")
    print(Base.FAIL,"This is a test!", Base.END)

    print("ANSI_Compatible:")
    print(ANSI_Compatible.Color(120),"This is a test!", ANSI_Compatible.END)

    print("Formatting:")
    print(Formatting.Bold,"This is a test!", Formatting.Reset)

    print("GColor:") # Gnome terminal supported
    print(GColor.RGB(204,100,145),"This is a test!", GColor.END)

    print("Color:")
    print(Color.F_Cyan,"This is a test!",Color.F_Default)
结果:
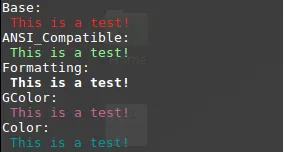
在Ubuntu Server 16.04上:
在Linux Mint 18.2上:
由于Python是解释性语言并在C中运行,因此可以在不使用模块的情况下设置颜色。
您可以像这样定义颜色类:
class color:
   PURPLE = '\033[1;35;48m'
   CYAN = '\033[1;36;48m'
   BOLD = '\033[1;37;48m'
   BLUE = '\033[1;34;48m'
   GREEN = '\033[1;32;48m'
   YELLOW = '\033[1;33;48m'
   RED = '\033[1;31;48m'
   BLACK = '\033[1;30;48m'
   UNDERLINE = '\033[4;37;48m'
   END = '\033[1;37;0m'
写代码时,你可以简单地写:
print(color.BLUE + "hello friends" + color.END)
请注意,你选择的颜色必须像类定义一样大写,并且这些是我个人觉得令人满意的颜色选择。要获取更完整的颜色选择以及背景选择,请查看:https://gist.github.com/RabaDabaDoba/145049536f815903c79944599c6f952a。
这是 C 语言的代码,但一旦你知道代码是如何编写的,就可以轻松地适应 Python。
以 BLUE 为例,因为这是你想要显示的颜色。
BLUE = '033[1;37;48m'
\033告诉Python要注意以下格式。
1通知代码加粗。(我更喜欢1而不是0,因为它更突出。)
34是实际的颜色代码。它选择了蓝色。
48m是背景颜色。48m与控制台窗口颜色相同,因此似乎没有背景。
print("{} hello friends {}".format(color.BLUE, color.END)),因为它更易读。 - Itai Ganot# Pure Python 3.x demo, 256 colors
# Works with bash under Linux and MacOS
fg = lambda text, color: "\33[38;5;" + str(color) + "m" + text + "\33[0m"
bg = lambda text, color: "\33[48;5;" + str(color) + "m" + text + "\33[0m"
def print_six(row, format):
for col in range(6):
color = row*6 + col + 4
if color>=0:
text = "{:3d}".format(color)
print (format(text,color), end=" ")
else:
print(" ", end=" ")
for row in range(-1,42):
print_six(row, fg)
print("",end=" ")
print_six(row, bg)
print()
# Simple usage: print(fg("text", 160))
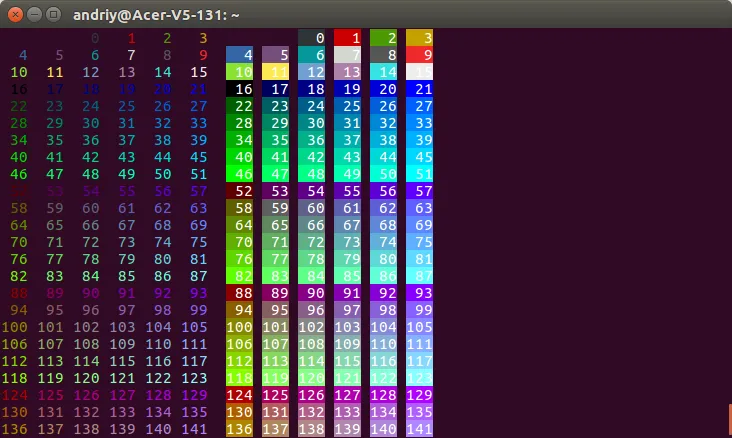
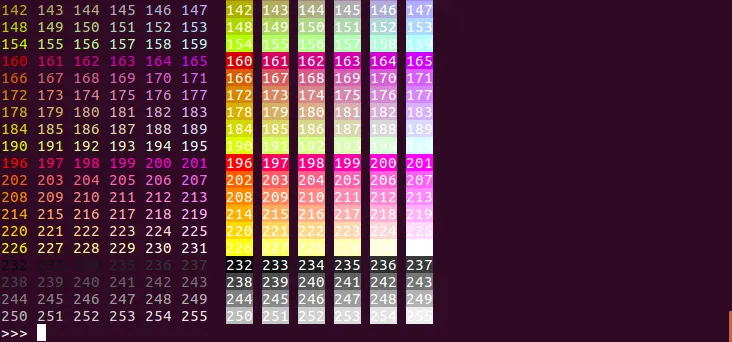
7、30-47和90-107会被着色。数字4会有下划线,而数字41则为粉色。这两列是相同的,意味着30-39和90-99具有前景色,而40-47和100-107具有背景色。 - Andreas detests censorship尝试这种方式,不需要导入模块,只需使用颜色代码数字,定义为常量:
BLUE = '34m'
message = 'hello friends'


def display_colored_text(color, text):
    colored_text = f"\033[{color}{text}\033[00m"
    return colored_text
例子:
>>> print(display_colored_text(BLUE, message))
hello friends
setup.py,就可以了。然后你可以很容易地像这样用颜色打印文本:import colors
print(colors.red('this is red'))
print(colors.green('this is green'))
下面是我从早期的python2答案中得到的一个答案
安装termcolor模块。
pip3 install termcolor
从termcolor导入colored类。
from termcolor import colored
使用提供的方法,以下是一个示例。
print(colored('hello', 'red'), colored('world', 'green'))
ESC[31m你好ESC[0m ESC[32m世界ESC[0m - user3103059不需要安装任何额外的库,它与我所知道的每个终端兼容。
类方法:
首先执行import config as cfg。
clipped是数据帧。
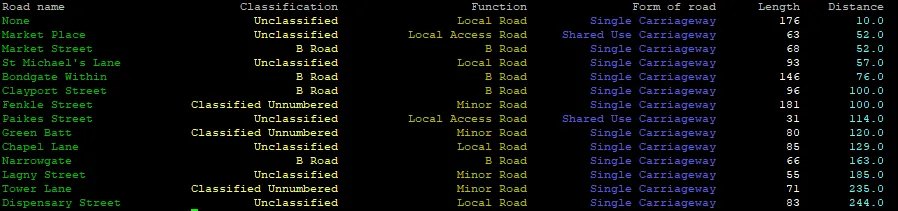
            #### HEADER: ####
            print('{0:<23} {1:>24} {2:>26} {3:>26} {4:>11} {5:>11}'.format('Road name','Classification','Function','Form of road','Length','Distance') )

            #### Now row by row: ####
            for index, row in clipped.iterrows():
                rdName      = self.colorize(row['name1'],cfg.Green)
                rdClass     = self.colorize(row['roadClassification'],cfg.LightYellow)
                rdFunction  = self.colorize(row['roadFunction'],cfg.Yellow)
                rdForm      = self.colorize(row['formOfWay'],cfg.LightBlue)
                rdLength    = self.colorize(row['length'],cfg.White)
                rdDistance  = self.colorize(row['distance'],cfg.LightCyan)
                print('{0:<30} {1:>35} {2:>35} {3:>35} {4:>20} {5:>20}'.format(rdName,rdClass,rdFunction,rdForm,rdLength,rdDistance) )
代码 {0:<30} {1:>35} {2:>35} {3:>35} {4:>20} {5:>20} 的意义:
0, 1, 2, 3, 4, 5 -> 列,总共有6列
30, 35, 20 -> 列宽(请注意,您需要添加\033[96m的长度 - Python中这也是一个字符串),可以自行实验:)
>, < -> 对齐方式:右对齐、左对齐(也可以用=填充零)
config.py 中有什么:
#colors
ResetAll = "\033[0m"

Bold       = "\033[1m"
Dim        = "\033[2m"
Underlined = "\033[4m"
Blink      = "\033[5m"
Reverse    = "\033[7m"
Hidden     = "\033[8m"

ResetBold       = "\033[21m"
ResetDim        = "\033[22m"
ResetUnderlined = "\033[24m"
ResetBlink      = "\033[25m"
ResetReverse    = "\033[27m"
ResetHidden     = "\033[28m"

Default      = "\033[39m"
Black        = "\033[30m"
Red          = "\033[31m"
Green        = "\033[32m"
Yellow       = "\033[33m"
Blue         = "\033[34m"
Magenta      = "\033[35m"
Cyan         = "\033[36m"
LightGray    = "\033[37m"
DarkGray     = "\033[90m"
LightRed     = "\033[91m"
LightGreen   = "\033[92m"
LightYellow  = "\033[93m"
LightBlue    = "\033[94m"
LightMagenta = "\033[95m"
LightCyan    = "\033[96m"
White        = "\033[97m"