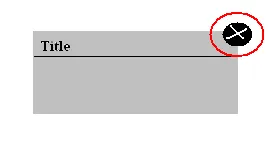
如何在自定义对话框框边上获取那个红圈中的交叉按钮/图像?
该问题涉及如何在自定义对话框中添加关闭按钮,使用户可以方便地关闭该对话框。
安卓系统不同于Windows,您不需要Windows风格的“关闭”按钮。同时,安卓也不同于MacOS,因此您也不需要一个小闪亮的红色像糖果一样的点。
当您为移动平台开发应用程序时,应遵循定义该平台使用模式和视觉样式的用户界面指南。
安卓没有标题栏、下拉菜单和最小化/还原/关闭按钮。不要试图制作它们,否则您将会制作出一个看起来从未适用于安卓平台的应用。
“返回”硬键是所需功能的按钮。它可以在不做出选择的情况下关闭对话框。在这里让安卓平台做同样的事情。不要强迫用户思考与他们使用的操作系统不同的操作。
您好,
要制作自定义对话框,请按照以下步骤进行操作。
create a xml file style.xml in your values folder. and enter style in your resource tag.
<style name="Theme.CustomDialog"
    parent="android:style/Theme.Dialog">
    <item name="android:windowBackground">@drawable/bg_popup</item>
    <item name="android:windowNoTitle">true</item>
    <item name="android:layout_width">wrap_content</item>
    <item name="android:layout_height">wrap_content</item>
</style>
create a custom_dialog.xml in layout folder.
<RelativeLayout android:layout_width="wrap_content"
    android:layout_height="wrap_content">

    <LinearLayout android:layout_width="wrap_content"
        android:layout_height="wrap_content" android:layout_marginTop="10dp" android:layout_marginRight="10dp">
    </LinearLayout>

    <ImageView android:layout_width="wrap_content"
        android:layout_height="wrap_content" android:background="@drawable/red_cross"
        android:layout_alignParentRight="true" android:layout_alignParentTop="true">
    </ImageView>
</RelativeLayout>
finally access this layout in an activity it will work.
这是您活动中的代码
AlertDialog.Builder builder;


                    Context mContext = YOURACTIVITY.this;
                    LayoutInflater inflater = (LayoutInflater) mContext.getSystemService(LAYOUT_INFLATER_SERVICE);
                    View layout = inflater.inflate(R.layout.custom_dialog,
                                                   (ViewGroup) findViewById(R.id.layout_root));


                    ImageView close_dialog = (ImageView) layout.findViewById(R.id.imageView_custom_dialog_close);

                    close_dialog.setOnClickListener(new View.OnClickListener() {

                        public void onClick(View v) {

                        alertDialog.dismiss();

                        }
                    });


                    builder = new AlertDialog.Builder(mContext);
                    builder.setView(layout);
                    alertDialog = builder.create();

                    alertDialog.show();
这是custom_dialog.xml文件
<?xml version="1.0" encoding="utf-8"?>
<LinearLayout xmlns:android="http://schemas.android.com/apk/res/android"
    android:id="@+id/layout_root"
    android:layout_width="fill_parent"
    android:layout_height="fill_parent"
    android:orientation="vertical"
    android:padding="10dp" android:background="@drawable/background">


    <ImageView
        android:id="@+id/imageView_custom_dialog_close"
        android:layout_width="wrap_content"
        android:layout_height="wrap_content"
        android:layout_gravity="right"
        android:layout_margin="2dp"
        android:src="@android:drawable/ic_delete" />


//add here any controls you might want

</LinearLayout>
在某个地方声明私有的AlertDialog alertDialog;...
希望这能帮到你。
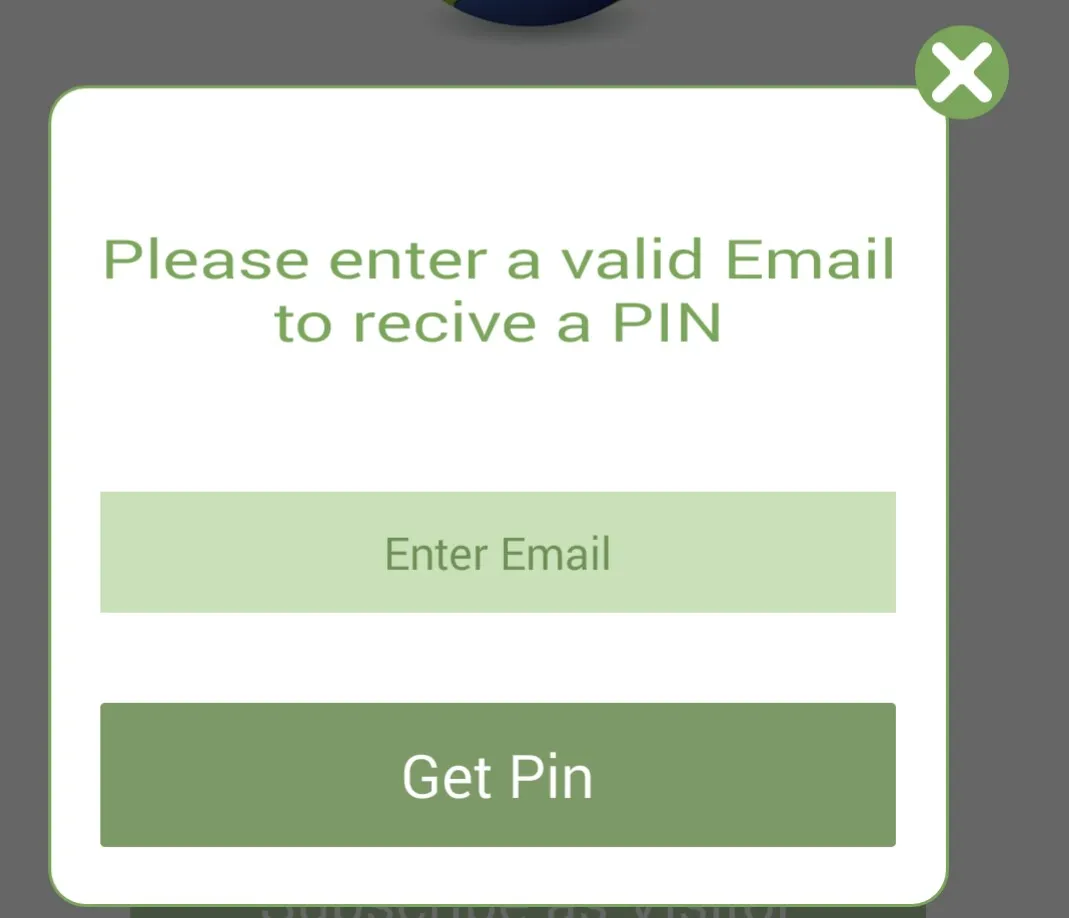
我在这方面做了一些工作,这里是在nuxes 5上测试过的代码,附加图像中的十字架是一个图片。
dialog.xml
<RelativeLayout
    android:layout_marginTop="20dp"
    android:layout_width="match_parent"
    android:layout_height="wrap_content"
    android:layout_marginRight="20dp"
    android:background="@drawable/rounded_border"
    android:paddingBottom="20dp"
    android:gravity="center_horizontal" >

    <TextView
        android:id="@+id/label_popup"
        android:layout_width="wrap_content"
        android:layout_height="wrap_content"
        android:layout_alignParentTop="true"
        android:layout_centerHorizontal="true"
        android:layout_marginTop="40dp"
        android:gravity="center_horizontal"
        android:text="@string/label_recive_pin"
        android:textColor="@color/green_line"
        android:padding="5dp"
        android:textScaleX="1.3"
        android:textSize="18sp" />

    <EditText
        android:id="@+id/edtpin"
        android:layout_width="wrap_content"
        android:layout_height="wrap_content"
        android:layout_below="@+id/label_popup"
        android:layout_centerHorizontal="true"
        android:layout_marginTop="40dp"
        android:background="@color/edit_green_bg"
        android:ems="15"
        android:gravity="center_horizontal"
        android:hint="@string/enter_email"
        android:inputType="textEmailAddress"
        android:paddingBottom="10dp"
        android:paddingTop="10dp"
        android:textColor="@color/edit_green_txt"
        android:textSize="15sp" >

        <requestFocus />
    </EditText>

    <Button
        android:id="@+id/btnLogin"
        android:layout_width="wrap_content"
        android:layout_height="wrap_content"
        android:layout_alignLeft="@+id/edtpin"
        android:layout_alignRight="@+id/edtpin"
        android:layout_below="@+id/edtpin"
        android:layout_centerHorizontal="true"
        android:layout_marginTop="30dp"
        android:background="@drawable/btn_bg_darkgreen"
        android:onClick="onLoginButtonClick"
        android:text="@string/get_pin_btn_txt"
        android:textColor="@color/white"
        android:textSize="20sp" />
</RelativeLayout>

<ImageView
    android:id="@+id/cancel_btn"
    android:layout_width="wrap_content"
    android:layout_height="wrap_content"
    android:layout_alignParentRight="true"
    android:layout_alignParentTop="true"
    android:src="@drawable/cross_window" />
<?xml version="1.0" encoding="utf-8"?>
<layer-list xmlns:android="http://schemas.android.com/apk/res/android" >
    <item>
        <shape android:shape="rectangle" >
            <solid android:color="@color/white" />
            <corners android:radius="12dip" />
            <stroke
                android:width="1dip"
                android:color="@color/green_line" />
        </shape>
    </item>
</layer-list>
  @Override
    protected void onCreate(Bundle savedInstanceState) {
        super.onCreate(savedInstanceState);
        requestWindowFeature(Window.FEATURE_NO_TITLE);
        getWindow().setBackgroundDrawable(new ColorDrawable(android.graphics.Color.TRANSPARENT));// *that how i made background transparent so that **Only** rounded border can be seen*
        setContentView(R.layout.dialog_getpin);
    }