Python 3.7 + PIL 如何将像素的灰度值转换为相应的透明度水平(0-255)?

3

无法确定如何将像素颜色列表转换为白色的等效透明度。

pixel_data = list(img.getdata())
print(pixel_data)
alpha_range = range(0, 256)  # increase count
color_range = range(256, -1, -1)  # decrease count
for i, pixel in enumerate(pixel_data):
    if pixel[:3] == (255, 255, 255):
        pixel_data[i] = (255, 255, 255, 0)
img.putdata(pixel_data)
print(list(pixel_data))

我希望能够解析灰度图像的像素,然后将其转换为相应的透明度水平:

.R., .G., .B. = .R., .G., .B., Alpha 
255, 255, 255 = 255, 255, 255, 0
254, 254, 254 = 255, 255, 255, 1
253, 253, 253 = 255, 255, 255, 2
252, 252, 252 = 255, 255, 255, 3
..., ..., ... = ..., ..., ..., 4
..., ..., ... = ..., ..., ..., 5
..., ..., ... = ..., ..., ..., 6
..., ..., ... = ..., ..., ..., .
..., ..., ... = ..., ..., ..., 255

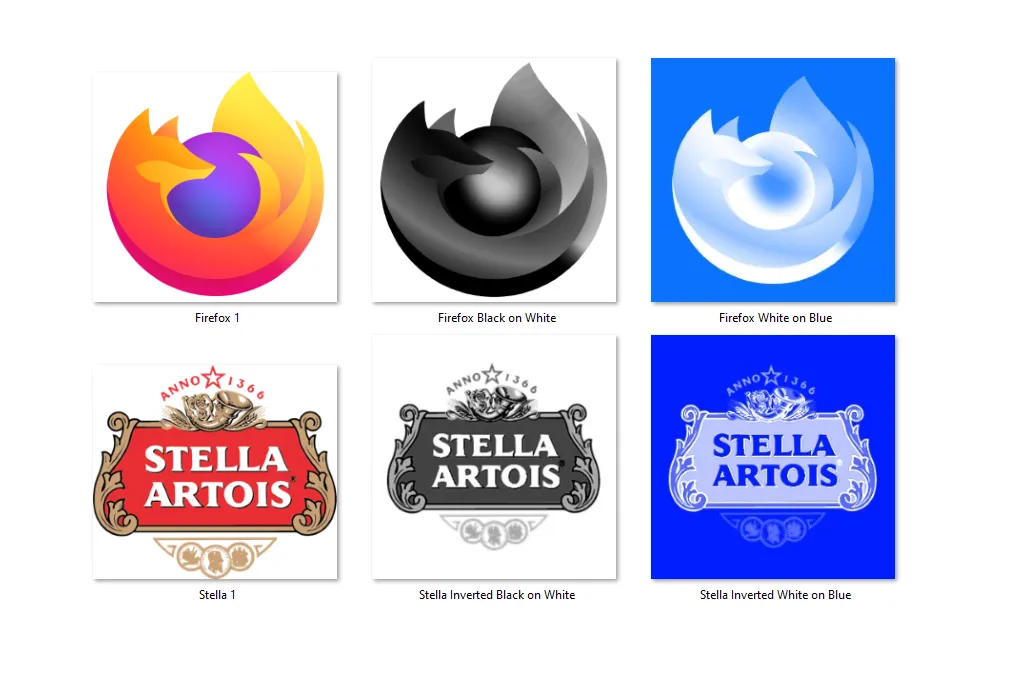
我希望最终结果完全是白色的,并且使用相匹配的不透明度(alpha 透明度)进行阴影处理。

提供图片以展示白色最终效果。蓝色背景方便查看: 提供图片以展示白色最终效果。蓝色背景方便查看

2个回答

1
我认为你的意思是这样的:

我想你的意思是这样的:

import numpy as np
from PIL import Image

# Open image and ensure it has an alpha channel
im = Image.open('image.png').convert('RGBA')

# Make into Numpy array, shape [h,w,4]
ni = np.array(im)

# Set the alpha channel of each pixel to "255 - red"
ni[...,3] = 255 - ni[...,0]

# Set the RGB of each pixel to white (255,255,255)
ni[:,:,(0,1,2)] = 255

# Make back into PIL Image and save
Image.fromarray(ni).save('result.png')

如果出于某些原因,您不喜欢Numpy,您可以像这样直接使用PIL/Pillow:
#!/usr/bin/env python3

from PIL import Image

# Open image, ensuring in RGB mode, rather than palette or greyscale
im = Image.open('image.png').convert('RGB')

# Extract Red channel
R, _, _ = im.split()

# Generate Alpha channel as (255-Red)
Alpha = R.point(lambda p: 255-p)

# Fill original image with white
im.paste((255,255,255),box=(0,0,im.width,im.height))

# Add in alpha channel
im.putalpha(Alpha)

# Save
im.save('result.png')

这几乎完美,哇!而且非常简单。但是这段代码会覆盖现有的 alpha 通道,我不希望发生这种情况。我使用上面的 for 循环来消除 numpy 接管的黑色/白色。 - Brandon
有没有办法让im.putalpha(Alpha)不影响现有的透明区域?目前它会将现有的透明区域变成黑色或白色。而我的先前脚本无法检测到新的白色或黑色作为要删除的颜色。 - Brandon

1

我能够对Mark的代码进行一些修改,从而达到了我想要的精确结果。谢谢!

#!/usr/bin/env python3
from PIL import Image

# Open image
img = Image.open('firefox.png').convert('RGBA')
img2 = img.copy()

# Extract Red channel
r, g, b, a = img.split()

# Generate Alpha channel as (255-Red)
alpha_r = r.point(lambda p: 255 - p)
alpha_g = g.point(lambda p: 255 - p)
alpha_b = b.point(lambda p: 255 - p)
alpha_a = b.point(lambda p: 255 - p)

# Fill original image with white
img.paste((255, 255, 255), box=(0, 0, img.width, img.height))

# Add in alpha channel
img.putalpha(alpha_r), img.putalpha(alpha_g), img.putalpha(alpha_b), img.putalpha(alpha_a)

# crop out white area
img = Image.composite(img, img2, img2)

# Save
img.save('result.png')

网页内容由stack overflow 提供, 点击上面的
可以查看英文原文,
原文链接