警告:2022年5月 - 此答案可能已过时 - 请查看David Stein的评论
让我给pinoyyid的优秀答案添加一条替代路线(对我来说没有用-弹出重定向错误)。
您不必使用OAuthPlayground,而是可以直接使用HTTP REST API。因此,与pinoyyid的答案不同,我们将在本地执行操作。按照pinoyyid的答案中的步骤1-3。我将引用它们:
- 创建Google帐户(例如my.drive.app@gmail.com)-如果您使用现有帐户,则可以跳过此步骤。
- 使用API控制台注册mydriveapp(https://console.developers.google.com/apis/credentials/oauthclient?project=mydriveapp 或 https://console.developers.google.com/apis/)
- 创建新的凭据集(NB OAuth客户端ID而不是服务帐户密钥,然后从选择中选择“Web应用程序”)
现在,不要使用playground,在凭据中添加以下内容:
授权的JavaScript源:http://localhost(我不知道是否需要,但只需这样做。)
授权重定向URI:http://localhost:8080
屏幕截图(德语):
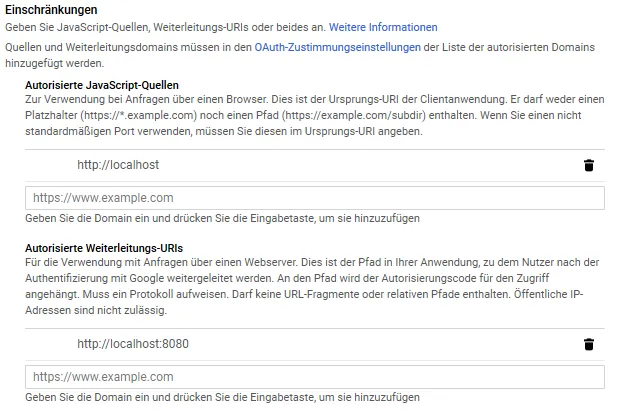
确保通过下面的蓝色按钮实际保存更改!
现在,您可能需要使用GUI构建HTTP请求。我使用了Insomnia,但您可以选择Postman或纯cURL。我推荐Insomnia,因为它可以让您轻松地通过同意屏幕。
使用以下参数构建新的GET请求:
URL: https://accounts.google.com/o/oauth2/v2/auth
Query Param: redirect_uri=http://localhost:8080
Query Param: prompt=consent
Query Param: response_type=code
Query Param: client_id=<your client id from OAuth credentials>
Query Param: scope=<your chosen scopes, e.g. https://www.googleapis.com/auth/drive.file>
Query Param: access_type=offline
如果您选择的工具没有自动处理URL编码,请确保自己正确处理。
在发送请求之前,请设置一个Web服务器来监听"http://localhost:8080"。如果您已经安装了node和npm,请运行“npm i express”,然后创建一个“index.js”文件:
var express = require('express');
var app = express();

app.get('/', function (req, res) {
  res.send('ok');
  console.log(req)
});

app.listen(8080, function () {
  console.log('Listening on port 8080!');
});
通过 node index.js 运行服务器。我建议要么不记录整个 req 对象,要么运行 node index.js | less,因为完整的输出将会非常巨大。
其他语言也有非常简单的解决方案。例如,在8080端口上使用 PHP 内置的 Web 服务器:php -S localhost:8080。
现在,在 Insomnia 中发送您的请求,您应该会看到登录提示:
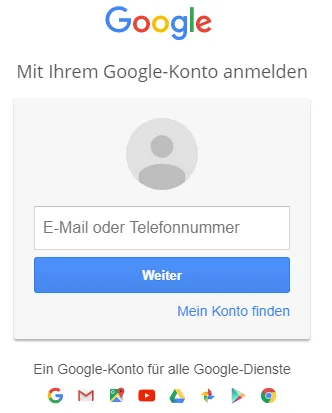
使用您的电子邮件和密码登录,然后确认同意屏幕(应包含您选择的范围)。
返回您的终端并检查输出。如果记录了整个内容,请滚动到底部(例如在 less 中按 PgDn),直到看到一行带有 code=4/... 的代码。
复制该代码;这是您要交换访问令牌和刷新令牌的授权代码。不要复制太多-如果有一个 & 符号,请不要复制它或之后的任何内容。& 符号分隔查询参数。我们只需要code。
现在设置一个 HTTP POST 请求,指向 https://www.googleapis.com/oauth2/v4/token 作为 表单 URL 编码。在 Insomnia 中,您只需单击即可完成-在其他工具中,您可能需要自己设置标题为 Content-Type: application/x-www-form-urlencoded。
添加以下参数:
code=<the authorization code from the last step>
client_id=<your client ID again>
client_secret=<your client secret from the OAuth credentials>
redirect_uri=http://localhost:8080
grant_type=authorization_code
再次确保编码正确。
发送请求并检查来自服务器的输出。您应该看到一个JSON对象:
{
  "access_token": "xxxx",
  "expires_in": 3600,
  "refresh_token": "1/xxxx",
  "scope": "https://www.googleapis.com/auth/drive.file",
  "token_type": "Bearer"
}
您可以立即使用access_token,但它仅在一个小时内有效。请注意刷新令牌。这是您始终可以*用于交换新的访问令牌的令牌。
* 如果用户更改密码、撤销访问权限、处于不活动状态超过6个月等,则必须重复该过程。
祝您OAuth愉快!