在现有圆形上曲线文本

55

我正在构建一款应用程序,画了两个圆。一个比另一个稍大。 我想在这些线之间弯曲文本,为我正在构建的循环菜单服务。

我阅读了大部分关于弯曲文本的内容,您需要将文本拆分为字符,并考虑正确的角度来绘制每个字符(通过旋转您正在绘制的上下文)。

我只是无法理解如何获得我的字符的正确角度和位置。

我包含了一个截图,展示目前菜单的样子。只有我添加的文本是从UIImageView中加载的图像。

alt text

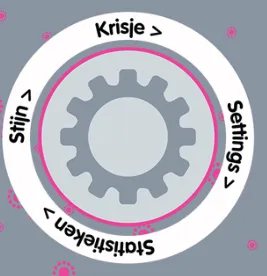
我希望有人能给我一些起点,告诉我如何在特定位置绘制白色圆圈中的文本。
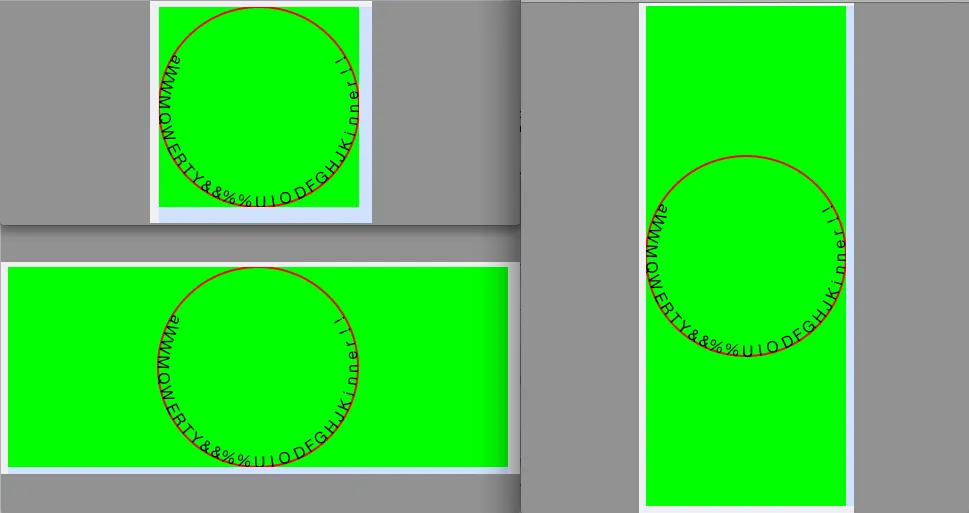
编辑: 好的,目前我处于这个阶段:

alt text

我使用以下代码来完成:

- (UIImage*) createMenuRingWithFrame:(CGRect)frame
{
    CGRect imageSize = CGRectMake(0,0,300,300);
    float perSectionDegrees = 360 / [sections count];
    float totalRotation = 90;
    char* fontName = (char*)[self.menuItemsFont.fontName cStringUsingEncoding:NSASCIIStringEncoding];

    CGColorSpaceRef colorSpace = CGColorSpaceCreateDeviceRGB();
    CGContextRef context = CGBitmapContextCreate(NULL, imageSize.size.width, imageSize.size.height, 8, 4 * imageSize.size.width, colorSpace, kCGImageAlphaPremultipliedFirst);

    CGContextSetTextMatrix(context, CGAffineTransformIdentity);
    CGContextSelectFont(context, fontName, 18, kCGEncodingMacRoman);

    CGContextSetRGBFillColor(context, 0, 0, 0, 1);

    CGPoint centerPoint = CGPointMake(imageSize.size.width / 2, imageSize.size.height / 2);
    double radius = (frame.size.width / 2);

    CGContextStrokeEllipseInRect(context, CGRectMake(centerPoint.x - (frame.size.width / 2), centerPoint.y - (frame.size.height / 2), frame.size.width, frame.size.height));

    for (int index = 0; index < [sections count]; index++)
    {
        NSString* menuItemText = [sections objectAtIndex:index];
        CGSize textSize = [menuItemText sizeWithFont:self.menuItemsFont];
        char* menuItemTextChar = (char*)[menuItemText cStringUsingEncoding:NSASCIIStringEncoding];

        float x = centerPoint.x + radius * cos(degreesToRadians(totalRotation));
        float y = centerPoint.y + radius * sin(degreesToRadians(totalRotation));

        CGContextSaveGState(context);

        CGContextTranslateCTM(context, x, y);
        CGContextRotateCTM(context, degreesToRadians(totalRotation - 90));
        CGContextShowTextAtPoint(context, 0 - (textSize.width / 2), 0 - (textSize.height / 2), menuItemTextChar, strlen(menuItemTextChar));

        CGContextRestoreGState(context);

        totalRotation += perSectionDegrees;
    }

    CGImageRef contextImage = CGBitmapContextCreateImage(context);

    CGContextRelease(context);
    CGColorSpaceRelease(colorSpace);

    return [UIImage imageWithCGImage:contextImage];
}

这些是我在其中使用的变量:

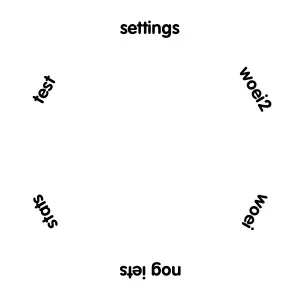
NSArray* sections = [[NSArray alloc] initWithObjects:@"settings", @"test", @"stats", @"nog iets", @"woei", @"woei2", nil];
self.menuItemsFont = [UIFont fontWithName:@"VAGRounded-Bold" size:18];

这些单词的旋转似乎是正确的,位置也对。现在我需要想办法确定字母(以及它们的坐标)应该旋转到哪个角度。我可能需要一些帮助。

编辑:已修复!请查看以下代码!

- (void) drawStringAtContext:(CGContextRef) context string:(NSString*) text atAngle:(float) angle withRadius:(float) radius
{
    CGSize textSize = [text sizeWithFont:self.menuItemsFont];

    float perimeter = 2 * M_PI * radius;
    float textAngle = textSize.width / perimeter * 2 * M_PI;

    angle += textAngle / 2;

    for (int index = 0; index < [text length]; index++)
    {
        NSRange range = {index, 1};
        NSString* letter = [text substringWithRange:range];     
        char* c = (char*)[letter cStringUsingEncoding:NSASCIIStringEncoding];
        CGSize charSize = [letter sizeWithFont:self.menuItemsFont];

        NSLog(@"Char %@ with size: %f x %f", letter, charSize.width, charSize.height);

        float x = radius * cos(angle);
        float y = radius * sin(angle);

        float letterAngle = (charSize.width / perimeter * -2 * M_PI);

        CGContextSaveGState(context);
        CGContextTranslateCTM(context, x, y);
        CGContextRotateCTM(context, (angle - 0.5 * M_PI));
        CGContextShowTextAtPoint(context, 0, 0, c, strlen(c));
        CGContextRestoreGState(context);

        angle += letterAngle;
    }
}

- (UIImage*) createMenuRingWithFrame:(CGRect)frame
{
    CGPoint centerPoint = CGPointMake(frame.size.width / 2, frame.size.height / 2);
    char* fontName = (char*)[self.menuItemsFont.fontName cStringUsingEncoding:NSASCIIStringEncoding];

    CGFloat* ringColorComponents = (float*)CGColorGetComponents(ringColor.CGColor);
    CGFloat* textColorComponents = (float*)CGColorGetComponents(textColor.CGColor);

    CGColorSpaceRef colorSpace = CGColorSpaceCreateDeviceRGB();
    CGContextRef context = CGBitmapContextCreate(NULL, frame.size.width, frame.size.height, 8, 4 * frame.size.width, colorSpace, kCGImageAlphaPremultipliedFirst);

    CGContextSetTextMatrix(context, CGAffineTransformIdentity);

    CGContextSelectFont(context, fontName, 18, kCGEncodingMacRoman);
    CGContextSetRGBStrokeColor(context, ringColorComponents[0], ringColorComponents[1], ringColorComponents[2], ringAlpha);
    CGContextSetLineWidth(context, ringWidth);  

    CGContextStrokeEllipseInRect(context, CGRectMake(ringWidth, ringWidth, frame.size.width - (ringWidth * 2), frame.size.height - (ringWidth * 2)));
    CGContextSetRGBFillColor(context, textColorComponents[0], textColorComponents[1], textColorComponents[2], textAlpha);

    CGContextSaveGState(context);
    CGContextTranslateCTM(context, centerPoint.x, centerPoint.y);

    float angleStep = 2 * M_PI / [sections count];
    float angle = degreesToRadians(90);

    textRadius = textRadius - 12;

    for (NSString* text in sections)
    {
        [self drawStringAtContext:context string:text atAngle:angle withRadius:textRadius];
        angle -= angleStep;
    }

    CGContextRestoreGState(context);

    CGImageRef contextImage = CGBitmapContextCreateImage(context);

    CGContextRelease(context);
    CGColorSpaceRelease(colorSpace);

    [self saveImage:[UIImage imageWithCGImage:contextImage] withName:@"test.png"];
    return [UIImage imageWithCGImage:contextImage];

}

这种方法对我来说效果很好——直到我需要使用特殊字符,比如度符号和外文变音符号。那些字符在我使用的字体中是存在的,所以我猜这是一个编码问题?更改NSASCIIStringEncoding并没有解决我的问题,所以我选择了CoreText解决方案(见下文)。 - avance
我尝试使用这段代码,但遇到了一些问题,即使使用了更新的帖子..首先,textRadius错误为未定义。我猜它是一个浮点数,但不确定它应该从哪里开始。我试图绘制一个单独的字符串,所以我没有使用它。此外,许多函数现在在IOS7中已被弃用。如果您正在尝试使用此功能并且屏幕上看不到任何文本,请尝试使用其他字体..显然,VAGRounded-Bold不是标准的IOS字体。 - Chris Young
12个回答

31
我修改了苹果的CoreTextArcCocoa示例项目(Tom H在这个回复中提到),并想在这里分享它。
我还添加了一些其他功能,例如将弧大小设置为小于180,并将文本颜色和偏移量移位作为属性(这样您就不必拥有巨大的框架来显示整个文本)。
 /*

 File: CoreTextArcView.m (iOS version)

 Abstract: Defines and implements the CoreTextArcView custom UIView subclass to
 draw text on a curve and illustrate best practices with CoreText.

 Based on CoreTextArcView provided by Apple for Mac OS X https://developer.apple.com/library/mac/#samplecode/CoreTextArcCocoa/Introduction/Intro.html

 Ported to iOS (& added color, arcsize features) August 2011 by Alec Vance, Juggleware LLC http://juggleware.com/

 */ 

#import <UIKit/UIKit.h>
#import <CoreText/CoreText.h>


@interface CoreTextArcView : UIView {
@private
    UIFont *            _font;
    NSString *          _string;
    CGFloat             _radius;
    UIColor *           _color;
    CGFloat             _arcSize;
    CGFloat             _shiftH, _shiftV; // horiz & vertical shift

    struct {
        unsigned int    showsGlyphBounds:1;
        unsigned int    showsLineMetrics:1;
        unsigned int    dimsSubstitutedGlyphs:1;
        unsigned int    reserved:29;
    }                   _flags;
}

@property(retain, nonatomic) UIFont *font;
@property(retain, nonatomic) NSString *text;
@property(readonly, nonatomic) NSAttributedString *attributedString;
@property(assign, nonatomic) CGFloat radius;
@property(nonatomic) BOOL showsGlyphBounds;
@property(nonatomic) BOOL showsLineMetrics;
@property(nonatomic) BOOL dimsSubstitutedGlyphs;
@property(retain, nonatomic) UIColor *color;
@property(nonatomic) CGFloat arcSize;
@property(nonatomic) CGFloat shiftH, shiftV;
@end


/*

 File: CoreTextArcView.m (iOS version)

 */ 

#import "CoreTextArcView.h"
#import <AssertMacros.h>
#import <QuartzCore/QuartzCore.h>

#define ARCVIEW_DEBUG_MODE          NO

#define ARCVIEW_DEFAULT_FONT_NAME   @"Helvetica"
#define ARCVIEW_DEFAULT_FONT_SIZE   64.0
#define ARCVIEW_DEFAULT_RADIUS      150.0
#define ARCVIEW_DEFAULT_ARC_SIZE    180.0


@implementation CoreTextArcView

- (id)initWithFrame:(CGRect)frame {
    self = [super initWithFrame:frame];
    if (self) {
        self.font = [UIFont fontWithName:ARCVIEW_DEFAULT_FONT_NAME size:ARCVIEW_DEFAULT_FONT_SIZE];
        self.text = @"Curvaceous Type";
        self.radius = ARCVIEW_DEFAULT_RADIUS;
        self.showsGlyphBounds = NO;
        self.showsLineMetrics = NO;
        self.dimsSubstitutedGlyphs = NO;
        self.color = [UIColor whiteColor];
        self.arcSize = ARCVIEW_DEFAULT_ARC_SIZE;
        self.shiftH = self.shiftV = 0.0f;
    }
    return self;
}

typedef struct GlyphArcInfo {
    CGFloat         width;
    CGFloat         angle;  // in radians
} GlyphArcInfo;

static void PrepareGlyphArcInfo(CTLineRef line, CFIndex glyphCount, GlyphArcInfo *glyphArcInfo, CGFloat arcSizeRad)
{
    NSArray *runArray = (NSArray *)CTLineGetGlyphRuns(line);

    // Examine each run in the line, updating glyphOffset to track how far along the run is in terms of glyphCount.
    CFIndex glyphOffset = 0;
    for (id run in runArray) {
        CFIndex runGlyphCount = CTRunGetGlyphCount((CTRunRef)run);

        // Ask for the width of each glyph in turn.
        CFIndex runGlyphIndex = 0;
        for (; runGlyphIndex < runGlyphCount; runGlyphIndex++) {
            glyphArcInfo[runGlyphIndex + glyphOffset].width = CTRunGetTypographicBounds((CTRunRef)run, CFRangeMake(runGlyphIndex, 1), NULL, NULL, NULL);
        }

        glyphOffset += runGlyphCount;
    }

    double lineLength = CTLineGetTypographicBounds(line, NULL, NULL, NULL);

    CGFloat prevHalfWidth = glyphArcInfo[0].width / 2.0;
    glyphArcInfo[0].angle = (prevHalfWidth / lineLength) * arcSizeRad;

    // Divide the arc into slices such that each one covers the distance from one glyph's center to the next.
    CFIndex lineGlyphIndex = 1;
    for (; lineGlyphIndex < glyphCount; lineGlyphIndex++) {
        CGFloat halfWidth = glyphArcInfo[lineGlyphIndex].width / 2.0;
        CGFloat prevCenterToCenter = prevHalfWidth + halfWidth;

        glyphArcInfo[lineGlyphIndex].angle = (prevCenterToCenter / lineLength) * arcSizeRad;

        prevHalfWidth = halfWidth;
    }
}


// ensure that redraw occurs.
-(void)setText:(NSString *)text{
    [_string release];
    _string = [text retain];

    [self setNeedsDisplay];
}

//set arc size in degrees (180 = half circle)
-(void)setArcSize:(CGFloat)degrees{
    _arcSize = degrees * M_PI/180.0;
}

//get arc size in degrees
-(CGFloat)arcSize{
    return _arcSize * 180.0/M_PI;
}

- (void)drawRect:(CGRect)rect {
    // Don't draw if we don't have a font or string
    if (self.font == NULL || self.text == NULL) 
        return;

    // Initialize the text matrix to a known value
    CGContextRef context = UIGraphicsGetCurrentContext();


    //Reset the transformation
    //Doing this means you have to reset the contentScaleFactor to 1.0
    CGAffineTransform t0 = CGContextGetCTM(context);


    CGFloat xScaleFactor = t0.a > 0 ? t0.a : -t0.a;
    CGFloat yScaleFactor = t0.d > 0 ? t0.d : -t0.d;
    t0 = CGAffineTransformInvert(t0);
    if (xScaleFactor != 1.0 || yScaleFactor != 1.0)
        t0 = CGAffineTransformScale(t0, xScaleFactor, yScaleFactor);

    CGContextConcatCTM(context, t0);

    CGContextSetTextMatrix(context, CGAffineTransformIdentity);

    if(ARCVIEW_DEBUG_MODE){
        // Draw a black background (debug)
        CGContextSetFillColorWithColor(context, [UIColor blackColor].CGColor);
        CGContextFillRect(context, self.layer.bounds);
    }

    NSAttributedString *attStr = self.attributedString;
    CFAttributedStringRef asr = (CFAttributedStringRef)attStr;
    CTLineRef line = CTLineCreateWithAttributedString(asr);
    assert(line != NULL);

    CFIndex glyphCount = CTLineGetGlyphCount(line);
    if (glyphCount == 0) {
        CFRelease(line);
        return;
    }

    GlyphArcInfo *  glyphArcInfo = (GlyphArcInfo*)calloc(glyphCount, sizeof(GlyphArcInfo));
    PrepareGlyphArcInfo(line, glyphCount, glyphArcInfo, _arcSize);

    // Move the origin from the lower left of the view nearer to its center.
    CGContextSaveGState(context);

    CGContextTranslateCTM(context, CGRectGetMidX(rect)+_shiftH, CGRectGetMidY(rect)+_shiftV - self.radius / 2.0);

    if(ARCVIEW_DEBUG_MODE){
        // Stroke the arc in red for verification.
        CGContextBeginPath(context);
        CGContextAddArc(context, 0.0, 0.0, self.radius, M_PI_2+_arcSize/2.0, M_PI_2-_arcSize/2.0, 1);
        CGContextSetRGBStrokeColor(context, 1.0, 0.0, 0.0, 1.0);
        CGContextStrokePath(context);
    }

    // Rotate the context 90 degrees counterclockwise (per 180 degrees)
    CGContextRotateCTM(context, _arcSize/2.0);

    // Now for the actual drawing. The angle offset for each glyph relative to the previous glyph has already been calculated; with that information in hand, draw those glyphs overstruck and centered over one another, making sure to rotate the context after each glyph so the glyphs are spread along a semicircular path.

    CGPoint textPosition = CGPointMake(0.0, self.radius);
    CGContextSetTextPosition(context, textPosition.x, textPosition.y);

    CFArrayRef runArray = CTLineGetGlyphRuns(line);
    CFIndex runCount = CFArrayGetCount(runArray);

    CFIndex glyphOffset = 0;
    CFIndex runIndex = 0;
    for (; runIndex < runCount; runIndex++) {
        CTRunRef run = (CTRunRef)CFArrayGetValueAtIndex(runArray, runIndex);
        CFIndex runGlyphCount = CTRunGetGlyphCount(run);
        Boolean drawSubstitutedGlyphsManually = false;
        CTFontRef runFont = CFDictionaryGetValue(CTRunGetAttributes(run), kCTFontAttributeName);

        // Determine if we need to draw substituted glyphs manually. Do so if the runFont is not the same as the overall font.
        if (self.dimsSubstitutedGlyphs && ![self.font isEqual:(UIFont *)runFont]) {
            drawSubstitutedGlyphsManually = true;
        }

        CFIndex runGlyphIndex = 0;
        for (; runGlyphIndex < runGlyphCount; runGlyphIndex++) {
            CFRange glyphRange = CFRangeMake(runGlyphIndex, 1);
            CGContextRotateCTM(context, -(glyphArcInfo[runGlyphIndex + glyphOffset].angle));

            // Center this glyph by moving left by half its width.
            CGFloat glyphWidth = glyphArcInfo[runGlyphIndex + glyphOffset].width;
            CGFloat halfGlyphWidth = glyphWidth / 2.0;
            CGPoint positionForThisGlyph = CGPointMake(textPosition.x - halfGlyphWidth, textPosition.y);

            // Glyphs are positioned relative to the text position for the line, so offset text position leftwards by this glyph's width in preparation for the next glyph.
            textPosition.x -= glyphWidth;

            CGAffineTransform textMatrix = CTRunGetTextMatrix(run);
            textMatrix.tx = positionForThisGlyph.x;
            textMatrix.ty = positionForThisGlyph.y;
            CGContextSetTextMatrix(context, textMatrix);

            if (!drawSubstitutedGlyphsManually) {
                CTRunDraw(run, context, glyphRange);
            } 
            else {
                // We need to draw the glyphs manually in this case because we are effectively applying a graphics operation by setting the context fill color. Normally we would use kCTForegroundColorAttributeName, but this does not apply as we don't know the ranges for the colors in advance, and we wanted demonstrate how to manually draw.
                CGFontRef cgFont = CTFontCopyGraphicsFont(runFont, NULL);
                CGGlyph glyph;
                CGPoint position;

                CTRunGetGlyphs(run, glyphRange, &glyph);
                CTRunGetPositions(run, glyphRange, &position);

                CGContextSetFont(context, cgFont);
                CGContextSetFontSize(context, CTFontGetSize(runFont));
                CGContextSetRGBFillColor(context, 0.25, 0.25, 0.25, 0.5);
                CGContextShowGlyphsAtPositions(context, &glyph, &position, 1);

                CFRelease(cgFont);
            }

            // Draw the glyph bounds 
            if ((self.showsGlyphBounds) != 0) {
                CGRect glyphBounds = CTRunGetImageBounds(run, context, glyphRange);

                CGContextSetRGBStrokeColor(context, 0.0, 0.0, 1.0, 1.0);
                CGContextStrokeRect(context, glyphBounds);
            }
            // Draw the bounding boxes defined by the line metrics
            if ((self.showsLineMetrics) != 0) {
                CGRect lineMetrics;
                CGFloat ascent, descent;

                CTRunGetTypographicBounds(run, glyphRange, &ascent, &descent, NULL);

                // The glyph is centered around the y-axis
                lineMetrics.origin.x = -halfGlyphWidth;
                lineMetrics.origin.y = positionForThisGlyph.y - descent;
                lineMetrics.size.width = glyphWidth; 
                lineMetrics.size.height = ascent + descent;

                CGContextSetRGBStrokeColor(context, 0.0, 1.0, 0.0, 1.0);
                CGContextStrokeRect(context, lineMetrics);
            }
        }

        glyphOffset += runGlyphCount;
    }

    CGContextRestoreGState(context);

    free(glyphArcInfo);
    CFRelease(line);    


}

-(void)dealloc
{
    [_font release];
    [_string release];
    [_color release];
    [super dealloc]
}

@synthesize font = _font;
@synthesize text = _string;
@synthesize radius = _radius;
@synthesize color = _color;
@synthesize arcSize = _arcSize;
@synthesize shiftH = _shiftH;
@synthesize shiftV = _shiftV;

@dynamic attributedString;
- (NSAttributedString *)attributedString {
    // Create an attributed string with the current font and string.
    assert(self.font != nil);
    assert(self.text != nil);

    // Create our attributes...

    // font
    CTFontRef fontRef = CTFontCreateWithName((CFStringRef)self.font.fontName, self.font.pointSize, NULL);

    // color
    CGColorRef colorRef = self.color.CGColor;

    // pack it into attributes dictionary

    NSDictionary *attributesDict = [NSDictionary dictionaryWithObjectsAndKeys:
                                    (id)fontRef, (id)kCTFontAttributeName,
                                    colorRef, (id)kCTForegroundColorAttributeName,
                                    nil];
    assert(attributesDict != nil);


    // Create the attributed string
    NSAttributedString *attrString = [[NSAttributedString alloc] initWithString:self.text attributes:attributesDict];

    CFRelease(fontRef);

    return [attrString autorelease];
}

@dynamic showsGlyphBounds;
- (BOOL)showsGlyphBounds {
    return _flags.showsGlyphBounds;
}

- (void)setShowsGlyphBounds:(BOOL)show {
    _flags.showsGlyphBounds = show ? 1 : 0;
}

@dynamic showsLineMetrics;
- (BOOL)showsLineMetrics {
    return _flags.showsLineMetrics;
}

- (void)setShowsLineMetrics:(BOOL)show {
    _flags.showsLineMetrics = show ? 1 : 0;
}

@dynamic dimsSubstitutedGlyphs;
- (BOOL)dimsSubstitutedGlyphs {
    return _flags.dimsSubstitutedGlyphs;
}

- (void)setDimsSubstitutedGlyphs:(BOOL)dim {
    _flags.dimsSubstitutedGlyphs = dim ? 1 : 0;
}

@end

1
我在我的一个项目中使用这段代码,发现它没有包含dealloc方法,所以我将其粘贴在下面。此外,Instruments报告了2个其他的内存泄漏:1)来自drawRect和2)来自attributedString的调用。对于后者,在返回时有必要进行autorelease,所以我不确定为什么会出现泄漏。如果有人能解决其中任何一个问题,我将不胜感激。 -(void)dealloc{ [_font release]; [_string release]; [_color release];[super dealloc]; - avance
非常感谢您提供这个优秀的示例代码。它对我很有用,但我想使用不同颜色的文本(一个单词是红色,另一个是绿色)。我还想选择文本在圆圈中开始的位置。您能否为这两个功能提供建议和/或创建一个GitHub? - fvisticot
1
如果有人需要与Avraham Shukron相同的效果,您必须将setArcSize或setArcRadius设置为负数。这是使弧线“微笑”而不是“哭泣”的方法。 - Lukas
@juggleware 你能把这个放到Github上吗? - zakdances
1
@Michael,你尝试设置shiftV属性了吗? - avance
显示剩余5条评论

24

我试着快速在纸上计算,可能会有错误 :)

将字符串的长度转换为 单位圆 上的单位。因此 (string.lenght / 圆周长) * 2π。现在你得到了整个字符串的弧度角度(即起始和结束之间的角度)。

对于单独的字母,你可以使用字母宽度做同样的方法来获得角度(以弧度为单位)。

一旦你得到了弧度角度,就可以计算出字母的 x 和 y 位置(和旋转角度)。

奖励:为了实现均匀间距,你甚至可以计算所有字符串的总长度与整个周长之间的比率。并在字符串之间平均分配剩余的空间。

更新 我使用html5/canvas制作了一个概念验证,所以请使用良好的浏览器查看 :) 你应该能够移植它。(注意,代码没有注释)
令人惊讶的是:该代码在 Chrome 的调试控制台开启时运行良好,关闭后就会失败。(解决方法:打开 Chrome 控制台:Ctrl-Shift-J,然后重新加载页面:F5);Firefox 3.6.8 看起来做得很好,但字母会“跳舞”。


我并不是一个数学奇才。但我相信我缺少了一些东西。我将我的字符串分成了字符,并且我知道它们的宽度和高度,但是如何知道它们应该放置在哪个角度?我采用了你的公式并将它们纳入了代码中,但似乎角度实际上并不取决于位置?我对此很糟糕 ;) - Wim Haanstra
我还没有为字符的方向添加任何计算。首要任务是正确获取位置(可以用点试一下),然后再确保方向正确。字符的基线垂直于角度。 - Dribbel
感谢Dribbel提供的解决方案。我会很快更新我的帖子并提供答案。 - Wim Haanstra

7
这是我绘制曲线属性字符串的方法,在预定义的角度(以弧度表示)上进行绘制:
[self drawCurvedStringOnLayer:self.layer withAttributedText:incident atAngle:angle withRadius:300];

字符串在弧形底部也会自动翻转。

enter image description here

- (void)drawCurvedStringOnLayer:(CALayer *)layer
             withAttributedText:(NSAttributedString *)text
                        atAngle:(float)angle
                     withRadius:(float)radius {

    // angle in radians

    CGSize textSize = CGRectIntegral([text boundingRectWithSize:CGSizeMake(CGFLOAT_MAX, CGFLOAT_MAX)
                                                        options:(NSStringDrawingUsesLineFragmentOrigin|NSStringDrawingUsesFontLeading)
                                                        context:nil]).size;

    float perimeter = 2 * M_PI * radius;
    float textAngle = (textSize.width / perimeter * 2 * M_PI); 

    float textRotation;
    float textDirection;
    if (angle > degreesToRadians(10) && angle < degreesToRadians(170)) {
        //bottom string
        textRotation = 0.5 * M_PI ;
        textDirection = - 2 * M_PI;
        angle += textAngle / 2;
    } else {
        //top string
        textRotation = 1.5 * M_PI ;
        textDirection = 2 * M_PI;
        angle -= textAngle / 2;
    }

    for (int c = 0; c < text.length; c++) {
        NSRange range = {c, 1};
        NSAttributedString* letter = [text attributedSubstringFromRange:range];
        CGSize charSize = CGRectIntegral([letter boundingRectWithSize:CGSizeMake(CGFLOAT_MAX, CGFLOAT_MAX)
                                                              options:(NSStringDrawingUsesLineFragmentOrigin|NSStringDrawingUsesFontLeading)
                                                              context:nil]).size;

        float letterAngle = ( (charSize.width / perimeter) * textDirection );

        float x = radius * cos(angle + (letterAngle/2));
        float y = radius * sin(angle + (letterAngle/2));

        CATextLayer *singleChar = [self drawTextOnLayer:layer
                                           withText:letter
                                              frame:CGRectMake(layer.frame.size.width/2 - charSize.width/2 + x,
                                                               layer.frame.size.height/2 - charSize.height/2 + y,
                                                               charSize.width, charSize.height)
                                            bgColor:nil
                                            opacity:1];

        singleChar.transform = CATransform3DMakeAffineTransform( CGAffineTransformMakeRotation(angle - textRotation) );

        angle += letterAngle;
    }
}


- (CATextLayer *)drawTextOnLayer:(CALayer *)layer
                        withText:(NSAttributedString *)text
                           frame:(CGRect)frame
                         bgColor:(UIColor *)bgColor
                         opacity:(float)opacity {

    CATextLayer *textLayer = [[CATextLayer alloc] init];
    [textLayer setFrame:frame];
    [textLayer setString:text];
    [textLayer setAlignmentMode:kCAAlignmentCenter];
    [textLayer setBackgroundColor:bgColor.CGColor];
    [textLayer setContentsScale:[UIScreen mainScreen].scale];
    [textLayer setOpacity:opacity];
    [layer addSublayer:textLayer];
    return textLayer;
}


/** Degrees to Radian **/
#define degreesToRadians(degrees) (( degrees ) / 180.0 * M_PI )

/** Radians to Degrees **/
#define radiansToDegrees(radians) (( radians ) * ( 180.0 / M_PI ) )

这是一个很好的解决方案!对于Swift 3,有一些更改,主要是所有东西都应该是CGFloat类型,在drawTextOnLayer中的UIColor应该是可选的,但除此之外,转换是微不足道的。 - Chris
2
嗨,感谢您的代码!我在这里进行了Swift 3端口 https://gist.github.com/cemolcay/9525d28a203da83d333545fc6e0d4371 - cem olcay

7
为了节省您的时间,这是我发现的CoreTextArcView的内容,它提供了以下功能:
- (id)initWithFrame:(CGRect)frame font:(UIFont *)font text:(NSString *)text radius:(float)radius arcSize:(float)arcSize color:(UIColor *)color;
  (x,y)<---------------     w             --------------->
      +--------------------------------------------------+
     ^|                                                  |  <--
     ||                                                  |  边框
     ||                                                  |
     ||                 VED L A BEL                      |
     ||             CU R            HE                   |
     ||           xx                   RE  x             |
      |          xx                        xxx           |
      |        xxx xx                     x   xxx        |
    h |      xxx    xx                  xxx     xx       |
      |      x       xxx         <-----------------------------
      |     xx         xx   xxxxxxx   xx           x     |  arcSize :
     ||    xx            xxx       xxx             xx    |  弧度大小
     ||    x              xxx      xx               x    |  (以角度表示)
     ||   xx                xx  xxx                 x    |
     ||   x  <---- r  ----->   x                    x    |
     ||   x                      (xc,yc)            x    |
     ||   x                             <-----------------------
     ||   x                                        xx    |  xc = x + w /2
     v+---xx--------------------------------------xx-----+  yc = y + h /2 + r /2
           xx                                    xx
            x                                   xx
            xxx                                xx
              xxx                            xxx
                xxxx                      xxxx
                   xxxxx              xxxxx
                        xxxxxxxxxxxxxxx

当r>0且arcsize>0时,此图形有效。


5
请查看这个苹果公司的示例项目:CoreTextArcCocoa 这个示例演示了如何使用Core Text在Cocoa应用程序中沿弧线绘制文本。此外,该示例还说明了您可以使用Cocoa字体面板接收字体设置,这些设置可以由Core Text用于选择用于绘制的字体。
CoreText也可用于iOS,因此您应该能够实现类似的功能。

谢谢您的回复。但不知何故,我无法使其正常工作。要么我的文本位置偏离太远,要么根本没有出现。我已经让它为4个菜单项工作了,现在我想要添加第五个项目,然后一切都失败了。我认为我需要更多的帮助。 - Wim Haanstra
我在我的帖子中添加了更多的代码,解释了我目前的进展。 - Wim Haanstra

4

我尝试了上述提到的git项目,并且正如ZpaceZombor所说,存在错误的偏移量。

CGContextTranslateCTM(context, CGRectGetMidX(rect)+_shiftH, CGRectGetMidY(rect)+_shiftV - self.radius / 2.0);

我已经简单地做出了更改

CGContextTranslateCTM(context, CGRectGetMidX(rect)+_shiftH, CGRectGetMidY(rect)+_shiftV);

我已经将半径设置为容器视图宽度和高度之间的最小值,所以我已将弧度大小设置为

我随意更改了这行代码。

CGContextRotateCTM(context, _arcSize/2.0);

使用

CGContextRotateCTM(context, M_PI_2);

我已经更改了init方法为

- (id)initWithFrame:(CGRect)frame font:(UIFont *)font text:(NSString *)text color:(UIColor *)color{

    self = [super initWithFrame:frame];
    if (self) {
        self.font = font;
        self.text = text;
        self.radius = -1 * (frame.size.width > frame.size.height ? frame.size.height / 2 : frame.size.width / 2);
        _arcSize = 2* M_PI;
        self.showsGlyphBounds = NO;
        self.showsLineMetrics = NO;
        self.dimsSubstitutedGlyphs = NO;
        self.color = color;
        self.shiftH = self.shiftV = 0.0f;

    }
    return self;
}

经过多次尝试,我对函数PrepareGlyphArcInfo进行了修改。

// this constants come from a single case ( fontSize = 22 | circle diameter = 250px | lower circle diameter 50px | 0.12f is a proportional acceptable value of 250px diameter | 0.18f is a proportional acceptable value of 50px | 0.035f is a proportional acceptable value of "big" chars
#define kReferredCharSpacing 0.12f
#define kReferredFontSize 22.f
#define kReferredMajorDiameter 250.f
#define kReferredMinorDiameter 50.f
#define kReferredMinorSpacingFix 0.18f
#define kReferredBigCharSpacingFix  0.035f

static void PrepareGlyphArcInfo(UIFont* font,CGFloat containerRadius,CTLineRef line, CFIndex glyphCount, GlyphArcInfo *glyphArcInfo, CGFloat arcSizeRad)
{
    NSArray *runArray = (NSArray *)CTLineGetGlyphRuns(line);

    CGFloat curMaxTypoWidth = 0.f;
    CGFloat curMinTypoWidth = 0.f;

    // Examine each run in the line, updating glyphOffset to track how far along the run is in terms of glyphCount.
    CFIndex glyphOffset = 0;
    for (id run in runArray) {
        CFIndex runGlyphCount = CTRunGetGlyphCount((CTRunRef)run);

            // Ask for the width of each glyph in turn.
        CFIndex runGlyphIndex = 0;
        for (; runGlyphIndex < runGlyphCount; runGlyphIndex++) {
            glyphArcInfo[runGlyphIndex + glyphOffset].width = CTRunGetTypographicBounds((CTRunRef)run, CFRangeMake(runGlyphIndex, 1), NULL, NULL, NULL);

            if (curMaxTypoWidth < glyphArcInfo[runGlyphIndex + glyphOffset].width)
                curMaxTypoWidth = glyphArcInfo[runGlyphIndex + glyphOffset].width;

            if (curMinTypoWidth > glyphArcInfo[runGlyphIndex + glyphOffset].width || curMinTypoWidth == 0)
                curMinTypoWidth = glyphArcInfo[runGlyphIndex + glyphOffset].width;

        }

        glyphOffset += runGlyphCount;
    }

    //double lineLength = CTLineGetTypographicBounds(line, NULL, NULL, NULL);

    glyphArcInfo[0].angle = M_PI_2; // start at the bottom circle

    CFIndex lineGlyphIndex = 1;

    // based on font size. (supposing that with fontSize = 22 we could use 0.12)
    CGFloat maxCharSpacing = font.pointSize * kReferredCharSpacing / kReferredFontSize;

    // for diameter minor than referred 250
    if ((fabsf(containerRadius)*2) < kReferredMajorDiameter)
        maxCharSpacing = maxCharSpacing + kReferredMinorSpacingFix * kReferredMinorDiameter / (fabsf(containerRadius)*2);

    CGFloat startAngle = fabsf(glyphArcInfo[0].angle);
    CGFloat endAngle = startAngle;

    for (; lineGlyphIndex < glyphCount; lineGlyphIndex++) {

        CGFloat deltaWidth = curMaxTypoWidth - glyphArcInfo[lineGlyphIndex].width;

        // fix applied to large characters like uppercase letters or symbols
        CGFloat bigCharFix = (glyphArcInfo[lineGlyphIndex-1].width == curMaxTypoWidth || (glyphArcInfo[lineGlyphIndex-1].width+2) >= curMaxTypoWidth ? kReferredBigCharSpacingFix : 0 );

        glyphArcInfo[lineGlyphIndex].angle = - (maxCharSpacing * (glyphArcInfo[lineGlyphIndex].width + deltaWidth ) / curMaxTypoWidth) - bigCharFix;

        endAngle += fabsf(glyphArcInfo[lineGlyphIndex].angle);
    }

    // center text to bottom
    glyphArcInfo[0].angle = glyphArcInfo[0].angle + (endAngle - startAngle ) / 2;

}

并将 drawRect: 方法更改为

- (void)drawRect:(CGRect)rect {
    // Don't draw if we don't have a font or string
    if (self.font == NULL || self.text == NULL) 
        return;

    // Initialize the text matrix to a known value
    CGContextRef context = UIGraphicsGetCurrentContext();

    //Reset the transformation
    //Doing this means you have to reset the contentScaleFactor to 1.0
    CGAffineTransform t0 = CGContextGetCTM(context);

    CGFloat xScaleFactor = t0.a > 0 ? t0.a : -t0.a;
    CGFloat yScaleFactor = t0.d > 0 ? t0.d : -t0.d;
    t0 = CGAffineTransformInvert(t0);
    if (xScaleFactor != 1.0 || yScaleFactor != 1.0)
        t0 = CGAffineTransformScale(t0, xScaleFactor, yScaleFactor);

    CGContextConcatCTM(context, t0);

    CGContextSetTextMatrix(context, CGAffineTransformIdentity);

    NSAttributedString *attStr = self.attributedString;
    CFAttributedStringRef asr = (CFAttributedStringRef)attStr;
    CTLineRef line = CTLineCreateWithAttributedString(asr);
    assert(line != NULL);

    CFIndex glyphCount = CTLineGetGlyphCount(line);
    if (glyphCount == 0) {
        CFRelease(line);
        return;
    }

    GlyphArcInfo *  glyphArcInfo = (GlyphArcInfo*)calloc(glyphCount, sizeof(GlyphArcInfo));
    PrepareGlyphArcInfo(self.font, self.radius, line, glyphCount, glyphArcInfo, _arcSize);

    // Move the origin from the lower left of the view nearer to its center.
    CGContextSaveGState(context);

    CGContextTranslateCTM(context, CGRectGetMidX(rect)+_shiftH, CGRectGetMidY(rect)+_shiftV);

    if(ARCVIEW_DEBUG_MODE){
        // Stroke the arc in red for verification.
        CGContextBeginPath(context);
        CGContextAddArc(context, 0.0, 0.0, self.radius, M_PI_2+_arcSize/2.0, M_PI_2-_arcSize/2.0, 1);
        CGContextSetRGBStrokeColor(context, 1.0, 0.0, 0.0, 1.0);
        CGContextStrokePath(context);
    }

    // Rotate the context 90 degrees counterclockwise (per 180 degrees)
    CGContextRotateCTM(context, M_PI_2);

    // Now for the actual drawing. The angle offset for each glyph relative to the previous glyph has already been calculated; with that information in hand, draw those glyphs overstruck and centered over one another, making sure to rotate the context after each glyph so the glyphs are spread along a semicircular path.

    CGPoint textPosition = CGPointMake(0.0, self.radius);
    CGContextSetTextPosition(context, textPosition.x, textPosition.y);

    CFArrayRef runArray = CTLineGetGlyphRuns(line);
    CFIndex runCount = CFArrayGetCount(runArray);

    CFIndex glyphOffset = 0;
    CFIndex runIndex = 0;
    for (; runIndex < runCount; runIndex++) {
        CTRunRef run = (CTRunRef)CFArrayGetValueAtIndex(runArray, runIndex);
        CFIndex runGlyphCount = CTRunGetGlyphCount(run);
        Boolean drawSubstitutedGlyphsManually = false;
        CTFontRef runFont = CFDictionaryGetValue(CTRunGetAttributes(run), kCTFontAttributeName);

        // Determine if we need to draw substituted glyphs manually. Do so if the runFont is not the same as the overall font.
        if (self.dimsSubstitutedGlyphs && ![self.font isEqual:(UIFont *)runFont]) {
            drawSubstitutedGlyphsManually = true;
        }

        CFIndex runGlyphIndex = 0;
        for (; runGlyphIndex < runGlyphCount; runGlyphIndex++) {
            CFRange glyphRange = CFRangeMake(runGlyphIndex, 1);
            CGContextRotateCTM(context, -(glyphArcInfo[runGlyphIndex + glyphOffset].angle));

            // Center this glyph by moving left by half its width.
            CGFloat glyphWidth = glyphArcInfo[runGlyphIndex + glyphOffset].width;
            CGFloat halfGlyphWidth = glyphWidth / 2.0;
            CGPoint positionForThisGlyph = CGPointMake(textPosition.x - halfGlyphWidth, textPosition.y);

            // Glyphs are positioned relative to the text position for the line, so offset text position leftwards by this glyph's width in preparation for the next glyph.
            textPosition.x -= glyphWidth;

            CGAffineTransform textMatrix = CTRunGetTextMatrix(run);
            textMatrix.tx = positionForThisGlyph.x;
            textMatrix.ty = positionForThisGlyph.y;
            CGContextSetTextMatrix(context, textMatrix);

            CTRunDraw(run, context, glyphRange);
        }

        glyphOffset += runGlyphCount;
    }

    CGContextSetFillColorWithColor(context, [UIColor clearColor].CGColor);
    CGContextSetAlpha(context,0.0);
    CGContextFillRect(context, rect);

    CGContextRestoreGState(context);

    free(glyphArcInfo);
    CFRelease(line);    

}

如您所见,我使用了一种不太好的方法来计算每个字符之间的空格(在原始示例中,字符之间的空格也基于弧大小)。无论如何,这似乎运行得相当正常。

最佳解决方案可能是曲线矩形(即线性文本),这样可以减少图形计算和奇怪的计算。

这就是我得到的结果 sample result

希望有所帮助


我在这里使用了您的一些代码来制作我的控件:http://stackoverflow.com/questions/29819787/how-to-make-equal-space-between-texts-in-the-circular-menu?noredirect=1#comment47773706_29819787。现在我想要使每个单词之间的空格相等。有人可以帮我吗? - Bala

3

Juggleware的解决方案非常好,但我似乎找不到改变方向的方法,比如说如何将弧形从顺时针移动到逆时针?

更新: 在与那个示例中过于复杂的代码苦苦挣扎了几天之后,我决定自己编写。我采用声明式方法使用放置在圆圈上并分别旋转的CATextLayers。这样,结果更加简单易懂。以下是核心代码:

-(void)layoutSublayersOfLayer:(CALayer*)layer
{
    if ( layer != self.layer )
    {
        return;
    }

    self.layer.sublayers = nil;

    LOG( @"Laying out sublayers..." );

    CGFloat xcenter = self.frame.size.width / 2;
    CGFloat ycenter = self.frame.size.height / 2;

    float angle = arcStart;
    float angleStep = arcSize / [self.text length];

    for ( NSUInteger i = 0; i < [self.text length]; ++i )
    {
        NSRange range = { .location = i, .length = 1 };
        NSString* c = [self.text substringWithRange:range];

        CGFloat yoffset = sin( DEGREES_TO_RADIANS(angle) ) * radius;
        CGFloat xoffset = cos( DEGREES_TO_RADIANS(angle) ) * radius;

        CGFloat rotAngle = 90 - angle;

        if ( clockwise )
        {
            yoffset = -yoffset;
            rotAngle = -90 + angle;
        }

        CATextLayer* tl = [[CATextLayer alloc] init];
        if ( debugMode )
        {
            tl.borderWidth = 1;
            tl.cornerRadius = 3;
            tl.borderColor = [UIColor whiteColor].CGColor;
        }
        tl.frame = CGRectMake( shiftH + xcenter - xoffset, shiftV + ycenter + yoffset, 20, 20 );
        tl.font = self.font.fontName;
        tl.fontSize = self.font.pointSize;
        tl.foregroundColor = self.color.CGColor;
        tl.string = c;
        tl.alignmentMode = @"center";

        tl.transform = CATransform3DMakeAffineTransform( CGAffineTransformMakeRotation( DEGREES_TO_RADIANS(rotAngle) ) );

        if ( debugMode )
        {
            CATextLayer* debugLayer = [self debugLayerWithText:[NSString stringWithFormat:@"%u: %.0f°", i, angle]];
            debugLayer.transform = CATransform3DMakeAffineTransform( CGAffineTransformMakeRotation( DEGREES_TO_RADIANS(-rotAngle) ) );
            [tl addSublayer:debugLayer];
        }        
        [self.layer addSublayer:tl];

        angle += angleStep;
    }
}

不需要了...我已经根据你的代码创建了自己的版本。谢谢! - Avi Shukron
谢谢提供代码!如果可以的话,我非常想要一个 GitHub 链接。 - fvisticot
@DrMickeyLauer,您的方法看起来更加简洁,特别是考虑到它没有使用那些奇怪的CF数组和结构体。您能否将您最新的示例/代码发布到GitHub上? - zakdances
@fvisticot 我已将原始代码放在Github上,网址为https://github.com/juggleware/CoreTextArcView_iOS。请贡献您的力量,帮助改进它! - avance
1
文字看起来有点模糊,不知道为什么?在Retina屏幕上显示时更加明显。 - JapCon
显示剩余3条评论

3

这个程序运行得非常完美。只需要将其转换成符合 ARC 的标准以满足我的需求。 - JapCon
best as per required - Muhammad Awais Salim

1

取内圆的周长,这是你想要在其上呈现字符的圆。我们将称其为totalLength

我假设你有一个字符串列表需要在圆周上呈现,存储在textItems中。

将每个字符串的宽度添加到textWidths数组,并均匀分布在totalLength上,可能像这样的伪代码(类似于Python):

block = max(textWidths)
assert(block * len(textWidths) <= totalLength)
offsets = [(block * i) + ((block-width) / 2) for i, width in enumerate(textWidths)]

虽然在触发断言的情况下可以做出更好的布局,但真正重要的是我们知道单词在已知区域内的起始和结束位置。为了在长度为totalLength的直线上呈现,我们只需从offsets[i]开始渲染每个文本块。

为了将其放到圆上,我们将把该直线映射回周长。为此,我们需要将沿该线的每个像素映射到圆上的位置和角度。该函数将沿该行的偏移量转换为角度(它取值范围为0到totalLength)。

def offsetToAngle(pixel):
    ratio = pixel / totalLength
    angle = math.pi * 2 * ratio # cool kids use radians.
    return angle

这是你的角度。为了获得一个职位:

def angleToPosition(angle, characterWidth):
    xNorm = math.sin(angle + circleRotation)
    yNorm = math.cos(angle + circleRotation)

    halfCWidth = characterWidth / 2
    x = xNorm * radius + yNorm * halfCWidth # +y = tangent
    y = yNorm * radius - xNorm * halfCWidth # -x = tangent again.

    # translate to the circle centre
    x += circleCentre.x
    y += circleCentre.y

    return x,y

这有点棘手。我认为这基本上是你问题的关键所在。重要的是,你需要沿着圆的切线反向偏移,以计算出开始渲染的点,使字符的中心击中圆的半径。什么构成“反向”取决于你的坐标系统。如果0,0在左下角,则切线分量的符号会交换。我假设是左上角。

这很重要:我还做了一个大胆的假设,即文本旋转发生在字形的左下角。如果不是这样,事情看起来会有点奇怪。在较大的字体大小下更容易注意到。总有一种方法可以补偿它旋转的位置,并且通常有一种方法可以告诉系统您希望旋转原点在哪里(这将与您代码中的CGContextTranslateCTM调用相关),您需要进行小实验,以便让字符绘制在单个点周围旋转,其底部靠近左侧。

circleRotation只是一个偏移量,因此您可以旋转整个圆,而不必始终保持相同的方向。这也是弧度。

现在,对于每个文本块中的每个字符:

for text, offset in zip(textItems, offsets):
    pix = offset # start each block at the offset we calculated earlier.
    for c in text:
        cWidth = measureGlyph(c)
        # choose the circumference location of the middle of the character
        # this is to match with the tangent calculation of tangentToOffset
        angle = offsetToAngle(pix + cWidth / 2)
        x,y = angleToPosition(angle, cWidth)
        drawGlyph(c, x, y, angle)

        pix += cWidth # start of next character in circumference space

这就是这个概念。


如果您能够从其底部中心绘制和旋转字形,则不需要切线相关的内容。 - Tom Whittock

1

是的,我提到了你的URL。但是如果你看一下代码,你就会明白我在那里修改了什么。我同意使用你的框架。但这只是稍微的增强。 - tikamchandrakar

网页内容由stack overflow 提供, 点击上面的
可以查看英文原文,
原文链接