AlertDialog设置自定义标题样式以匹配标准AlertDialog标题

21
我正在开发一个 Android 应用程序,并且我有一个 AlertDialog 的子类。我想在对话框标题区的右侧放置 2 个 ImageButtons(类似于 Activity 中的 ActionBar)。我使用 setCustomTitle() 方法来实现这一点,该方法用我自己创建的自定义视图替换了标题区。这很好用,但是我的自定义标题区的样式与标准标题样式(高度、颜色、分隔符等)不同。
我的问题是:考虑到样式因操作系统版本和制造商而异,我如何为对话框中的自定义标题设置样式,以便它能匹配其他 AlertDialogs 的标准标题样式?
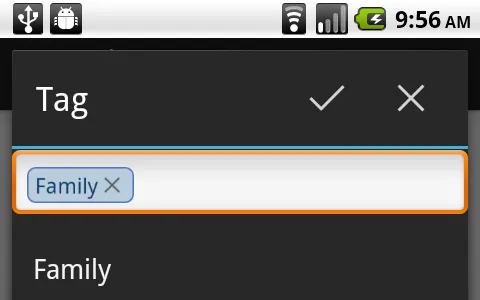
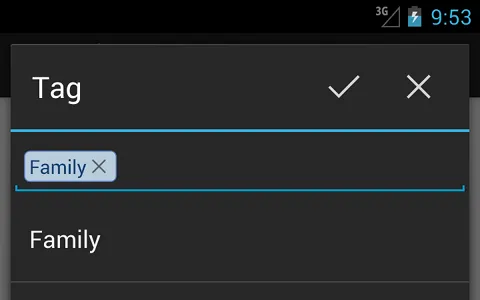
这里是一个具有标准样式的 AlertDialog 的图像(这是来自 ICS 的图像,但我想能够匹配任何变体 -- 不是这种特定风格): enter image description here 
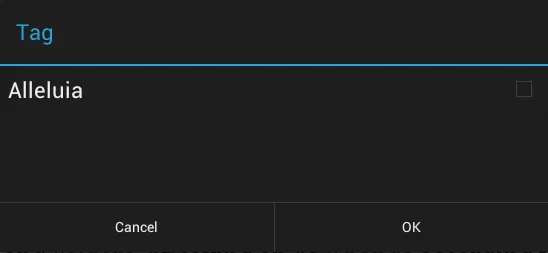
这是一个具有自定义标题和按钮的 AlertDialog 的图像(注意标题的高度和颜色与标准对话框不匹配): enter image description here 
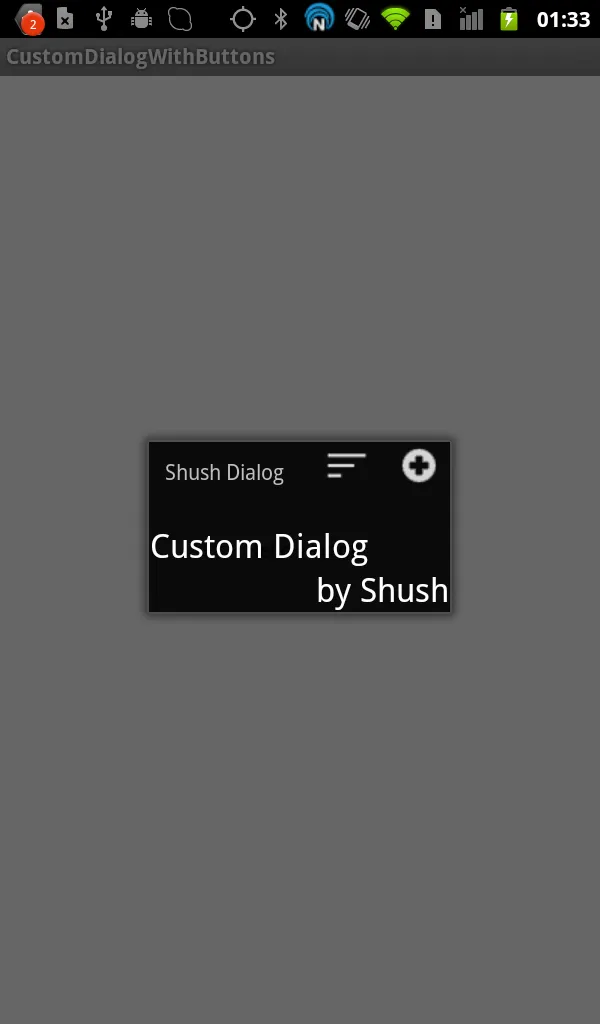
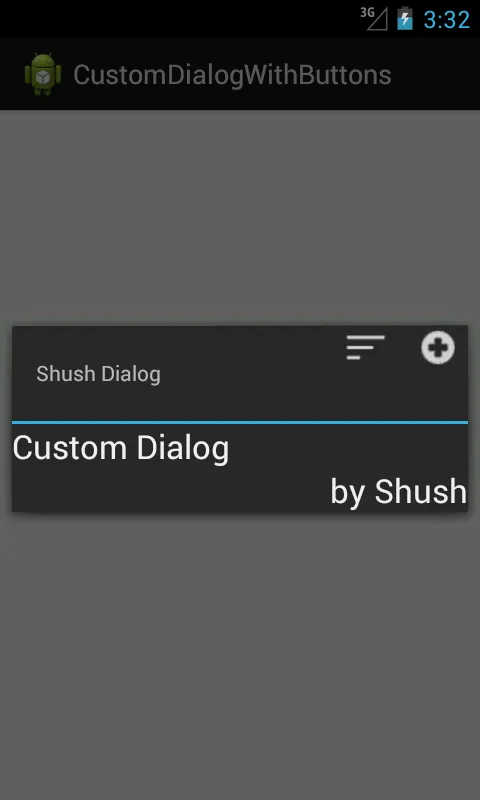
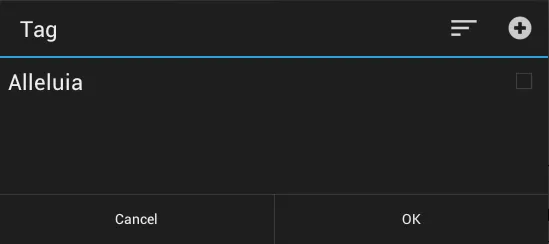
编辑:我不能只是将 ImageButtons 添加到标准标题视图中,因为我无法访问它。如果您知道一种(可靠的、非黑客)方法可以让我向标准标题区添加按钮,则我也会接受这种方法。
3个回答

9
鉴于这个问题有新的兴趣,让我详细说明一下我如何“解决”这个问题。首先,我在我的应用程序中使用 ActionBarSherlock。我想这不是必要的,但它非常有帮助,因为ABS项目中定义的样式和主题允许我在ICS之前的设备上模仿Holo主题,从而提供了应用程序中一致的体验。其次,我的“对话框”不再是一个对话框,而是一个以对话框为主题的活动。这使得操作视图层次结构更简单,因为我完全控制。因此,现在向标题区域添加按钮变得微不足道。以下是截图(2.2设备和4.1模拟器)。请注意,唯一的显着样式差异是EditText,我选择不进行处理。

2.2 device 4.1 emulator

这是我的对话框活动中的onCreate:

public void onCreate(Bundle savedInstanceState) {
    super.onCreate(savedInstanceState);
    requestWindowFeature(Window.FEATURE_NO_TITLE);

    setContentView(R.layout.activity_tag);
    setTitle(R.string.tag_dialog_title);

    View sherlockTitle = findViewById(android.R.id.title);
    if (sherlockTitle != null) {
        sherlockTitle.setVisibility(View.GONE);
    }
    View sherlockDivider = findViewById(R.id.abs__titleDivider);
    if (sherlockDivider != null) {
        sherlockDivider.setVisibility(View.GONE);
    }

    // setup custom title area
    final View titleArea = findViewById(R.id.dialog_custom_title_area);
    if (titleArea != null) {
        titleArea.setVisibility(View.VISIBLE);

        TextView titleView = (TextView) titleArea.findViewById(R.id.custom_title);
        if (titleView != null) {
            titleView.setText(R.string.tag_dialog_title);
        }

        ImageButton cancelBtn = (ImageButton) titleArea.findViewById(R.id.cancel_btn);
        cancelBtn.setOnClickListener(new View.OnClickListener() {
            @Override
            public void onClick(View v) {
                finish();
            }
        });
        cancelBtn.setVisibility(View.VISIBLE);

        ImageButton okBtn = (ImageButton) titleArea.findViewById(R.id.ok_btn);
        okBtn.setOnClickListener(new View.OnClickListener() {
            @Override
            public void onClick(View v) {
                // do stuff here
                finish();
            }
        });
        okBtn.setVisibility(View.VISIBLE);
    }
}

这是与该活动相关的布局:

<LinearLayout
    android:orientation="vertical"
    android:layout_height="fill_parent"
    android:layout_width="fill_parent">
    <LinearLayout
        android:id="@+id/dialog_custom_title_area"
        android:orientation="vertical"
        android:fitsSystemWindows="true"
        android:layout_width="fill_parent"
        android:layout_height="wrap_content">
        <LinearLayout
            android:layout_width="fill_parent"
            android:layout_height="wrap_content"
            android:orientation="horizontal"
            android:paddingRight="10dp">
            <TextView
                android:id="@+id/custom_title" style="?android:attr/windowTitleStyle"
                android:layout_width="0dp"
                android:layout_height="wrap_content"
                android:layout_weight="1"
                android:minHeight="@dimen/abs__alert_dialog_title_height"
                android:paddingLeft="16dip"
                android:paddingRight="16dip"
                android:textColor="#ffffff"
                android:gravity="center_vertical|left" />

            <ImageButton
                android:id="@+id/ok_btn"
                android:layout_height="wrap_content"
                android:layout_width="wrap_content"
                android:minWidth="@dimen/abs__action_button_min_width"
                android:minHeight="@dimen/abs__alert_dialog_title_height"
                android:scaleType="center"
                android:src="@drawable/ic_action_accept"
                android:background="@drawable/abs__item_background_holo_dark"
                android:visibility="visible"
                android:layout_gravity="center_vertical"
                android:contentDescription="@string/acc_done"/>

            <ImageButton
                android:id="@+id/cancel_btn"
                android:layout_height="wrap_content"
                android:layout_width="wrap_content"
                android:minWidth="@dimen/abs__action_button_min_width"
                android:minHeight="@dimen/abs__alert_dialog_title_height"
                android:scaleType="center"
                android:src="@drawable/ic_action_cancel"
                android:background="@drawable/abs__item_background_holo_dark"
                android:visibility="visible"
                android:layout_gravity="center_vertical"
                android:contentDescription="@string/acc_cancel"
                />
        </LinearLayout>
        <View
            android:id="@+id/dialog_title_divider"
            android:layout_width="fill_parent"
            android:layout_height="2dip"
            android:background="@color/abs__holo_blue_light" />
    </LinearLayout>

    <RelativeLayout
        android:id="@+id/list_suggestions_layout"
        android:layout_height="wrap_content"
        android:layout_width="fill_parent">

        <!-- this is where the main dialog area is laid out -->

    </RelativeLayout>

</LinearLayout>

最后,在我的AndroidManifest.xml文件中,这是我如何定义我的TagActivity:
<activity 
    android:icon="@drawable/ic_home" 
    android:name=".activity.TagActivity" 
    android:theme="@style/Theme.Sherlock.Dialog"/>

0

好的,也许这不是最完美的解决方案,也许它是一个糟糕的解决方案,但我在Android 2.3.7和Android 4.1.2上尝试过:

2.3.7(真实设备)

2.3.7 (real device)

4.1.2(模拟器)

4.1.2 (emulator)


我们首先创建一个对话框标题样式,以确保我们有一些空间来放置我们的图标。

res/values/dialogstyles.xml

<?xml version="1.0" encoding="utf-8"?>
<resources xmlns:android="http://schemas.android.com/apk/res/android">

    <style name="Dialog" parent="@android:style/Theme.Dialog">
        <item name="android:windowTitleStyle">@style/MyOwnDialogTitle</item>
    </style>

    <style name="MyOwnDialogTitle">
        <!--  we need to make sure our images fit -->
        <item name="android:layout_marginRight">100dp</item>
    </style>

</resources>

res/values-v11/dialogstyles.xml

<?xml version="1.0" encoding="utf-8"?>
<resources xmlns:android="http://schemas.android.com/apk/res/android">

    <style name="Dialog" parent="@android:style/Theme.Holo.Dialog">
        <item name="android:windowTitleStyle">@style/MyOwnDialogTitle</item>
    </style>

</resources>

然后我们使用两个技巧创建我们的DialogFragment:

  • onCreate中设置样式:

    @Override
    public void onCreate(Bundle savedInstanceState) {
        super.onCreate(savedInstanceState);
        setStyle(DialogFragment.STYLE_NORMAL, R.style.Dialog);
    }
    
  • 重写onCreateView,并将我们的布局(按钮)添加到对话框中(请参见注释)

    @Override
    public View onCreateView(LayoutInflater inflater, ViewGroup container, Bundle savedInstanceState) {
        //我们需要这个视图来删除树观察者(这就是为什么它是final的原因)
        final View view = inflater.inflate(R.layout.dialog_custom, container);
        getDialog().setTitle("Shush Dialog");
        //注册一个布局侦听器以添加我们的按钮
        view.getViewTreeObserver().addOnGlobalLayoutListener(new OnGlobalLayoutListener() {
    
            @SuppressWarnings("deprecation")
            @SuppressLint("NewApi")
            @Override
            public void onGlobalLayout() {
                //填充我们的按钮
                View menu = LayoutInflater.from(getActivity()).inflate(R.layout.layout_mymenu, null);
                //获取对话框的根视图(我相信这是最薄弱的环节)
                FrameLayout fl = ((FrameLayout) getDialog().getWindow().getDecorView());
                //获取根视图的高度(以估计标题的高度)
                int height = fl.getHeight() - fl.getPaddingTop() - fl.getPaddingBottom();
                //为了估算标题的高度,我们减去视图的高度
                //我们确定我们有高度,因为布局已完成
                height = height - view.getHeight();
                //准备我们的视图的布局参数(这包括设置其宽度)
                //如果我们确保它很小,设置高度是不必要的
                //我们甚至可以添加一些填充,但无论如何!
                FrameLayout.LayoutParams params = new FrameLayout.LayoutParams(FrameLayout.LayoutParams.WRAP_CONTENT, height);
                params.gravity = Gravity.RIGHT | Gravity.TOP;
                //添加视图
                fl.addView(menu, params);
                if(android.os.Build.VERSION.SDK_INT >= android.os.Build.VERSION_CODES.JELLY_BEAN)
                    view.getViewTreeObserver().removeOnGlobalLayoutListener(this);
                else
                    view.getViewTreeObserver().removeGlobalOnLayoutListener(this);
            }
        });
        return view;
    }
    

-2

好的,如果只是图片,那么你需要确保在xml中创建的所有内容都按照密度像素或DP进行缩放。大多数简单的设置画笔的代码通常也是按照像素设置的,可能需要手动编写版本以适应密度像素。


我觉得你误解了我的意思。为了更清晰明了,我已经添加了一些图片链接。 - mikejonesguy
我希望这回答了你的问题。 - sdfwer
1
不,我认为你还是误解了问题。(请看我的最新编辑。)对我来说,对话框的标题区域无法通过ID访问,因此我不能只是将我的按钮添加到其中。我必须使用setCustomTitle(View view),它替换现有的标题区域。 - mikejonesguy
我认为这只是整体布局的包装内容,底部视图的缩放有一些变化。 - sdfwer

网页内容由stack overflow 提供, 点击上面的
可以查看英文原文,
原文链接