如何在Swift中居中显示弹出视图

48

我有以下代码用于显示一个没有箭头的弹出视图(对话框),它可以正常工作。唯一的问题是,在 iPad 上,该对话框显示在左上角。我希望将视图居中显示在屏幕上。

在我的以下代码中应该更改或添加什么?:

func show_help(){


    let storyboard = UIStoryboard(name: "Main", bundle: nil)
    let controller = storyboard.instantiateViewControllerWithIdentifier("Help") as! UIViewController

    controller.modalPresentationStyle = UIModalPresentationStyle.popover

    let popoverPresentationController = controller.popoverPresentationController

    // result is an optional (but should not be nil if modalPresentationStyle is popover)
    if let _popoverPresentationController = popoverPresentationController {

        // set the view from which to pop up
        _popoverPresentationController.sourceView = self.view;
        _popoverPresentationController.permittedArrowDirections = UIPopoverArrowDirection.allZeros;
        // present (id iPhone it is a modal automatic full screen)
        self.presentViewController(controller, animated: true, completion: nil)
    }

}

附加信息

输入图像描述

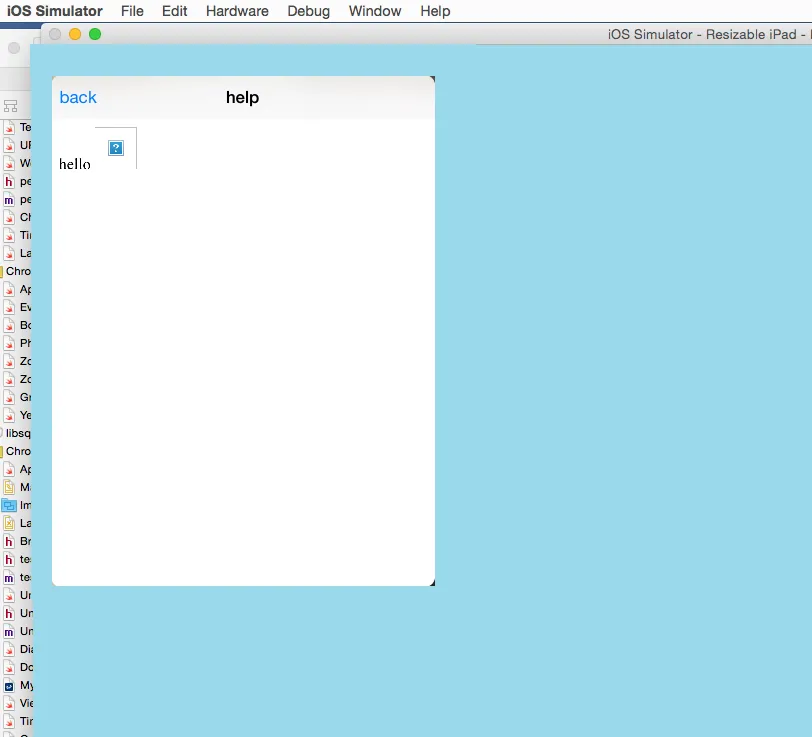
在我的视图控制器中,我设置了首选大小,如下所示:

override func viewDidLoad() {
        let dialogheigth:CGFloat = self.view.frame.height * 0.5;
        let dialogwidth:CGFloat = self.view.frame.width * 0.5;
        self.preferredContentSize = CGSizeMake(dialogwidth,dialogheigth);
}

你能发一下截图吗?我能知道它是否完全弹出了吗? - Sohil R. Memon
非常感谢您的帮助。我刚刚添加了一个屏幕截图和一些来自我的视图的代码。蓝色是背景颜色。白色是我的弹出窗口。额外的代码显示,我设置了弹出窗口的首选大小。 - mcfly soft
通常情况下,您应该在这种情况下使用 popoverLayoutMargins。但是请看这里:https://dev59.com/k18e5IYBdhLWcg3wJXvm#26632329,在iOS 8中它已经失效了。 - bteapot
11个回答

106

你需要为弹出窗口提供源矩形。

根据苹果文档:源矩形是指指定视图中用于锚定弹出窗口的矩形。与sourceView属性一起使用此属性来指定弹出窗口的锚定位置。

在您的情况下,在

_popoverPresentationController.sourceView = self.view;

添加:

_popoverPresentationController.sourceRect = CGRectMake(CGRectGetMidX(self.view.bounds), CGRectGetMidY(self.view.bounds),0,0)

这会管用的!

在此输入图片描述


3
旋转后似乎无法保持居中,有什么建议可以让警报保持居中? - nurider
1
使用Objective-C开发了一个保持居中的解决方案。在此处查看Stack Overflow的答案 - nurider
可以通过Storyboard这样居中。例如,我的弹出式转场是在Storyboard中创建的,我可以将锚点设置为视图,但我无法弄清如何居中。 - lostintranslation
3
谢谢你的解决方案,为了让它对我起作用,我必须通过执行popover?.permittedArrowDirections = UIPopoverArrowDirection()来摆脱箭头,否则箭头会指向屏幕中间,也就是弹出窗口只覆盖屏幕的一半。我的弹出窗口是从tableViewCell的点击生成的。 - rockhammer
你能不能参考我的问题并回答我,如果可能的话,你可以点击下面的链接:https://stackoverflow.com/questions/49914682/popoverpresentation-controller-not-displaying-on-centre-of-the-screen-with-the-t - Gautam Sareriya
更新至2020年:'actionController.popoverPresentationController?.sourceRect = CGRect(x: self.view.bounds.midX, y: self.view.bounds.midY,width: 0,height: 0)' - Jan Bergström

42

这里是使用 Swift 3 的实现方式

let popover = storyboard?.instantiateViewController(withIdentifier: "popover") as! PopoverVC

    popover.modalPresentationStyle = UIModalPresentationStyle.popover
    popover.popoverPresentationController?.backgroundColor = UIColor.green
    popover.popoverPresentationController?.delegate = self

    popover.popoverPresentationController?.sourceView = self.view
    popover.popoverPresentationController?.sourceRect = CGRect(x: self.view.bounds.midX, y: self.view.bounds.midY, width: 0, height: 0)

    popover.popoverPresentationController?.permittedArrowDirections = UIPopoverArrowDirection(rawValue: 0)

    self.present(popover, animated: true)

根据Istvan的答案


24

Swift 4 实现:

popover.popoverPresentationController?.sourceRect = CGRect(x: view.center.x, y: view.center.y, width: 0, height: 0)
popover.popoverPresentationController?.sourceView = view
popover.popoverPresentationController?.permittedArrowDirections = UIPopoverArrowDirection(rawValue: 0)

6

中心气泡控制器的Swift 4实现

let navigationController = UINavigationController(rootViewController: controller)

 navigationController.modalPresentationStyle = .popover      
 navigationController.modalPresentationStyle = UIModalPresentationStyle.popover
 let popover = navigationController.popoverPresentationController
 controller.preferredContentSize = CGSize(width:500,height:600) //manage according to Device like iPad/iPhone
 popover?.delegate = self
 popover?.sourceView = self.view
 popover?.sourceRect = CGRect(x: view.center.x, y: view.     .y, width: 0, height: 0)
 popover?.permittedArrowDirections = UIPopoverArrowDirection(rawValue: 0)

 self.present(navigationController, animated: true, completion: nil)

5

使用另一种方式可以在Swift 3 (Xcode 8, iOS 9)中实现:

从某个地方调用:

self.performSegue(withIdentifier: "showPopupSegue", sender: yourButton)

在segue被触发之前调用的函数:

override func prepare(for segue: UIStoryboardSegue, sender: Any?) {
    if let popoverPresentationController = segue.destination.popoverPresentationController {
        let controller = popoverPresentationController
        controller.permittedArrowDirections = UIPopoverArrowDirection(rawValue: 0)
        controller.sourceView = self.view
        controller.sourceRect = CGRect(x: UIScreen.main.bounds.width * 0.5 - 200, y: UIScreen.main.bounds.height * 0.5 - 100, width: 400, height: 200)
        segue.destination.preferredContentSize=CGSize(width: 400, height: 200)
    }
}

请记得将故事板的Segue Kind属性设置为“Present as Popover”,Anchor属性设置为前一个视图控制器中的任何视图。


2

基本上包括三个步骤(iOS 8):

1.- 展示视图:

假设你想向用户展示一个自定义视图以请求评论。在这里,函数loadNibForRate()返回从其nib加载的RateDialog实例,但是您可以使用任何您想要的方法来定位您的UIViewController

private static func presentCustomDialog(parent: RateDialogParent) -> Bool {
    /// Loads the rateDialog from its xib, handled this way for further customization if desired
      if let rateDialog = loadNibForRate() {
        rateDialog.modalPresentationStyle = UIModalPresentationStyle.Popover
        rateDialog.modalTransitionStyle = UIModalTransitionStyle.CrossDissolve
        let x = parent.view.center

        let sourceRectX : CGFloat
        //Here we check for the orientation of the device, just to know if we are on an iPad
        let maximumDim = max(UIScreen.mainScreen().bounds.height, UIScreen.mainScreen().bounds.width)
        if maximumDim == 1024 { //iPad
            sourceRectX = x.x
        }else {
            sourceRectX = 0
        }

        rateDialog.popoverPresentationController?.sourceView = parent.view
        rateDialog.popoverPresentationController?.permittedArrowDirections = UIPopoverArrowDirection.allZeros
        rateDialog.popoverPresentationController?.sourceRect = CGRectMake(sourceRectX, x.y, 0, 0)
        rateDialog.popoverPresentationController?.popoverLayoutMargins = UIEdgeInsetsMake(0, 0, 0, 0)
        rateDialog.popoverPresentationController?.delegate = parent

        rateDialogParent = parent

        callFunctionAsync() {
            parent.presentViewController(rateDialog, animated: true, completion: nil)
        }
        return true
    }
    return false
}

2.- 如果我们旋转设备,那么弹出窗口将不知道如何重新定位自己,除非我们在父容器 RateDialogParent 上进行设置。

public class RateDialogParent: UIViewController, UIPopoverPresentationControllerDelegate {
/**
This function guarantees that the RateDialog is alwas centered at parent, it locates the RateDialog's view by searching for its tag (-555)
 */
 public func popoverPresentationController(popoverPresentationController: UIPopoverPresentationController, willRepositionPopoverToRect rect: UnsafeMutablePointer<CGRect>, inView view: AutoreleasingUnsafeMutablePointer<UIView?>) {
    if popoverPresentationController.presentedViewController.view.tag == RateDialog.thisViewTag {
        let x = popoverPresentationController.presentingViewController.view.center
        let newRect = CGRectMake(x.x, x.y, 0, 0)
        rect.initialize(newRect)
    }
 }
}

3.- 您的RateDialog应该设置一个标签,这只是为了避免在您的RateDialogParent中有多个弹出窗口时重新定位不需要的弹出窗口。

class RateDialog: UIViewController {
 @IBOutlet weak var reviewTitle: UILabel!
 @IBOutlet weak var reviewMessage : UILabel!
 @IBOutlet weak var cancelButtonTitle: UIButton!
 @IBOutlet weak var remindButtonTitle : UIButton!
 @IBOutlet weak var rateButtonTitle : UIButton!

    /// For being able to locate this view
 static let thisViewTag = -555

 override func viewDidLoad() {
    super.viewDidLoad()
    //sets the tag to identify this view
    self.view.tag = RateDialog.thisViewTag
 }
}

1

如果有帮助的话,我已经为UIViewController创建了一个扩展。

extension UIViewController{
    func configureAsPopoverAndPosition(withWidthRatio widthRatio:CGFloat,
                                       heightRatio:CGFloat){
        modalPresentationStyle = .popover
        let screenWidth = UIScreen.main.bounds.width
        let screenHeight = UIScreen.main.bounds.height
        let popover = popoverPresentationController
        popover?.sourceView = self.view

        popover?.permittedArrowDirections = [UIPopoverArrowDirection(rawValue: 0)]
        preferredContentSize = CGSize(width: (screenWidth * widthRatio),
                                      height: (screenHeight * heightRatio))

        popover?.sourceRect = CGRect(x: view.center.x,
                                     y: view.center.y,
                                     width: 0,
                                     height: 0)
    }
}

使用方法:

if UIDevice.current.userInterfaceIdiom == .pad{
                    yourViewController.configureAsPopoverAndPosition(withWidthRatio: 0.7 /*Make view controller width 70 % of screen width*/,
                                                                        heightRatio: 0.7/*Make view controller height 70 % of screen height*/)
                }

这将在屏幕中心显示弹出框。

1
在iOS8中,您不需要使用self.view.frame来计算宽度和高度。
您可以使用以下方式调整对话框的高度和宽度:
override func viewDidLoad() {
     var frameSize: CGPoint = CGPointMake(UIScreen.mainScreen().bounds.size.width*0.5, UIScreen.mainScreen().bounds.size.height*0.5)
     self.preferredContentSize = CGSizeMake(frameSize.x,frameSize.y);
}

编辑:

您也可以像下面这样设置 contentSizeForViewInPopover

self.contentSizeForViewInPopover = CGSizeMake(320.0, 360.0)

让我知道这是否有帮助?


谢谢您的帮助,但问题仍然存在。我刚刚用您的preferredContentSize替换了我的代码,但对话框仍然在左上角。 - mcfly soft
我尝试过了,但XCode显示:“'contentSizeforViewinPopover'不可用:请使用UIViewController.preferredContentSize”。我也尝试了self.view.contentSizeForViewInPopover = CGSizeMake(320.0, 360.0),但方法“'contentSizeforViewinPopover'”不可用。 - mcfly soft

0

Swift 4.1

这里是简单的解决方案:

使用一个公共变量 var popover

var popover: UIPopoverPresentationController?

YourViewController 作为弹出窗口显示,按照下面提到的方法使用 popover?.sourceRect

let storyboard: UIStoryboard = UIStoryboard(name: "YOUR_STORYBOARD", bundle: nil)
let vc = storyboard.instantiateViewController(withIdentifier: "YOUR_IDENTIFIER") as! YourViewController
let navController = UINavigationController(rootViewController: vc)
navController.modalPresentationStyle = UIModalPresentationStyle.popover
popover = yourController.popoverPresentationController!
popover?.sourceRect = CGRect(x: UIScreen.main.bounds.midX, y: UIScreen.main.bounds.midY, width: 0, height: 0)
popover?.sourceView = self.view
popover?.delegate = self
popover?.permittedArrowDirections = UIPopoverArrowDirection(rawValue: 0)
vc.preferredContentSize = CGSize(width: width, height: height)
self.present(navController, animated: true, completion: nil)

使用viewWillTransition来处理视图的横竖屏切换。

override func viewWillTransition(to size: CGSize, with coordinator: UIViewControllerTransitionCoordinator) {
     super.viewWillTransition(to: size, with: coordinator)
     popover?.sourceRect = CGRect(x: UIScreen.main.bounds.midX, y: UIScreen.main.bounds.midY, width: 0, height: 0)
}

这将在横屏和竖屏中央对齐屏幕,为iPad使用分割视图时更加灵活。


0
简单的解决方案:modalPresentationStyle = .formSheet
let storyboard = UIStoryboard(name: "Main", bundle: nil)
if let viewController = storyboard.instantiateViewController(withIdentifier: "PurchaseViewController") as?  PurchaseViewController {
    viewController.modalPresentationStyle = .formSheet
    self.present(viewController, animated: true)
}

网页内容由stack overflow 提供, 点击上面的
可以查看英文原文,
原文链接