阅读了Bresenham's (also 'Midpoint') circle algorithm的维基百科页面后,似乎最简单的方法就是修改其操作,使其不是
setPixel(x0 + x, y0 + y);
setPixel(x0 - x, y0 + y);
而类似的情况,每次你要做的是
lineFrom(x0 - x, y0 + y, x0 + x, y0 + y);
那就是说,对于每一对点(具有相同的
y 值),Bresenham算法要求你绘制这些点,而现在你需要用一条线将它们连接起来。10
直接使用蛮力法。这种方法会迭代超过一些像素,但它只使用整数乘法和加法。你完全避免了Bresenham的复杂性和sqrt可能成为瓶颈的问题。
for(int y=-radius; y<=radius; y++)
    for(int x=-radius; x<=radius; x++)
        if(x*x+y*y <= radius*radius)
            setpixel(origin.x+x, origin.y+y);
5
if(x*x+y*y < radius*radius + radius)。如果你只想得到圆形(环),你可以这样做:if(x*x+y*y > radius*radius - radius && x*x+y*y < radius*radius + radius)。 - Marcin<= 替换为 <,将 radius * 0.8f 替换为 + radius,另一个 if 语句与此无关(仅用于轮廓)。 - Marcin这是一份C#初步指南(对于C来说应该不难理解)- 这是“原始”形式,没有使用Bresenham算法消除重复的平方根。
Bitmap bmp = new Bitmap(200, 200);

int r = 50; // radius
int ox = 100, oy = 100; // origin

for (int x = -r; x < r ; x++)
{
    int height = (int)Math.Sqrt(r * r - x * x);

    for (int y = -height; y < height; y++)
        bmp.SetPixel(x + ox, y + oy, Color.Red);
}

bmp.Save(@"c:\users\dearwicker\Desktop\circle.bmp");
10
你可以使用这个:
void DrawFilledCircle(int x0, int y0, int radius)
{
    int x = radius;
    int y = 0;
    int xChange = 1 - (radius << 1);
    int yChange = 0;
    int radiusError = 0;

    while (x >= y)
    {
        for (int i = x0 - x; i <= x0 + x; i++)
        {
            SetPixel(i, y0 + y);
            SetPixel(i, y0 - y);
        }
        for (int i = x0 - y; i <= x0 + y; i++)
        {
            SetPixel(i, y0 + x);
            SetPixel(i, y0 - x);
        }

        y++;
        radiusError += yChange;
        yChange += 2;
        if (((radiusError << 1) + xChange) > 0)
        {
            x--;
            radiusError += xChange;
            xChange += 2;
        }
    }
}
这里有很棒的想法!由于我正在进行需要绘制成千上万个圆的项目,我已经评估了这里所有的建议(并通过预先计算半径的平方来改进了一些):
http://quick-bench.com/mwTOodNOI81k1ddaTCGH_Cmn_Ag
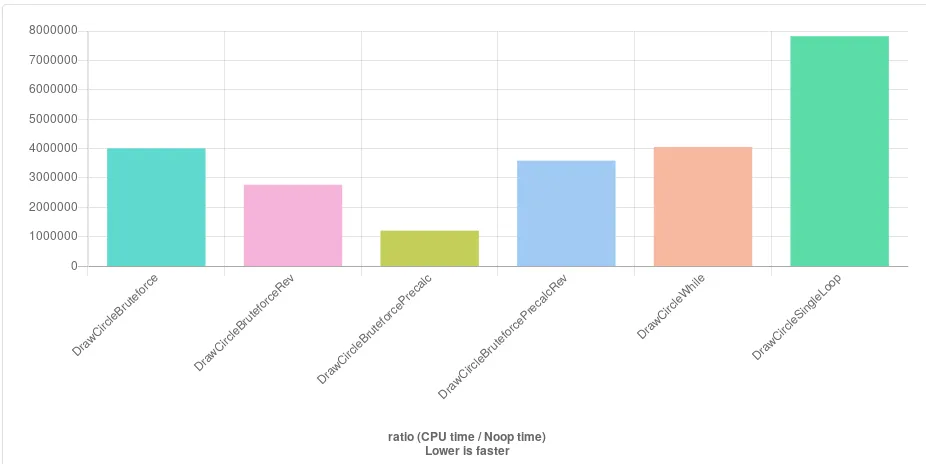
Rev变体只是将x和y交换了,因为沿y轴连续访问更快,可以适应我的网格/画布结构。
最佳方法是Daniel Earwicker的方法(DrawCircleBruteforcePrecalc),它预先计算Y值以避免不必要的半径检查。令人惊讶的是,这抵消了sqrt调用引起的额外计算。
一些评论建议kmillen的变体(DrawCircleSingleLoop)使用单个循环应该非常快,但在这里是最慢的。我认为这是因为所有除法操作。但也许我没有正确地将其适应于那段代码中的全局变量。如果有人看一下就好了。
编辑:在查看了一些汇编代码自大学时代以来的第一次之后,我设法找到圆形原点的最终加法是罪魁祸首。通过预先计算这些值,根据测试结果,可以将最快的方法再提高3.7-3.9倍!http://quick-bench.com/7ZYitwJIUgF_OkDUgnyMJY4lGlA 令人惊叹。
这是我的代码:
for (int x = -radius; x < radius ; x++)
{
    int hh = (int)std::sqrt(radius_sqr - x * x);
    int rx = center_x + x;
    int ph = center_y + hh;

    for (int y = center_y-hh; y < ph; y++)
        canvas[rx][y] = 1;
}
我喜欢palm3D的答案。这是一种惊人地快速的暴力解决方案,没有平方根或三角函数能减慢它的速度。它唯一的弱点是嵌套循环。
将其转换为单循环使此函数的速度几乎提高了一倍。
int r2 = r * r;
int area = r2 << 2;
int rr = r << 1;

for (int i = 0; i < area; i++)
{
    int tx = (i % rr) - r;
    int ty = (i / rr) - r;

    if (tx * tx + ty * ty <= r2)
        SetPixel(x + tx, y + ty, c);
}
这个单循环解决方案与线绘制解决方案的效率不相上下。
            int r2 = r * r;
            for (int cy = -r; cy <= r; cy++)
            {
                int cx = (int)(Math.Sqrt(r2 - cy * cy) + 0.5);
                int cyy = cy + y;

                lineDDA(x - cx, cyy, x + cx, cyy, c);
            }
3
Intel(R) Core(TM) i7-4980HQ CPU @ 2.80GHz。 - Brandonpalm3D的暴力算法我发现是一个很好的起点。这种方法使用相同的前提条件,但它包括了几种跳过检查大多数像素的方法。
首先,这是代码:
int largestX = circle.radius;
for (int y = 0; y <= radius; ++y) {
    for (int x = largestX; x >= 0; --x) {
        if ((x * x) + (y * y) <= (circle.radius * circle.radius)) {
            drawLine(circle.center.x - x, circle.center.x + x, circle.center.y + y);
            drawLine(circle.center.x - x, circle.center.x + x, circle.center.y - y);
            largestX = x;
            break; // go to next y coordinate
        }
    }
}
接下来是解释。
首先要注意的是,如果你找到一个在给定水平线内的圆的最小x坐标,那么你就立即知道了最大x坐标。这是由于圆的对称性造成的。如果最小x坐标比圆的边界框左侧前10个像素,则最大x坐标就在圆的边界框右侧后10个像素处。
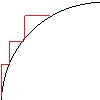
从高x值迭代到低x值的原因是,可以用更少的迭代次数找到最小x值。这是因为对于大多数线而言,最小x值比圆心x坐标更接近圆的边界框左侧,这是由于圆向外弯曲的形状所导致的,如此图所示。
下一点要注意的是,由于圆也在垂直上对称,每个找到的线都会给你一个免费的第二条线来画,每当你在圆的顶半部分找到一条线时,你都可以在半径-y y坐标处得到底半部分的一条线。因此,当发现任何一条线时,都可以画两条线,并且只需要迭代y值的顶半部分。
最后要注意的是,如果从圆心开始向上移动y,则每个下一个线的最小x值必须比上一条线更接近圆心x坐标。这也是由于当你沿着圆向上移动时,圆会越来越向圆心x值靠拢。这里有一个关于这种情况的可视化说明。 总结: 1.如果找到一条线的最小x坐标,则可以同时获得最大x坐标。 2.在圆的顶半部分找到要绘制的每条线时,都会在底半部分获得一条免费的线。 3.当从圆心的y坐标迭代到顶部时,每条线的最小x坐标都必须比上一个x坐标更接近圆心。
你还可以存储<(半径*半径)>和<(y*y)>的值,而不是多次计算它们。
我使用了精度为两位的定点值(我们必须处理半点和半点的平方值)
正如在先前的答案中提到的,我也使用平方值而不是平方根。
首先,在圆的1/8部分检测其边界限制。我使用这些点的对称点来绘制圆的4个“边框”。然后我画出圆内的正方形。
与“中点圆算法”不同,这个算法可以处理偶数直径(并且还可以通过一些小改动处理实数直径)。
如果我的解释不清楚,请原谅,我是法国人;)
void DrawFilledCircle(int circleDiameter, int circlePosX, int circlePosY)
{
    const int FULL = (1 << 2);
    const int HALF = (FULL >> 1);

    int size = (circleDiameter << 2);// fixed point value for size
    int ray = (size >> 1);
    int dY2;
    int ray2 = ray * ray;
    int posmin,posmax;
    int Y,X;
    int x = ((circleDiameter&1)==1) ? ray : ray - HALF;
    int y = HALF;
    circlePosX -= (circleDiameter>>1);
    circlePosY -= (circleDiameter>>1);

    for (;; y+=FULL)
    {
        dY2 = (ray - y) * (ray - y);

        for (;; x-=FULL)
        {
            if (dY2 + (ray - x) * (ray - x) <= ray2) continue;

            if (x < y)
            {
                Y = (y >> 2);
                posmin = Y;
                posmax = circleDiameter - Y;

                // Draw inside square and leave
                while (Y < posmax)
                {
                    for (X = posmin; X < posmax; X++)
                        setPixel(circlePosX+X, circlePosY+Y);
                    Y++;
                }
                // Just for a better understanding, the while loop does the same thing as:
                // DrawSquare(circlePosX+Y, circlePosY+Y, circleDiameter - 2*Y);
                return;
            }

            // Draw the 4 borders
            X = (x >> 2) + 1;
            Y = y >> 2;
            posmax = circleDiameter - X;
            int mirrorY = circleDiameter - Y - 1;

            while (X < posmax)
            {
                setPixel(circlePosX+X, circlePosY+Y);
                setPixel(circlePosX+X, circlePosY+mirrorY);
                setPixel(circlePosX+Y, circlePosY+X);
                setPixel(circlePosX+mirrorY, circlePosY+X);
                X++;
            }
            // Just for a better understanding, the while loop does the same thing as:
            // int lineSize = circleDiameter - X*2;
            // Upper border:
            // DrawHorizontalLine(circlePosX+X, circlePosY+Y, lineSize);
            // Lower border:
            // DrawHorizontalLine(circlePosX+X, circlePosY+mirrorY, lineSize);
            // Left border:
            // DrawVerticalLine(circlePosX+Y, circlePosY+X, lineSize);
            // Right border:
            // DrawVerticalLine(circlePosX+mirrorY, circlePosY+X, lineSize);

            break;
        }
    }
}

void DrawSquare(int x, int y, int size)
{
    for( int i=0 ; i<size ; i++ )
        DrawHorizontalLine(x, y+i, size);
}

void DrawHorizontalLine(int x, int y, int width)
{
    for(int i=0 ; i<width ; i++ )
        SetPixel(x+i, y);
}

void DrawVerticalLine(int x, int y, int height)
{
    for(int i=0 ; i<height ; i++ )
        SetPixel(x, y+i);
}
为了使用非整数直径,您可以增加固定点的精度或使用双精度值。甚至可以根据dY2 +(ray-x)*(ray-x)和ray2(dx² + dy²和r²)之间的差异制作一种抗锯齿效果。
1
这段代码被用于我的新3D打印机固件中,已经证明是从1到43像素直径的填充圆最快的方法。如果需要更大的直径,下面的内存块(或数组)应该按照我不想浪费时间解释的结构进行扩展...
如果您有问题,或需要比43更大的直径,请联系我,我将帮助您绘制最快和完美的填充圆...或者可以在那些直径上使用Bresenham的圆形绘图算法,但是必须在绘制圆形后填充,或将填充合并到Bresenham的圆形绘图算法中,这只会导致填充圆比我的代码慢。我已经对不同的代码进行了基准测试,我的解决方案比其他方案快4到5倍。作为测试,我已经能够在运行在1核72 MHz Cortex-M4上的BigTreeTech tft24 1.1上绘制出数百个不同大小和颜色的填充圆。
https://www.youtube.com/watch?v=7_Wp5yn3ADI
// this must be declared anywhere, as static or global
// as long as the function can access it !

 uint8_t Rset[252]={
  0,1,1,2,2,1,2,3,3,1,3,3,4,4,2,3,4,5,5,5,2,4,5,5,
  6,6,6,2,4,5,6,6,7,7,7,2,4,5,6,7,7,8,8,8,2,5,6,7,
  8,8,8,9,9,9,3,5,6,7,8,9,9,10,10,10,10,3,5,7,8,9,
  9,10,10,11,11,11,11,3,5,7,8,9,10,10,11,11,12,12,
  12,12,3,6,7,9,10,10,11,12,12,12,13,13,13,13,3,6,
  8,9,10,11,12,12,13,13,13,14,14,14,14,3,6,8,9,10,
  11,12,13,13,14,14,14,15,15,15,15,3,6,8,10,11,12,
  13,13,14,14,15,15,15,16,16,16,16,4,7,8,10,11,12,
  13,14,14,15,16,16,16,17,17,17,17,17,4,7,9,10,12,
  13,14,14,15,16,16,17,17,17,18,18,18,18,18,4,7,9,
  11,12,13,14,15,16,16,17,17,18,18,18,19,19,19,19,
  19,7,9,11,12,13,15,15,16,17,18,18,19,19,20,20,20,
  20,20,20,20,20,7,9,11,12,14,15,16,17,17,18,19,19
  20,20,21,21,21,21,21,21,21,21};

       // SOLUTION 1: (the fastest)

void FillCircle_v1(uint16_t x, uint16_t y, uint16_t r)
 {
   // all needed variables are created and set to their value...
   uint16_t radius=(r<1) ? 1 : r ;
   if (radius>21 ) {radius=21; }
   uint16_t diam=(radius*2)+1;
   uint16_t ymir=0, cur_y=0;
   radius--; uint16_t target=(radius*radius+3*radius)/2; radius++;
 // this part draws directly into the ILI94xx TFT buffer mem.
 // using pointers..2 versions where you can draw
 // pixels and lines with coordinates will follow
   for (uint16_t yy=0; yy<diam; yy++)
   { ymir= (yy<=radius) ? yy+target : target+diam-(yy+1);
   cur_y=y-radius+yy;
   uint16_t *pixel=buffer_start_addr+x-Rset[ymir]+cur_y*buffer_width;
   for (uint16_t xx= 0; xx<=(2*Rset[ymir]); xx++)
   { *pixel++ = CANVAS::draw_color; }}}


  // SOLUTION 2: adaptable to any system that can
  // add a pixel at a time: (drawpixel or add_pixel,etc_)

void FillCircle_v2(uint16_t x, uint16_t y, uint16_t r)
 {
   // all needed variables are created and set to their value...
   uint16_t radius=(r<1) ? 1 : r ;
   if (radius>21 ) {radius=21; }
   uint16_t diam=(radius*2)+1;
   uint16_t ymir=0, cur_y=0;
   radius--; uint16_t target=(radius*radius+3*radius)/2; radius++;
  for (uint16_t yy=0; yy<diam; yy++)
  { ymir= (yy<=radius) ? yy+target : target+diam-(yy+1);
    cur_y=y-radius+yy;
    uint16_t Pixel_x=x-Rset[ymir];
    for (uint16_t xx= 0; xx<=(2*Rset[ymir]); xx++)
     { //use your add_pixel or draw_pixel here
       // using those coordinates:
       // X position will be... (Pixel_x+xx)
       // Y position will be... (cur_y)
       // and add those 3 brackets at the end
   }}}


  // SOLUTION 3: adaptable to any system that can draw fast
  //                horizontal lines
 void FillCircle_v3(uint16_t x, uint16_t y, uint16_t r)
  {
   // all needed variables are created and set to their value...
   uint16_t radius=(r<1) ? 1 : r ;
   if (radius>21 ) {radius=21; }
   uint16_t diam=(radius*2)+1;
   uint16_t ymir=0, cur_y=0;
   radius--; uint16_t target=(radius*radius+3*radius)/2; radius++;
   for (uint16_t yy=0; yy<diam; yy++)
   { ymir= (yy<=radius) ? yy+target : target+diam-(yy+1);
   cur_y=y-radius+yy;
   uint16_t start_x=x-Rset[ymir];
   uint16_t width_x=2*Rset[ymir];

   //  ... then use your best drawline function using those values:
   //  start_x:   position X of the start of the line
   //  cur_y:     position Y of the current line
   //  width_x:   length of the line
   //  if you need a 2nd coordinate then :end_x=start_x+width_x
   // and add those 2 brackets after !!!

    }}
原文链接
- 相关问题
- 4 使用泛洪算法填充圆形(C语言)
- 6 快速分解算法
- 16 绘制抗锯齿圆形的算法?
- 15 快速圆形碰撞检测
- 18 中点圆算法用于绘制填充圆形
- 18 快速的CRC算法?
- 8 快速因数分解算法?
- 4 用偶数直径画同心瓷砖圆形
- 6 快速变化检测算法
- 3 快速解压算法
setPixel命令以及一个省略末尾像素的lineFrom命令。 - AakashM