如何使用PIL将所有白色像素变为透明?

100

我正在尝试使用Python Image Library将所有白色像素变成透明的。 (我是一个尝试学习Python的C语言程序员,请温柔些) 我已经成功进行了转换(至少像素值看起来正确),但是我无法弄清如何将列表转换为缓冲区以重新创建图像。以下是代码:

img = Image.open('img.png')
imga = img.convert("RGBA")
datas = imga.getdata()

newData = list()
for item in datas:
    if item[0] == 255 and item[1] == 255 and item[2] == 255:
        newData.append([255, 255, 255, 0])
    else:
        newData.append(item)

imgb = Image.frombuffer("RGBA", imga.size, newData, "raw", "RGBA", 0, 1)
imgb.save("img2.png", "PNG")
11个回答

124

你需要做出以下更改:

  • 添加一个元组 (255, 255, 255, 0) 而不是列表 [255, 255, 255, 0]
  • 使用 img.putdata(newData)

这是可用的代码:

from PIL import Image

img = Image.open('img.png')
img = img.convert("RGBA")
datas = img.getdata()

newData = []
for item in datas:
    if item[0] == 255 and item[1] == 255 and item[2] == 255:
        newData.append((255, 255, 255, 0))
    else:
        newData.append(item)

img.putdata(newData)
img.save("img2.png", "PNG")

7
只是为了节省您的时间:如果您正在使用Python3,您必须选择Pillow(http://python-pillow.org/)而不是PIL。 - user4311599
1
对于 GIF,似乎需要transparency作为 save(Pillow 5.1.0)的参数。还可以参见如何使用 PIL(python-imaging)创建透明的 gif (或 png) - handle
3
"RGBA" 中的 A 代表“alpha”,意思是“不透明度”。因此,newData.append((255,255,255,0))中的 0 表示“完全透明”。如果有好奇的新手需要进一步解释。我猜 putdata() 会改变 PIL 对象,但我不知道内部运作机制。 - Nathan majicvr.com
这对我没有用,因为迭代pixdata只给了我一堆0。答案的年龄可能与此有关。Giovanni G. PY的下面的答案效果更好。 - wfgeo
1
rgba[rgba[...,-1]==0] = [255,255,255,0] - Muhammad Abdullah
显示剩余4条评论

56

你也可以使用像素访问模式来就地修改图像:

from PIL import Image

img = Image.open('img.png')
img = img.convert("RGBA")

pixdata = img.load()

width, height = img.size
for y in range(height):
    for x in range(width):
        if pixdata[x, y] == (255, 255, 255, 255):
            pixdata[x, y] = (255, 255, 255, 0)

img.save("img2.png", "PNG")

如果您经常使用上面的内容,也可以将其包装成脚本。


2
作为效率的参考,上述循环在我的普通计算机上处理256x256像素图像大约需要0.05秒。这比我预期的要快。 - M Katz
1
优点:这个方法可以处理巨大的图像(32000x32000像素)。在高端服务器上测试,我尝试过的其他方法在这个大小上都会出现内存错误,但是它们能够处理(22000x22000像素)。缺点:这比我尝试过的其他方法慢,比如使用numpy替换值,然后使用“Image.fromarray”将其转换回PIL对象。为了补充@MKatz的参考意见,这个方法在处理32000x32000像素的图像时需要7分钟15秒。 - kevinmicke
嘿,有没有办法使除了一种颜色之外的所有颜色都变成透明的?我尝试使用for循环,但是它太耗时间了!请帮忙。 - Nithin Sai
@NithinSai,创建一个仅从原始图片复制一种颜色的副本怎么样? - DonCarleone
@DonCarleone 我确实尝试过,但我不知道如何使用Python,我是一个初学者,不知道如何使用PIL从另一个PNG文件中复制一种颜色来创建新图像。请帮帮我。 - Nithin Sai
1
@NithinSai 如果这有帮助的话,请看一下: https://dev59.com/1q7la4cB1Zd3GeqPbl7s - DonCarleone

12

由于这是在搜索“将枕头白色变为透明”时当前的谷歌搜索结果,我想补充一下,使用numpy也可以实现同样的效果,并且在我的基准测试中(一个具有大量白色背景的单个8MP图像)速度约快10倍(约为300毫秒与建议解决方案的3.28秒)。代码也稍微更短:

import numpy as np

def white_to_transparency(img):
    x = np.asarray(img.convert('RGBA')).copy()

    x[:, :, 3] = (255 * (x[:, :, :3] != 255).any(axis=2)).astype(np.uint8)

    return Image.fromarray(x)

它也很容易被替换为“几乎透明”的版本(例如,一个通道是254而不是255)。当然,这将使整个图片部分透明,除了纯黑色:

def white_to_transparency_gradient(img):
    x = np.asarray(img.convert('RGBA')).copy()

    x[:, :, 3] = (255 - x[:, :, :3].mean(axis=2)).astype(np.uint8)

    return Image.fromarray(x)

注意:默认情况下,Pillow图像会转换为只读数组,因此需要使用.copy()方法。


这个函数将会消耗大量的内存。 - gotounix
为什么会有这么多空间占用?但它仍然是线性的,确实需要创建一些额外的数组,但即使考虑到所有因素,它可能也只有5倍的空间占用(可能更少),对于10倍的加速来说,这是一个不错的权衡(此外,如果您在如此严苛的条件下工作,无法在内存中创建5个图像,则Python可能不是您任务的正确语言...) - Marco Spinaci
我在一台1G VPS上使用它时总是会出现内存错误异常,而增加VPS的内存后一切正常。 - gotounix
你能解释一下为什么要使用axis=2吗?我原以为应该是axis=3,因为我们正在使Alpha 'A'通道透明。 - fdabhi
一张图片总共有3个轴 - 高度、宽度和通道 - 因此axis=3会引发错误。我们保存到alpha的事实被赋值语句的lhs所包含,即我们正在写入第三个轴的索引3(R=0,G=1,B=2,alpha=3)。rhs上的.any(axis=2)意味着您想获取至少一个第三维(因为它是[:, :, :3])的前三个索引(R、G或B)与255不同的像素。 - Marco Spinaci

8
import Image
import ImageMath

def distance2(a, b):
    return (a[0] - b[0]) * (a[0] - b[0]) + (a[1] - b[1]) * (a[1] - b[1]) + (a[2] - b[2]) * (a[2] - b[2])

def makeColorTransparent(image, color, thresh2=0):
    image = image.convert("RGBA")
    red, green, blue, alpha = image.split()
    image.putalpha(ImageMath.eval("""convert(((((t - d(c, (r, g, b))) >> 31) + 1) ^ 1) * a, 'L')""",
        t=thresh2, d=distance2, c=color, r=red, g=green, b=blue, a=alpha))
    return image

if __name__ == '__main__':
    import sys
    makeColorTransparent(Image.open(sys.argv[1]), (255, 255, 255)).save(sys.argv[2]);

5
该函数结合了之前解决方案的所有优点:它允许任何背景,并使用numpy(比传统列表更快)。
import numpy as np
from PIL import Image

def convert_png_transparent(src_file, dst_file, bg_color=(255,255,255)):
    image = Image.open(src_file).convert("RGBA")
    array = np.array(image, dtype=np.ubyte)
    mask = (array[:,:,:3] == bg_color).all(axis=2)
    alpha = np.where(mask, 0, 255)
    array[:,:,-1] = alpha
    Image.fromarray(np.ubyte(array)).save(dst_file, "PNG")

5

对于大尺寸图像,循环耗时较长的情况下,更pythonic的方式是使用其他方法。

from PIL import Image

img = Image.open('img.png')
img = img.convert("RGBA")

imgnp = np.array(img)

white = np.sum(imgnp[:,:,:3], axis=2)
white_mask = np.where(white == 255*3, 1, 0)

alpha = np.where(white_mask, 0, imgnp[:,:,-1])

imgnp[:,:,-1] = alpha 

img = Image.fromarray(np.uint8(imgnp))
img.save("img2.png", "PNG")

4

Python 3版本,带有目录中的所有文件

import glob
from PIL import Image

def transparent(myimage):
    img = Image.open(myimage)
    img = img.convert("RGBA")

    pixdata = img.load()

    width, height = img.size
    for y in range(height):
        for x in range(width):
            if pixdata[x, y] == (255, 255, 255, 255):
                pixdata[x, y] = (255, 255, 255, 0)

    img.save(myimage, "PNG")

for image in glob.glob("*.png"):
    transparent(image)

2

我很惊讶没有人意识到不仅需要更改特定颜色,而且还需要更改该颜色与其他颜色的混合。这就是Gimp使用“颜色转透明度”功能所做的事情。将cr333的代码扩展为https://dev59.com/e2DVa4cB1Zd3GeqPdWwD#62334218,我们可以得到类似于此功能的东西:

from PIL import Image

target_color = (255, 255, 255)

img   = Image.open('img.png')
imga  = img.convert("RGBA")
datas = imga.getdata()

newData = list()
for item in datas:
    newData.append((
        item[0], item[1], item[2],
        max( 
            abs(item[0] - target_color[0]), 
            abs(item[1] - target_color[1]), 
            abs(item[2] - target_color[2]), 
        )  
    ))

imgb = Image.frombuffer("RGBA", imga.size, newData, "raw", "RGBA", 0, 1)
imgb.save("img2.png", "PNG")


2

@egeres使用距离目标颜色的方法创建alpha值,这真的很巧妙,可以创造出更美好的结果。以下是使用numpy的示例:

import numpy as np
import matplotlib.pyplot as plt

def color_to_alpha(im, target_color):
    alpha = np.max(
        [
            np.abs(im[..., 0] - target_color[0]),
            np.abs(im[..., 1] - target_color[1]),
            np.abs(im[..., 2] - target_color[2]),
        ],
        axis=0,
    )
    ny, nx, _ = im.shape
    im_rgba = np.zeros((ny, nx, 4), dtype=im.dtype)
    for i in range(3):
        im_rgba[..., i] = im[..., i]
    im_rgba[..., 3] = alpha
    return im_rgba

target_color = (0.0, 0.0, 0.0)
im = plt.imread("img.png")
im_rgba = color_to_alpha(im, target_color)

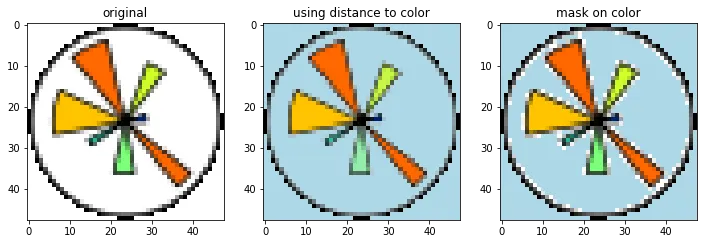
为了完整起见,下面包含了应用于 matplotlib 徽标的基于掩码的版本的比较:

from pathlib import Path
import matplotlib.pyplot as pl
import numpy as np


def color_to_alpha(im, alpha_color):
    alpha = np.max(
        [
            np.abs(im[..., 0] - alpha_color[0]),
            np.abs(im[..., 1] - alpha_color[1]),
            np.abs(im[..., 2] - alpha_color[2]),
        ],
        axis=0,
    )
    ny, nx, _ = im.shape
    im_rgba = np.zeros((ny, nx, 4), dtype=im.dtype)
    for i in range(3):
        im_rgba[..., i] = im[..., i]
    im_rgba[..., 3] = alpha
    return im_rgba


def color_to_alpha_mask(im, alpha_color):
    mask = (im[..., :3] == alpha_color).all(axis=2)
    alpha = np.where(mask, 0, 255)
    ny, nx, _ = im.shape
    im_rgba = np.zeros((ny, nx, 4), dtype=im.dtype)
    im_rgba[..., :3] = im
    im_rgba[..., -1] = alpha
    return im_rgba


# load example from images included with matplotlib
fn_img = Path(plt.__file__).parent / "mpl-data" / "images" / "matplotlib_large.png"
im = plt.imread(fn_img)[..., :3]  # get rid of alpha channel already in image

target_color = [1.0, 1.0, 1.0]
im_rgba = color_to_alpha(im, target_color)
im_rgba_masked = color_to_alpha_mask(im, target_color)

fig, axes = plt.subplots(ncols=3, figsize=(12, 4))
[ax.set_facecolor("lightblue") for ax in axes]
axes[0].imshow(im)
axes[0].set_title("original")
axes[1].imshow(im_rgba)
axes[1].set_title("using distance to color")
axes[2].imshow(im_rgba_masked)
axes[2].set_title("mask on color")

comparison of different color-to-alpha techniques


2

我非常喜欢Jonathan的答案。使用NumPy并且不使用np.where可以实现这个目标的另一种方法:

import numpy as np
from PIL import Image

img = Image.open('img.png') # n x m x 3
imga = img.convert("RGBA")  # n x m x 4

imga = np.asarray(imga) 
r, g, b, a = np.rollaxis(imga, axis=-1) # split into 4 n x m arrays 
r_m = r != 255 # binary mask for red channel, True for all non white values
g_m = g != 255 # binary mask for green channel, True for all non white values
b_m = b != 255 # binary mask for blue channel, True for all non white values

# combine the three masks using the binary "or" operation 
# multiply the combined binary mask with the alpha channel
a = a * ((r_m == 1) | (g_m == 1) | (b_m == 1))

# stack the img back together 
imga =  Image.fromarray(np.dstack([r, g, b, a]), 'RGBA')

我将我的方法与keithb的(最高评分答案)进行了基准测试,结果发现我的方法比他的快18%(在大小为124 * 124的102个图像上平均计算)。


1
这个解决方案确实比Jonathan的快2.5倍。 - alanwilter

网页内容由stack overflow 提供, 点击上面的
可以查看英文原文,
原文链接