将图像拉伸以适应

24
src 应该将其宽度拉伸至 match_parent ,同时保持长宽比例。 当图像大于父级容器时,它会正确缩小。 但是当图像较小时,它不会放大缩放。(所示为所需行为)
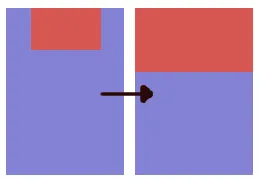
enter image description here
<RelativeLayout
    android:layout_width="match_parent"
    android:layout_height="match_parent" >

    <ImageView
        android:id="@+id/banner"
        android:layout_width="match_parent"
        android:layout_height="wrap_content"
        android:scaleType="fitCenter"
        android:adjustViewBounds="true"
        android:src="@drawable/foo"
        />

</RelativeLayout>

使用 ScaleType.fitXY 会拉伸图片的宽度,但不改变高度。


你尝试过使用scale type fitEnd或fitStart吗?这对我解决了类似的问题。当我使用fitEnd时,我没有设置adjustViewBounds属性。 - blackcj
8个回答

25
我认为这是不可能的,至少不是通过scaleType属性提供的选项实现。
在这种情况下,你最好使用centerCrop,但是只有图片的中心部分会可见。
然而,如果你不能接受这个选项,那么你可以在不失去宽高比的情况下编程缩放图像。 为了实现这一点,你需要根据屏幕宽度计算一个缩放因子,然后使用这个缩放因子来确定图像的新高度。
做法如下:
ImageView imageView = (ImageView)findViewById(R.id.imageView);
Bitmap bitmap = BitmapFactory.decodeResource(getResources(), R.drawable.foo);

int imageWidth = bitmap.getWidth();
int imageHeight = bitmap.getHeight();

int newWidth = getScreenWidth(); //this method should return the width of device screen.
float scaleFactor = (float)newWidth/(float)imageWidth;
int newHeight = (int)(imageHeight * scaleFactor);

bitmap = Bitmap.createScaledBitmap(bitmap, newWidth, newHeight, true);
imageView.setImageBitmap(bitmap);

此外,您需要在布局文件中调整ImageView的声明:

<ImageView
        android:id="@+id/imageView"
        android:layout_width="wrap_content"
        android:layout_height="wrap_content" />

谢谢,解决了问题。我就觉得解决方案不会在XML里面。 - Matt
1
@Andy,你的代码是在什么上下文中编写的?我在Context或Activity中找不到getScreenWidth()。 - user1545072
@YekhezkelYovel,那个方法你应该自己创建。实现超出了回答的范围。 - Andy Res
我现在明白了。我只是在那里放置了注释,以便清楚地表明您留下了一些未完成的事情,但这并不是什么大问题。 - user1545072

11

android:adjustViewBounds="true"可以实现这个功能!


1
当然会。但是在JellyBean 4.1.2上不起作用。 - Narendra Singh

9

使用 MainImage.setScaleType(ImageView.ScaleType.FIT_XY);

或者你可以在xml中简单地添加android:scaleType="fitXY"


2
这比所有的Java都容易得多。谢谢! - Tadhg
2
谢谢,android:scaleType="fitXY" 像魔法一样好用! - Yamashiro Rion

6
setContentView(R.layout.activity_main);

ImageView imageView = (ImageView)findViewById(R.id.imageView);
Bitmap bitmap = BitmapFactory.decodeResource(getResources(), R.drawable.image);

int imageWidth = bitmap.getWidth();
int imageHeight = bitmap.getHeight();

DisplayMetrics metrics = this.getResources().getDisplayMetrics();

int newWidth = metrics.widthPixels;
float scaleFactor = (float)newWidth/(float)imageWidth;
int newHeight = (int)(imageHeight * scaleFactor);

bitmap = Bitmap.createScaledBitmap(bitmap, newWidth, newHeight, true);
imageView.setImageBitmap(bitmap);

布局

<ImageView
    android:id="@+id/imageView"
    android:layout_width="match_parent"
    android:layout_height="wrap_content"
    android:scaleType="centerInside"
    android:src="@drawable/image" />

3

请问:

<RelativeLayout
    android:layout_width="match_parent"
    android:layout_height="match_parent">
    <ImageView
        android:id="@+id/banner"
        android:layout_width="match_parent"
        android:layout_height="wrap_content"
        android:scaleType="centerCrop"
        android:adjustViewBounds="true"
        android:src="@drawable/foo" />
</RelativeLayout>

做不到你想要的吗?


这会拉伸宽度,但不会拉伸高度。与 fitXY 有相同的效果。 - Matt
尝试将layout_height设置为"match_parent"。 - yarian
那会使我的ImageView占据整个屏幕。 - Matt

2

当我需要这种行为时,通常在XML中使用以下类:

当然,有时根据一些要求进行调整。但是,在视图的上下文中,我发现将类从ImageView更改为不同的类比在Java代码中更容易。

package shush.android.util;

import android.annotation.SuppressLint;
import android.content.Context;
import android.graphics.Bitmap;
import android.graphics.drawable.BitmapDrawable;
import android.util.AttributeSet;
import android.widget.ImageView;

/**
 * @author Sherif elKhatib
 *
 * ImageView Class that maintains the width of the view and changes height to keep the aspect ratio.
 */
public class AspectImageView extends ImageView {

    public AspectImageView(Context context) {
        super(context);
    }

    public AspectImageView(Context context, AttributeSet attrs) {
        super(context, attrs);
    }

    public AspectImageView(Context context, AttributeSet attrs, int defStyle) {
        super(context, attrs, defStyle);
    }

    @Override
    protected void onMeasure(int widthMeasureSpec, int heightMeasureSpec) {
        if(getBackground() == null || getBackground().getIntrinsicHeight()==0 || getBackground().getIntrinsicWidth()==0) {
            super.onMeasure(widthMeasureSpec, heightMeasureSpec);
            return;
        }
        int width = MeasureSpec.getSize(widthMeasureSpec);
        int height = width * getBackground().getIntrinsicHeight() / getBackground().getIntrinsicWidth();
        setMeasuredDimension(width, height);
    }
    @SuppressLint("NewApi")
    @SuppressWarnings("deprecation")
    @Override
    public void setImageBitmap(Bitmap bm) {
        if(bm == null)
            return;
        BitmapDrawable bd = new BitmapDrawable(getContext().getResources(), bm);
        if(android.os.Build.VERSION.SDK_INT >= android.os.Build.VERSION_CODES.JELLY_BEAN)
            setBackground(bd);
        else
            setBackgroundDrawable(bd);
    }
}

2

将这两个优秀的答案(这一个这一个)结合起来,形成一个快速解决方案。我希望这可以为某些人节省不必要的研究时间!

private Bitmap getScaledBitmap(int resource) {
    DisplayMetrics displaymetrics = new DisplayMetrics();
    getWindowManager().getDefaultDisplay().getMetrics(displaymetrics);
    int width = displaymetrics.widthPixels;

    Bitmap bitmap = BitmapFactory.decodeResource(getResources(), resource);

    float scaleFactor = (float) width / (float) bitmap.getWidth();
    int newHeight = (int) (bitmap.getHeight() * scaleFactor);

    return Bitmap.createScaledBitmap(bitmap, width, newHeight, true);
}

使用方法如下:

imageView.setImageBitmap(getScaledBitmap(R.drawable.banner_home_2));

1

没有运气。这会使视图的大小恰好足以垂直适应图像,两侧留有空间。 - Matt

网页内容由stack overflow 提供, 点击上面的
可以查看英文原文,
原文链接