iOS 13: Swift - '通过编程设置应用程序根视图控制器'无法工作

71

我在AppDelegate.swift中有以下代码来设置iOS应用程序的根视图控制器。但它不起作用,它遵循目标结构(在“通用”选项卡下定义)并忽略此代码。

(Xcode 11,Swift 5.1,iOS 13)

class AppDelegate: UIResponder, UIApplicationDelegate {

    var window: UIWindow?

    func application(_ application: UIApplication, didFinishLaunchingWithOptions launchOptions: [UIApplication.LaunchOptionsKey: Any]?) -> Bool {

        window = UIWindow(frame: UIScreen.main.bounds)
        guard let rootVC = UIViewController() else {
            print("Root VC not found")
            return true
        }
        let rootNC = UINavigationController(rootViewController: rootVC)
        window?.rootViewController = rootNC
        window?.makeKeyAndVisible()

        return true
    }
}

无法理解问题出在哪里。

我也尝试了以下参考资料,但没有成功:

2
“不起作用”不是一个足够的问题描述。 - rmaddy
1
你正在使用哪个版本的iOS进行测试? - rmaddy
2
从iOS 12开始,像这样设置根视图控制器已经过时了。您需要使用SceneDelegate。 - Shreeram Bhat
1
阅读Scenes文档,并观看来自WWDC 2019的相关视频。 - rmaddy
1
对于任何寻找更新的“Single View App” Xcode模板的人,该模板支持iOS 12和13,并支持故事板或全代码用户界面,请参见https://github.com/rmaddy/XcodeTemplates。 - rmaddy
显示剩余5条评论
16个回答

138

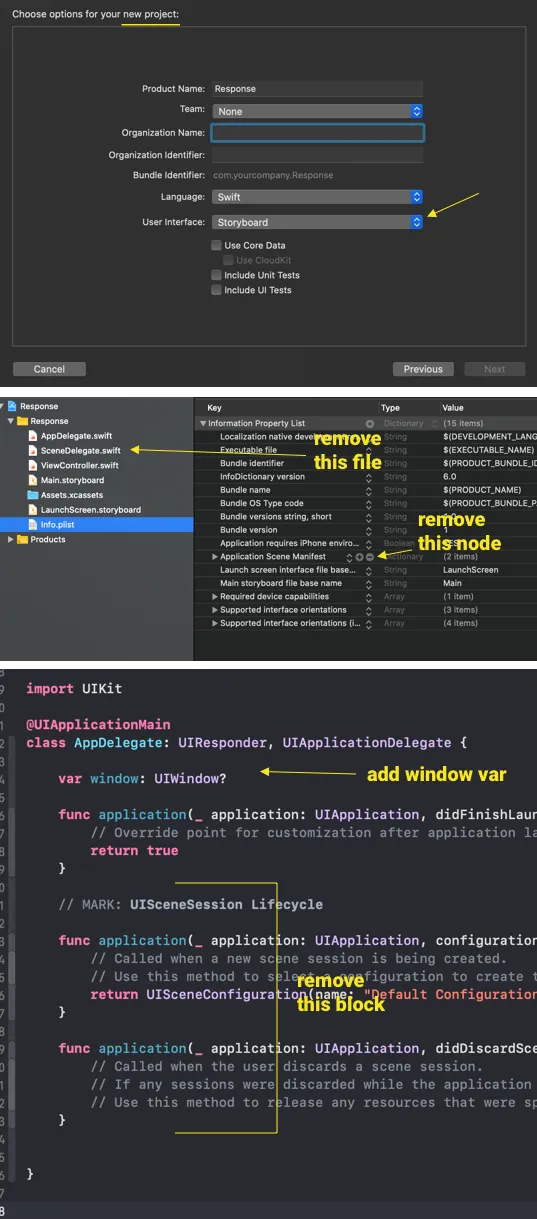
如果您在Xcode 11中创建的项目需要选择一个与SwiftUI不同的旧方法,您可以按照以下步骤操作:

获取旧方法的步骤


4
如果您不计划使用SwiftUI或者SceneDelegate.swift文件只占用了不必要的空间,这是一个很好的解决方案。 - grantespo
2
这确实是最好的解决方案! - Niraj
这会导致我的应用程序崩溃并显示:“应用程序窗口在应用启动结束时应该具有根视图控制器”。 - S.S.D
哇,我找了两天才找到这个解决方案。谢谢你! - Charlie
该死,这导致我的应用程序崩溃并显示以下内容:[SceneConfiguration] Info.plist不包含任何UIScene配置字典(正在查找名称为“(无名称)”的配置)。 - Edison Espinosa

60

我尝试了以下两种选项,它们都适用于我。在iOS-13(Xcode 11)中,默认情况下启用了一个名为UIWindowScene的新文件SceneDelegate.swift。

class SceneDelegate: UIResponder, UIWindowSceneDelegate {

    var window: UIWindow?


    func scene(_ scene: UIScene, willConnectTo session: UISceneSession, options connectionOptions: UIScene.ConnectionOptions) {

        guard let windowScene = (scene as? UIWindowScene) else { return }


        self.window = UIWindow(windowScene: windowScene)
        //self.window =  UIWindow(frame: UIScreen.main.bounds)

        let storyboard = UIStoryboard(name: "MyStoryboardName", bundle: nil)
        guard let rootVC = storyboard?.instantiateViewController(identifier: "ViewControllerIdentifierName") as? ViewController else {
            print("ViewController not found")
            return
        }
        let rootNC = UINavigationController(rootViewController: rootVC)
        self.window?.rootViewController = rootNC
        self.window?.makeKeyAndVisible()
    }
}

替代选项:

class SceneDelegate: UIResponder, UIWindowSceneDelegate {

    var window: UIWindow?


    func scene(_ scene: UIScene, willConnectTo session: UISceneSession, options connectionOptions: UIScene.ConnectionOptions) {
        let windowScene = UIWindowScene(session: session, connectionOptions: connectionOptions)
        self.window = UIWindow(windowScene: windowScene)
        //self.window =  UIWindow(frame: UIScreen.main.bounds)
        let storyboard = UIStoryboard(name: "MyStoryboardName", bundle: nil)
        guard let rootVC = storyboard?.instantiateViewController(identifier: "ViewControllerIdentifierName") as? ViewController else {
            print("ViewController not found")
            return
        }
        let rootNC = UINavigationController(rootViewController: rootVC)
        self.window?.rootViewController = rootNC
        self.window?.makeKeyAndVisible()

    }
}

我不知道它为什么有效,也不知道它是如何工作的,但它解决了我的问题。

帮助我的参考文档:


如何从任何UIViewController(例如HomeVC / LoginVC)更改RootViewController? - Jay Patel
@JD。如果您正在尝试使用iOS 13,请先通过SceneDelegate获取Window场景对象,然后获取窗口对象(使用与上面回答的类似的源代码),然后使用常规代码设置导航控制器。 - Krunal
1
如何获取windowScene实例?我正在尝试在SceneDelegate.swift上访问“window”,但是没有得到它。 - Jay Patel
使用未解决的标识符“AppConstants”。AppConstant在哪里? - Rubaiyat Jahan Mumu
@mumu - 感谢您指出这个问题。我已经纠正了它。 - Krunal
这会导致文本字段出现问题。当使用此解决方案时,您设置为新的初始控制器的视图中的任何文本字段都将打印错误“连接到守护程序无效”。 - msweet168

31

我尝试了以下方法,它在iOS 13上对我有效,也在来自Xcode 11的iOS 12.4.2上进行了测试。

func resetRoot() {
            guard let rootVC = UIStoryboard.init(name: "Main", bundle: nil).instantiateViewController(withIdentifier: "ViewController") as? ViewController else {
                return
            }
            let navigationController = UINavigationController(rootViewController: rootVC)

            UIApplication.shared.windows.first?.rootViewController = navigationController
            UIApplication.shared.windows.first?.makeKeyAndVisible()
     }

1
这里显示了关于keyWindow已被弃用的警告。另一个选项是"UIApplication.shared.windows.first?.rootViewController"。 - Jay Patel
不行。窗口计数为零。为了使其工作,我必须创建一个实例UIWindow()并将其分配给委托的窗口属性,然后它才开始在12.x版本中工作。 - Hemant Bavle
@HemantBavle,您能详细说明如何使其工作,并且它是否适用于iOS 12和13? - Stotch
@Stotch 我刚刚在AppDelegate中添加了上述函数,并通过AppDelegate实例使用该函数。 在iOS 12和13中都很好用。 - Vikram Chaudhary
优秀的答案,它百分之百地工作,谢谢你,你节省了我一半的时间。 - Akash Raghani
这个可以工作,但是在我实现它之后,我看到了两个导航栏。 - Krunal Nagvadia

13

第一个情况

如果你的项目主要是使用Storyboard,在Xcode 11之前开发,并且没有使用SwiftUI,但是你想使用与AppDelegate相关联的旧类。

  • 尝试在info.plist中删除“Application Scene Manifest”。
  • 从项目中完全删除ScenceDelegate。

    然后你就可以使用你的旧代码了。

第二个情况

如果你想同时使用Appdelegte和ScenceDelegate,则下面是可行的代码。

AppDelegate代码:

func application(_ application: UIApplication, didFinishLaunchingWithOptions launchOptions: [UIApplication.LaunchOptionsKey: Any]?) -> Bool {   
 if #available(iOS 13.0, *){
    //do nothing we will have a code in SceneceDelegate for this 
} else {
    let mainStoryboard = UIStoryboard(name: "Main", bundle: nil)
    let VC = mainStoryboard.instantiateViewController(withIdentifier: "LoginVC") as! LoginVC
    navigationController?.isNavigationBarHidden = true
    navigationController = UINavigationController(rootViewController: VC)
    navigationController?.isNavigationBarHidden = true // or not, your choice.
    self.window = UIWindow(frame: UIScreen.main.bounds)
    self.window!.rootViewController = navigationController
}
return true
}

场景委托代码:

func scene(_ scene: UIScene, willConnectTo session: UISceneSession, options connectionOptions: UIScene.ConnectionOptions) {

    let mainStoryboard = UIStoryboard(name: "Main", bundle: nil)
    let VC = mainStoryboard.instantiateViewController(withIdentifier: "LoginVC") as! LoginVC
    navigationController?.isNavigationBarHidden = true
    guard let windowScene = (scene as? UIWindowScene) else { return }
    self.window = UIWindow(frame: windowScene.coordinateSpace.bounds)
    window.windowScene = windowScene
    window.rootViewController = VC
    window.makeKeyAndVisible()
    let appDelegate = UIapplication.shared.delegate as! AppDelegate
    appDelegate.window = window
}

12
这里是适用于iOS 13.x和iOS 12.x及以下版本的解决方案。
对于iOS 13,在场景代理中:
func scene(_ scene: UIScene, willConnectTo session: UISceneSession, options connectionOptions: UIScene.ConnectionOptions) {
            guard let windowScene = (scene as? UIWindowScene) else { return }
            self.window = UIWindow(frame: windowScene.coordinateSpace.bounds)
           //Make sure to do this else you won't get 
           //the windowScene object using UIApplication.shared.connectedScenes
            self.window?.windowScene = windowScene 
            let storyBoard: UIStoryboard = UIStoryboard(name: storyBoardName, bundle: nil)
            window?.rootViewController = storyBoard.instantiateInitialViewController()
            window?.makeKeyAndVisible()
        }

在一个实用类中,我编写了以下函数来获取window对象并将其赋值给appdelegate.window。根据我的需求,在不同的情况下需要在多个位置设置根视图控制器,因此我需要窗口对象。
static func redirectToMainNavRVC(currentVC: UIViewController){
        let appDelegate = UIApplication.shared.delegate as! AppDelegate
        let vc = UIStoryboard(name: appDelegate.storyBoardName, bundle: nil).instantiateViewController(withIdentifier: "MainNavigationViewController") as! MainNavigationViewController
    if #available(iOS 13.0, *){
        if let scene = UIApplication.shared.connectedScenes.first{
            guard let windowScene = (scene as? UIWindowScene) else { return }
            print(">>> windowScene: \(windowScene)")
            let window: UIWindow = UIWindow(frame: windowScene.coordinateSpace.bounds)
            window.windowScene = windowScene //Make sure to do this
            window.rootViewController = vc
            window.makeKeyAndVisible()
            appDelegate.window = window
        }
    } else {
        appDelegate.window?.rootViewController = vc
        appDelegate.window?.makeKeyAndVisible()
    }
}

这对我来说很有效。希望对其他人也有效。


6

对于 Xcode 11+ 和 Swift 5+,在 SceneDelegate.swift 文件中:


var window: UIWindow?

    func scene(_ scene: UIScene, willConnectTo session: UISceneSession, options connectionOptions: UIScene.ConnectionOptions) {
        guard let windowScene = scene as? UIWindowScene else { return }
        let window = UIWindow(windowScene: windowScene)
        let submodules = (
            home: HomeRouter.createModule(),
            search: SearchRouter.createModule(),
            exoplanets: ExoplanetsRouter.createModule()
        )
            
        let tabBarController = TabBarModuleBuilder.build(usingSubmodules: submodules)
            
        window.rootViewController = tabBarController
        self.window = window
        window.makeKeyAndVisible()
    }

5

5

如果你不想使用主故事板,而是想通过编程方式创建自己的视图。

对于 Xcode 11。

func scene(_ scene: UIScene, willConnectTo session: UISceneSession, options connectionOptions: UIScene.ConnectionOptions) {

    guard let windowScene = (scene as? UIWindowScene) else { return }
    window = UIWindow(windowScene: windowScene)
    window?.makeKeyAndVisible()
    window?.rootViewController = UINavigationController(rootViewController:      ViewController())
}

这肯定会起作用。谢谢。


3
完全与现有答案相同 https://dev59.com/9FMH5IYBdhLWcg3w0jiF#58084612 - matt
@matt。同意!但是代码行数会减少。感谢您的建议。 - Amit Thakur
如果您不使用故事板,那么这将更好、更清晰。 - midtownguru

4
var window: UIWindow?

已将代码从AppdDelegate.swift移至SceneDelegate.swift。

因此,我在场景代理类中使用了rootViewController,并且它有效 -

   func scene(_ scene: UIScene, willConnectTo session: UISceneSession, options connectionOptions: UIScene.ConnectionOptions) {
        // Use this method to optionally configure and attach the UIWindow `window` to the provided UIWindowScene `scene`.
        // If using a storyboard, the `window` property will automatically be initialized and attached to the scene.
        // This delegate does not imply the connecting scene or session are new (see `application:configurationForConnectingSceneSession` instead).
        guard let _ = (scene as? UIWindowScene) else { return }

        if let tabBarController = window?.rootViewController as? UITabBarController {
                  let storyboard = UIStoryboard(name: "Main", bundle: nil)
                  let vc = storyboard.instantiateViewController(identifier: "NavController")

                  vc.tabBarItem = UITabBarItem(tabBarSystemItem: .topRated, tag: 1)
                  tabBarController.viewControllers?.append(vc)
              }
    }

2
重要注意事项: 如果您计划将SwiftUI添加到现有项目中,则项目的部署目标必须设置为iOS 13,然后项目必须具有SceneDelegate。您不能仅使用AppDelegate启动应用程序。 (如果您不打算使用SwiftUI,但仍需要最小部署目标为iOS 13,请按照Carlos García上面的答案操作)
如果您正在尝试在已创建的项目中添加SwiftUI代码,请确保:
- 最小部署目标设置为iOS 13 - 您已正确设置Appdelegate + SceneDelegate - 主要是,在Info.plist中具有“Application Scene Manifest”条目,可能需要创建一个虚拟项目并从那里复制该条目

enter image description here

enter image description here

enter image description here


网页内容由stack overflow 提供, 点击上面的
可以查看英文原文,
原文链接