如何使用Swift编程以程序化方式创建带有分组部分的分组表视图

6
我想知道如何通过编程创建分组/分段的表格视图。我正在尝试创建的设计是这样的:

enter image description here

我希望在页面顶部有一个高度为160的
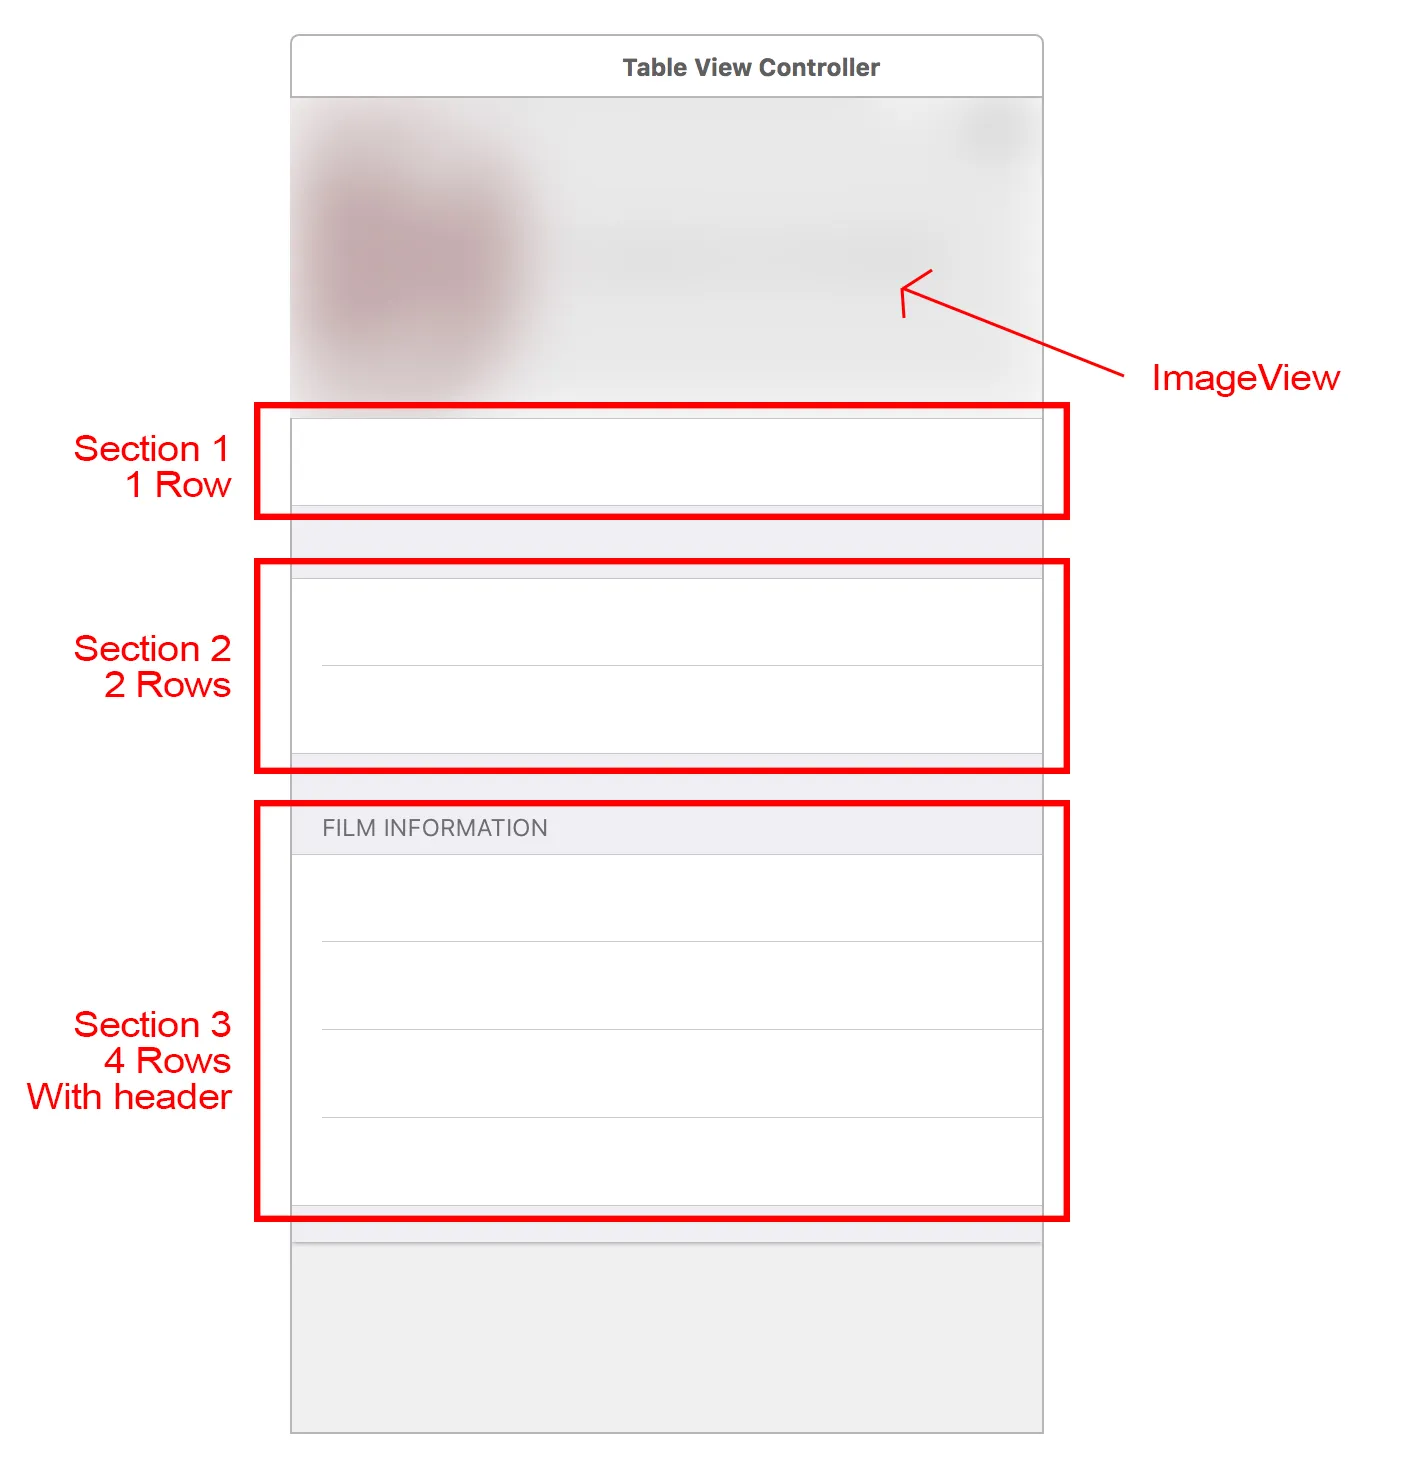
UIImageView,接下来是三个部分,每个部分包含不同数量的行。然后我会在每一行中放置静态标签,并使用我的数据更新它们的标签。
这个视图控制器的代码如下:
import UIKit

class SelectedFilmTableViewController: UITableViewController {

var film: Film? {
    didSet {
        navigationItem.title = film?.Film_Name
    }
}

var cellId = "cellId"

override func viewDidLoad() {
    super.viewDidLoad()

    tableView.dataSource = self
    tableView.delegate = self
    tableView.registerClass(UITableViewCell.self, forCellReuseIdentifier: cellId)

}

override func numberOfSectionsInTableView(tableView: UITableView) -> Int {

    return 1
}

override func tableView(tableView: UITableView, numberOfRowsInSection section: Int) -> Int {
    return 1
}

override func tableView(tableView: UITableView, cellForRowAtIndexPath indexPath: NSIndexPath) -> UITableViewCell {

    let cell = tableView.dequeueReusableCellWithIdentifier(cellId, forIndexPath: indexPath) as UITableViewCell

    cell.textLabel?.text = film?.Directed_By
    cell.detailTextLabel?.text = film?.Film_Poster_Image_URL

    return cell

}

}

我尝试添加了方法来说明 numberOfSections 等,但是在构建应用程序时似乎没有看到它们。我只看到一个普通的表格视图。我错过了一些设置吗?
因为我是通过编程方式导航到这个VC,所以我需要在不使用故事板的情况下进行设置。
任何有关如何创建所需外观的帮助都将不胜感激,谢谢!
3个回答

9

当将其他视图与TableView组合时,我更喜欢创建一个UIViewController并使用UITableViewController作为嵌入式控制器。

我在github上提交了一个示例,请查看

以下是您的表格控制器代码:

class MyTableController : UITableViewController {
    override func numberOfSectionsInTableView(tableView: UITableView) -> Int {
        return 3
    }

    override func tableView(tableView: UITableView, titleForHeaderInSection section: Int) -> String? {
        if(section == 2) {
            return "Film Information"
        } else {
            return " "
        }
    }

    override func tableView(tableView: UITableView, numberOfRowsInSection section: Int) -> Int {
        if(section == 0) {
            return 1
        } else if(section == 1) {
            return 2
        } else {
            return 4
        }
    }

    override func tableView(tableView: UITableView, cellForRowAtIndexPath indexPath: NSIndexPath) -> UITableViewCell {

        let cell = tableView.dequeueReusableCellWithIdentifier("SomeCell", forIndexPath: indexPath) as UITableViewCell


        return cell

    }
}

1
首先,您应该使用以下方法返回3个部分。
override func numberOfSectionsInTableView(tableView: UITableView) -> Int {    
    return 3
}

根据传递给该方法的章节号,返回每个章节的1、2和4行(rows)。
override func tableView(tableView: UITableView, numberOfRowsInSection section: Int) -> Int {
    // return if section == 0 return 1 and so on...
}

最后使用传递到此方法的indexPath,根据存储在indexPath中的section和row返回相应的内容。
override func tableView(tableView: UITableView, cellForRowAtIndexPath indexPath: NSIndexPath) -> UITableViewCell {

    let cell = tableView.dequeueReusableCellWithIdentifier(cellId, forIndexPath: indexPath) as UITableViewCell

  // if indexPath.section == 0 {
  //  cell.textLabel?.text = film?.Directed_By
  //  cell.detailTextLabel?.text = film?.Film_Poster_Image_URL
  // } else if ....


    return cell

}

0

你忘记调用 reloadData。请更新 viewDidLoad 方法为:

override func viewDidLoad() {
    super.viewDidLoad()

    tableView.dataSource = self
    tableView.delegate = self
    tableView.registerClass(UITableViewCell.self, forCellReuseIdentifier: cellId)
    tableView.reloadData()
}

如果您需要具有不同行数的3个部分,请更改您的方法为:
override func numberOfSectionsInTableView(tableView: UITableView) -> Int {

    return 3
}

override func tableView(tableView: UITableView, numberOfRowsInSection section: Int) -> Int {
    return [1,2,4][section]
}

要将图像添加到顶部,请使用UITableView的属性tableHeaderView


网页内容由stack overflow 提供, 点击上面的
可以查看英文原文,
原文链接